XPyCode Documentation
| Description | Python scripting for Excel with a full-featured IDE |
| Author(s) | BGE Advisory |
| Repository | https://xpycode.com/repo |
| Copyright | Copyright © 2026 BGE Advisory |
Welcome to XPyCode
XPyCode is a powerful Excel-Python integration platform that brings the full power of Python directly into Microsoft Excel. Write, execute, and manage Python code seamlessly within your workbooks with a professional IDE, custom function publishing, comprehensive package management, and real-time debugging capabilities.
Key Features
-
Python in Excel
Execute Python code with full access to Excel objects. Work with workbooks, worksheets, ranges, and more through an intuitive API.
-
Integrated IDE
Monaco-based code editor with IntelliSense, syntax highlighting, code completion, and integrated debugging tools.
-
Package Manager
Install and manage Python packages per workbook with automatic dependency resolution. Isolated environments for each workbook.
-
Custom Functions
Publish Python functions as Excel User Defined Functions (UDFs). Use them like native Excel formulas with full type support.
-
Event Handling
React to Excel events (worksheet changes, selections, calculations) with Python code. Build interactive spreadsheets.
-
On-Time Events
Schedule Python functions to run at specific times, repeating intervals, or one-shot datetimes. Built-in timer management in the IDE.
-
Debugger
Set breakpoints, step through code, inspect variables, and debug your Python scripts directly in the IDE.
-
Customizable Themes
Dark and light themes for both the IDE and editor. Customize fonts, colors, and layout to match your preferences.
-
Object Management
Save Python objects in the kernel and reuse them across code executions. Perfect for data analysis workflows.
 Quick Start
Get started with XPyCode in just a few steps:
Then open Excel and access XPyCode through Add-ins → More AddIns → Shared Folder → XPyCode.
Get Started → View Tutorials →
What Can You Build?
XPyCode enables a wide range of Excel automation and data analysis scenarios:
- Data Analysis: Use pandas, numpy, and scikit-learn with Excel data and return result in Excel
- API Integration: Fetch data from REST APIs and display in worksheets
- Custom Calculations: Build complex financial models with Python libraries
- Report Automation: Generate formatted reports from Excel data
- Machine Learning: Train models and make predictions within Excel
- Database Connectivity: Query SQL databases and load results into Excel
Learning Path
- Installation Guide - Install XPyCode and set up your environment
- Quick Start - 5-minute walkthrough of core features
- First Function - Create and publish your first Excel function
- User Guide - Deep dive into IDE features and capabilities
- Tutorials - Step-by-step practical examples
Documentation Sections
-
Getting Started
Installation, quick start guide, and creating your first function.
-
User Guide
Complete guide to IDE features, Excel integration, and package management.
-
Tutorials
Practical step-by-step tutorials for common use cases.
-
Reference
Keyboard shortcuts, API reference, and troubleshooting guide.
System Requirements
- Operating System: Windows 10/11 (64-bit recommended)
- Python: 3.9 or higher
- Microsoft Excel: 2016 or later with Office.js Add-in support
- Memory: 4GB RAM minimum, 8GB recommended
- Disk Space: 500MB for installation plus space for packages
Platform Support
While XPyCode is primarily designed for Windows, other platforms are enabled but not extensively tested. Community feedback welcome!
Getting Help
- Troubleshooting Guide - Common issues and solutions
- GitHub Issues - Report bugs or request features
- Contributing - Help improve XPyCode
License
XPyCode is licensed under the MIT License with Commons Clause. You are free to use, modify, and distribute the software for any purpose, but you may not sell it as a commercial product.
See the License page for full details.
Ready to supercharge Excel with Python?
Getting Started
Installation
This guide will walk you through installing XPyCode and setting up your development environment.
Prerequisites
Before installing XPyCode, ensure your system meets these requirements:
System Requirements
- Operating System: Windows 10/11 (64-bit) or other platforms (experimental)
- Python: Version 3.9 or higher
- Microsoft Excel: 2016 or later with Office.js Add-in support (365, 2019, 2021)
- Memory: 4GB RAM minimum (8GB recommended)
- Disk Space: 500MB for XPyCode plus additional space for packages
Verify Python Installation
Check that Python is installed and meets the minimum version:
You should see output like Python 3.9.x or higher. If not, download Python from python.org.
Python Installation Tips
- Make sure to check "Add Python to PATH" during installation
- On Windows, use the 64-bit installer for best performance
- Verify
pipis available by runningpip --version
Installing XPyCode
Install XPyCode using pip:
Alternative Launch Methods
You can also launch XPyCode using:
- Windows:
xpycode_master.exein the Scripts directory - Other platforms: Equivalent executable in the Scripts/bin directory
This will install XPyCode and all its dependencies including:
- FastAPI and Uvicorn (web framework and server)
- PySide6 (Qt bindings for the IDE)
- Jedi (Python autocompletion)
- WebSockets (communication layer)
- And other required packages
Installation Time
First-time installation may take 2-5 minutes as pip downloads and installs all dependencies. Subsequent updates will be faster.
Verify Installation
Confirm XPyCode is installed correctly:
Launching XPyCode
Start the XPyCode Server
Launch the XPyCode Master server from your terminal:
You should see output indicating the server has started:
INFO:     Started server process
INFO:     Waiting for application startup.
INFO:     Application startup complete.
INFO:     Uvicorn running on http://127.0.0.1:8000
Server Running
Keep this terminal window open. The server must be running for XPyCode to work in Excel.
Access the Excel Add-in
- Open Microsoft Excel
- Navigate to Home tab → Add-ins → More Add-ins
- Click on Shared Folder tab
- Look for XPyCode in the list
- Click Add to enable the add-in

Add-in Registration
The add-in is automatically registered when you first start the XPyCode server. If you don't see it, try restarting Excel.
Manual Certificate Installation
On non-Windows platforms or if you encounter certificate issues, you may need to manually install the self-signed certificate located in ~/.xpycode/certs (or %USERPROFILE%\.xpycode\certs on Windows).
Manual Manifest Sideloading
For Excel Desktop on non-Windows platforms or Excel for Web, you'll need to manually sideload the manifest file located in ~/.xpycode/manifest (or %USERPROFILE%\.xpycode\manifest on Windows).
Open the XPyCode Console
Once the add-in is loaded:
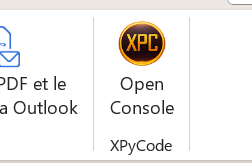
- You'll see a XPyCode tab in the Excel ribbon
- Click Open Console to launch the XPyCode IDE
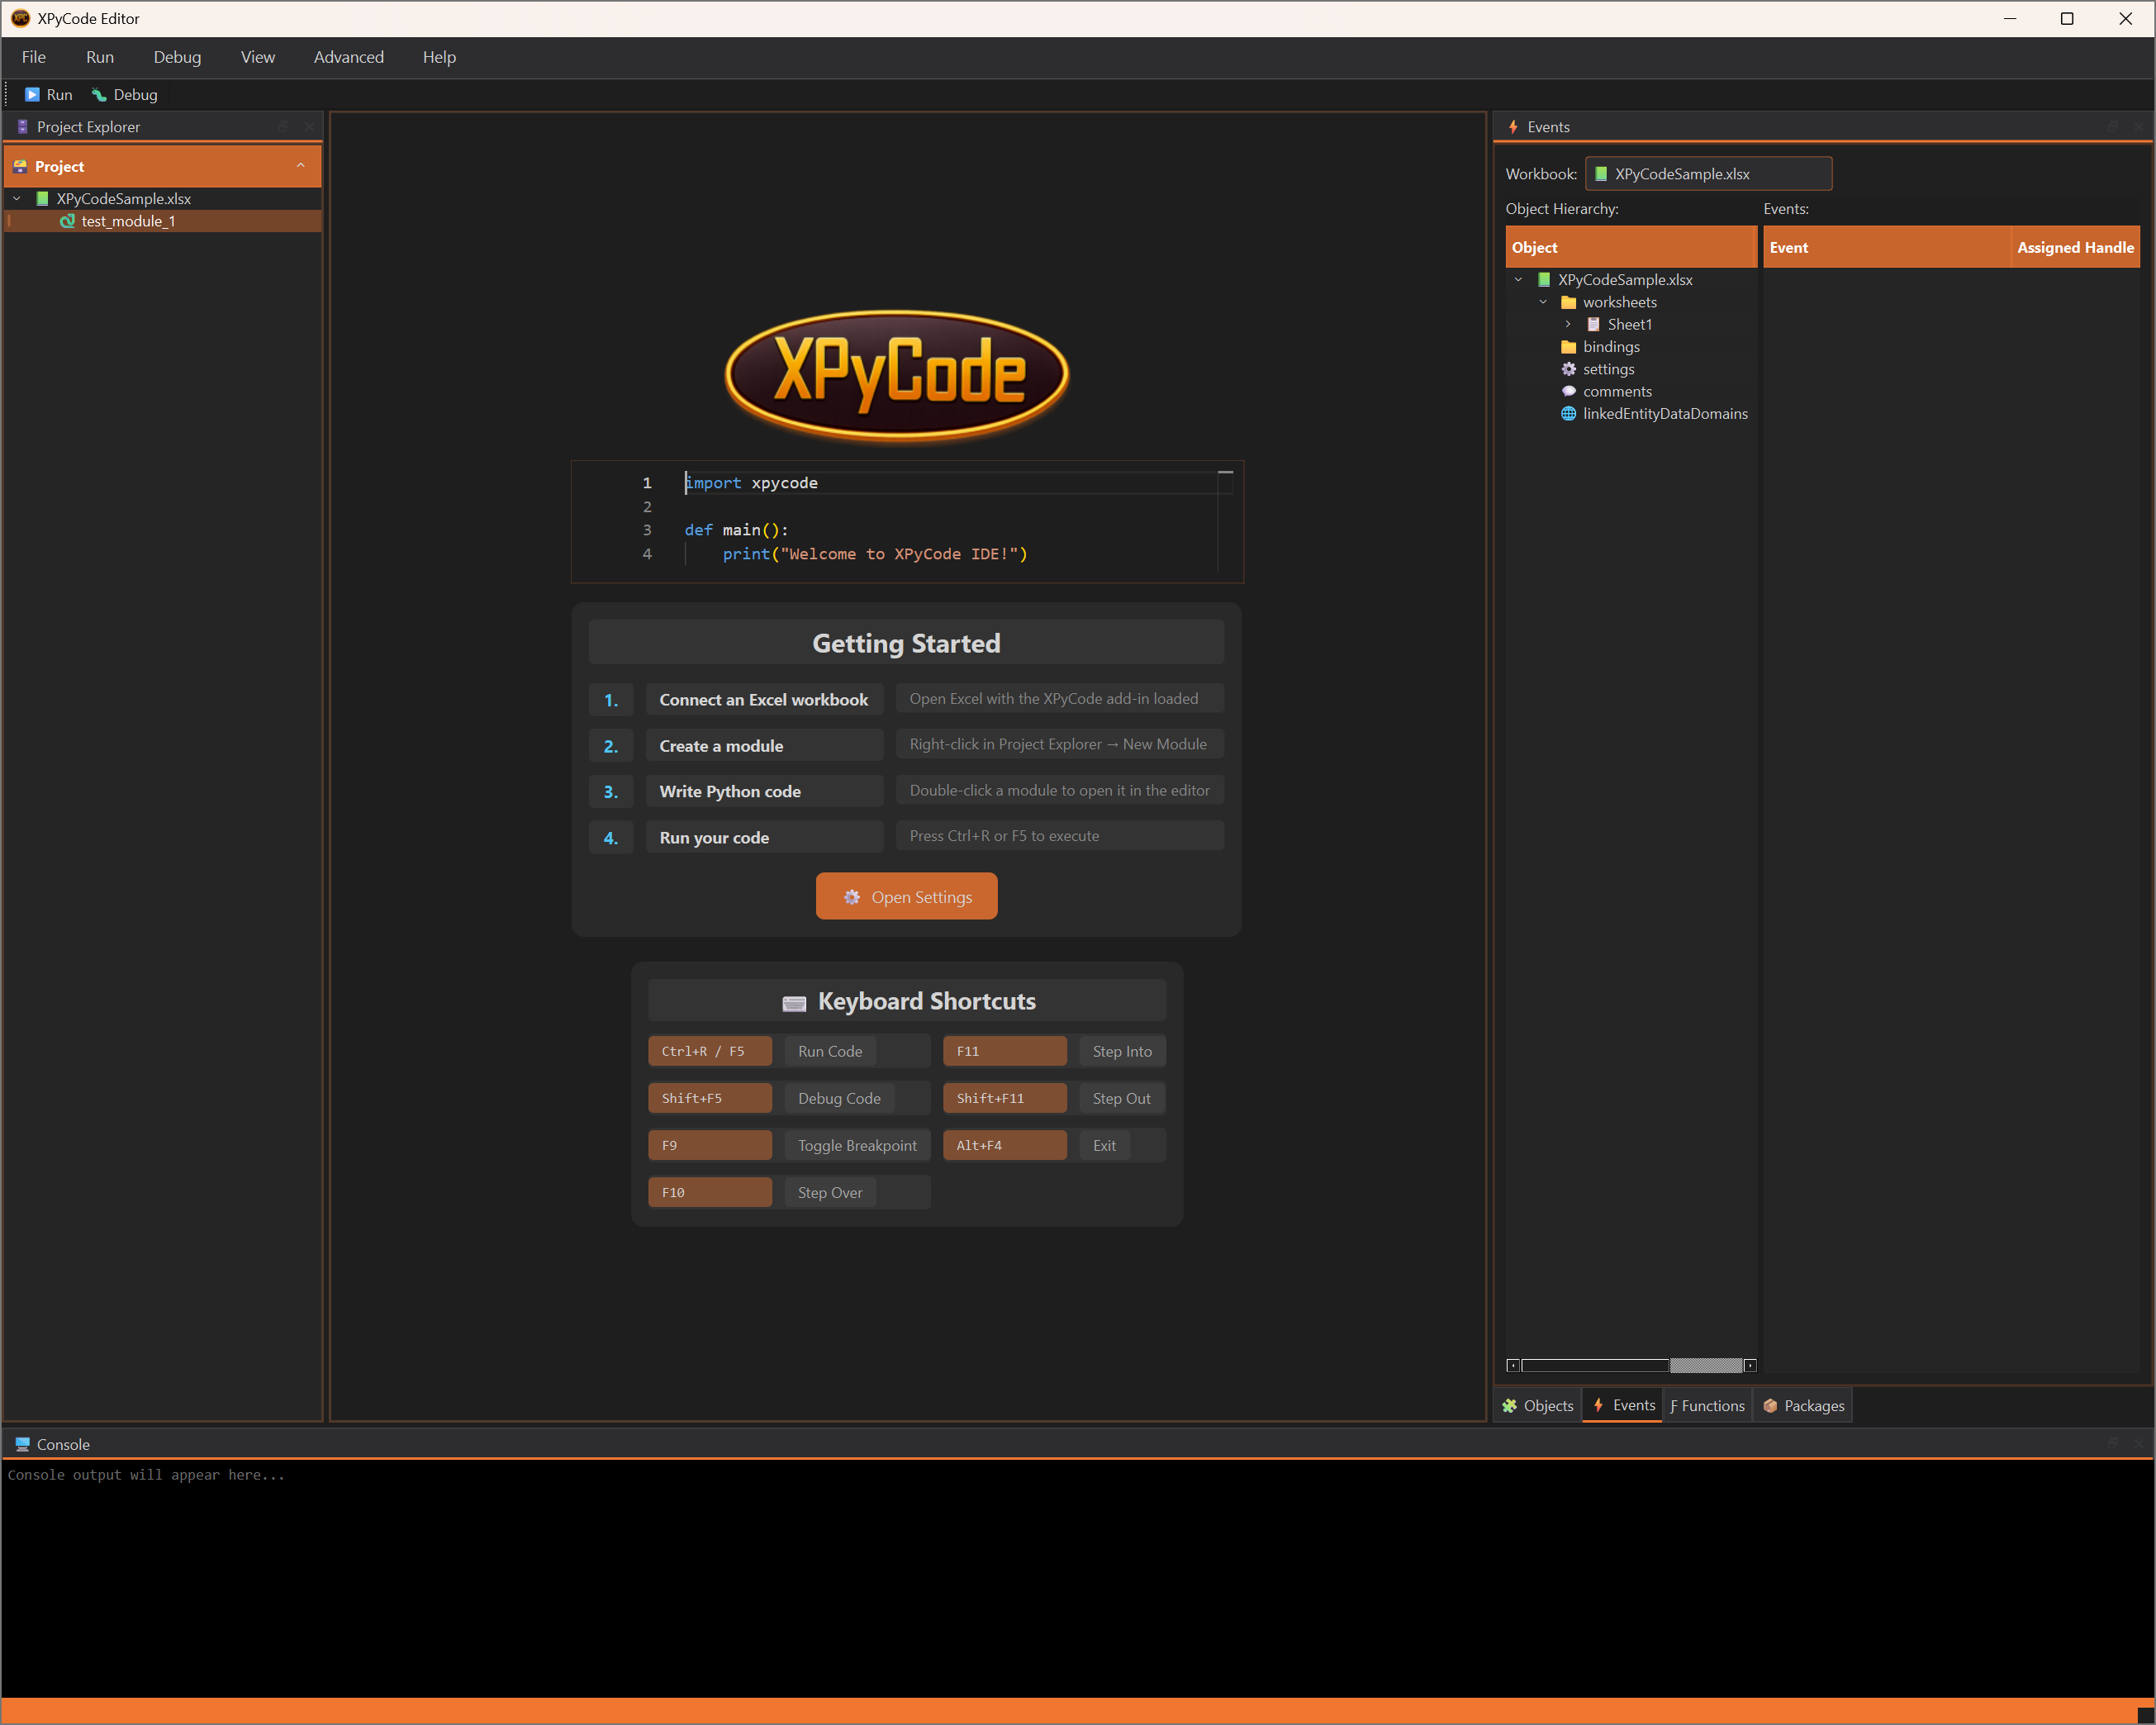
The XPyCode IDE window will open, showing:
- Welcome screen with quick links
- Project Explorer on the left
- Code Editor in the center
- Console at the bottom
- Utilities tabs on the right
Configuration
Default Settings
XPyCode comes with sensible defaults, but you can customize it through File → Settings:
See the Settings guide for detailed configuration options.
First-Time Setup
On first launch, XPyCode will:
- Create configuration directories in your user folder
- Set up the default theme (XPC Dark)
- Initialize the package cache directory
- Register the self-signed certificates for HTTPS protocol (Windows only - manual installation required on other platforms)
- Register the Excel add-in manifest (Windows Excel Desktop only - manual sideloading required for other platforms)
Upgrading XPyCode
XPyCode includes a built-in upgrade command to check for and install updates from PyPI.
Check for Updates
To check if an update is available without installing:
This will display the current and available versions without making any changes.
Upgrade Interactively
To upgrade with a confirmation prompt:
XPyCode will:
- Check PyPI for the latest version
- Display current and available versions
- Ask for confirmation before proceeding
- If running as a service, automatically stop and restart it
- Perform the upgrade using pip
- Verify the upgrade was successful
Upgrade Automatically
To upgrade without confirmation prompts (useful for scripts):
Service Auto-Restart
If XPyCode is running as a system service, the upgrade process will automatically:
- Stop the service before upgrading
- Wait for the process to shutdown cleanly
- Perform the upgrade
- Restart the service automatically
This ensures a smooth upgrade with minimal downtime.
Manual Process Running
If XPyCode is running manually (not as a service), you must stop it before upgrading. The upgrade command will detect this and ask you to close XPyCode first.
Manual Upgrade (Alternative)
You can also upgrade manually using pip:
After updating:
- Close all Excel workbooks
- Restart the XPyCode server
- Reopen Excel
Version Compatibility
Always restart the server after updating. Running an old server with new add-ins may cause compatibility issues.
Addin Hosting Modes
XPyCode supports two modes for running the Excel add-in. Both modes run the Python kernel locally on your machine - only the add-in UI hosting differs.
External Mode (Default)
In external mode, the add-in UI is served from https://addin.xpycode.com. This is the default mode and requires no certificate management. The Python kernel and business layer still run locally.
Local Mode
In local mode, the add-in UI is served from a local HTTPS server on your machine. Requires self-signed certificates.
Mode Switch Cache Clearing
When switching between local and external modes, XPyCode will automatically clear the Office add-in cache. This affects all Office add-ins, not just XPyCode. You may need to restart Excel after switching modes.
Troubleshooting Installation
Python Not Found
If you get "Python not found" error:
- Verify Python is installed:
python --version - Check Python is in your PATH environment variable
- Try using
python3instead ofpython
Pip Installation Fails
If pip install fails with network errors:
# Use a different PyPI mirror
pip install xpycode_master --index-url https://pypi.org/simple

# Or install with verbose output to see what's failing
pip install -v xpycode_master
Add-in Not Appearing in Excel
If the add-in doesn't appear:
- Ensure the XPyCode server is running
- Check Excel trusts add-ins from shared folders:
- File → Options → Trust Center → Trust Center Settings → Trusted Add-in Catalogs
- Restart Excel completely (close all workbooks)
- Manually add the manifest location if needed (check server logs for the path)
Port Auto-Discovery
XPyCode automatically scans for available ports to avoid conflicts. You can override this behavior by specifying ports manually (when using local mode):
# Use a different port with local mode
python -m xpycode_master --use-local-addin --addin-port 8001 --server-port 9001 --watchdog-port 8100
Port Configuration
The --addin-port argument is only used when running in local mode (--use-local-addin). In external mode, the add-in UI is served from https://addin.xpycode.com, so no local addin port is needed.
Then update the add-in configuration to match the new port with Add-ins → More Add-ins → Shared Folder → Refresh
Firewall Issues
Windows Firewall may block the connection:
- Click "Allow access" when prompted
- Or manually add an exception for Python in Windows Firewall settings
Next Steps
Now that XPyCode is installed and running:
- Quick Start - Take a 5-minute tour of key features
- First Function - Create your first Python function in Excel
- User Guide - Explore all IDE capabilities
Need Help?
If you encounter issues not covered here, check the Troubleshooting Guide or open an issue on GitHub.
Quick Start
This 5-minute guide will help you understand XPyCode's core features and workflow.
Launch XPyCode
If you haven't already, start the XPyCode server:
First Launch on Windows
On your very first launch, XPyCode needs to register its Excel Add-in manifest and protocol handler. You have two options:
- Use the Windows installer — the setup wizard takes care of everything automatically.
-
Run the setup command manually — if you installed via
pip, run:This registers the
xpycode://protocol handler and the Excel Add-in manifest in one step.
Once the setup is complete, load the add-in in Excel:
- Open Excel and go to Home → Add-ins → More Add-ins
- Select the Shared Folder tab
- Choose XPyCode and click Add
One-time setup
You only need to do the steps above once. After the add-in is loaded, it will appear automatically every time you open Excel.
Open the IDE
With XPyCode running and the add-in loaded:
- Click Open Console in the XPyCode ribbon
- Click the <> Editor button to launch the IDE
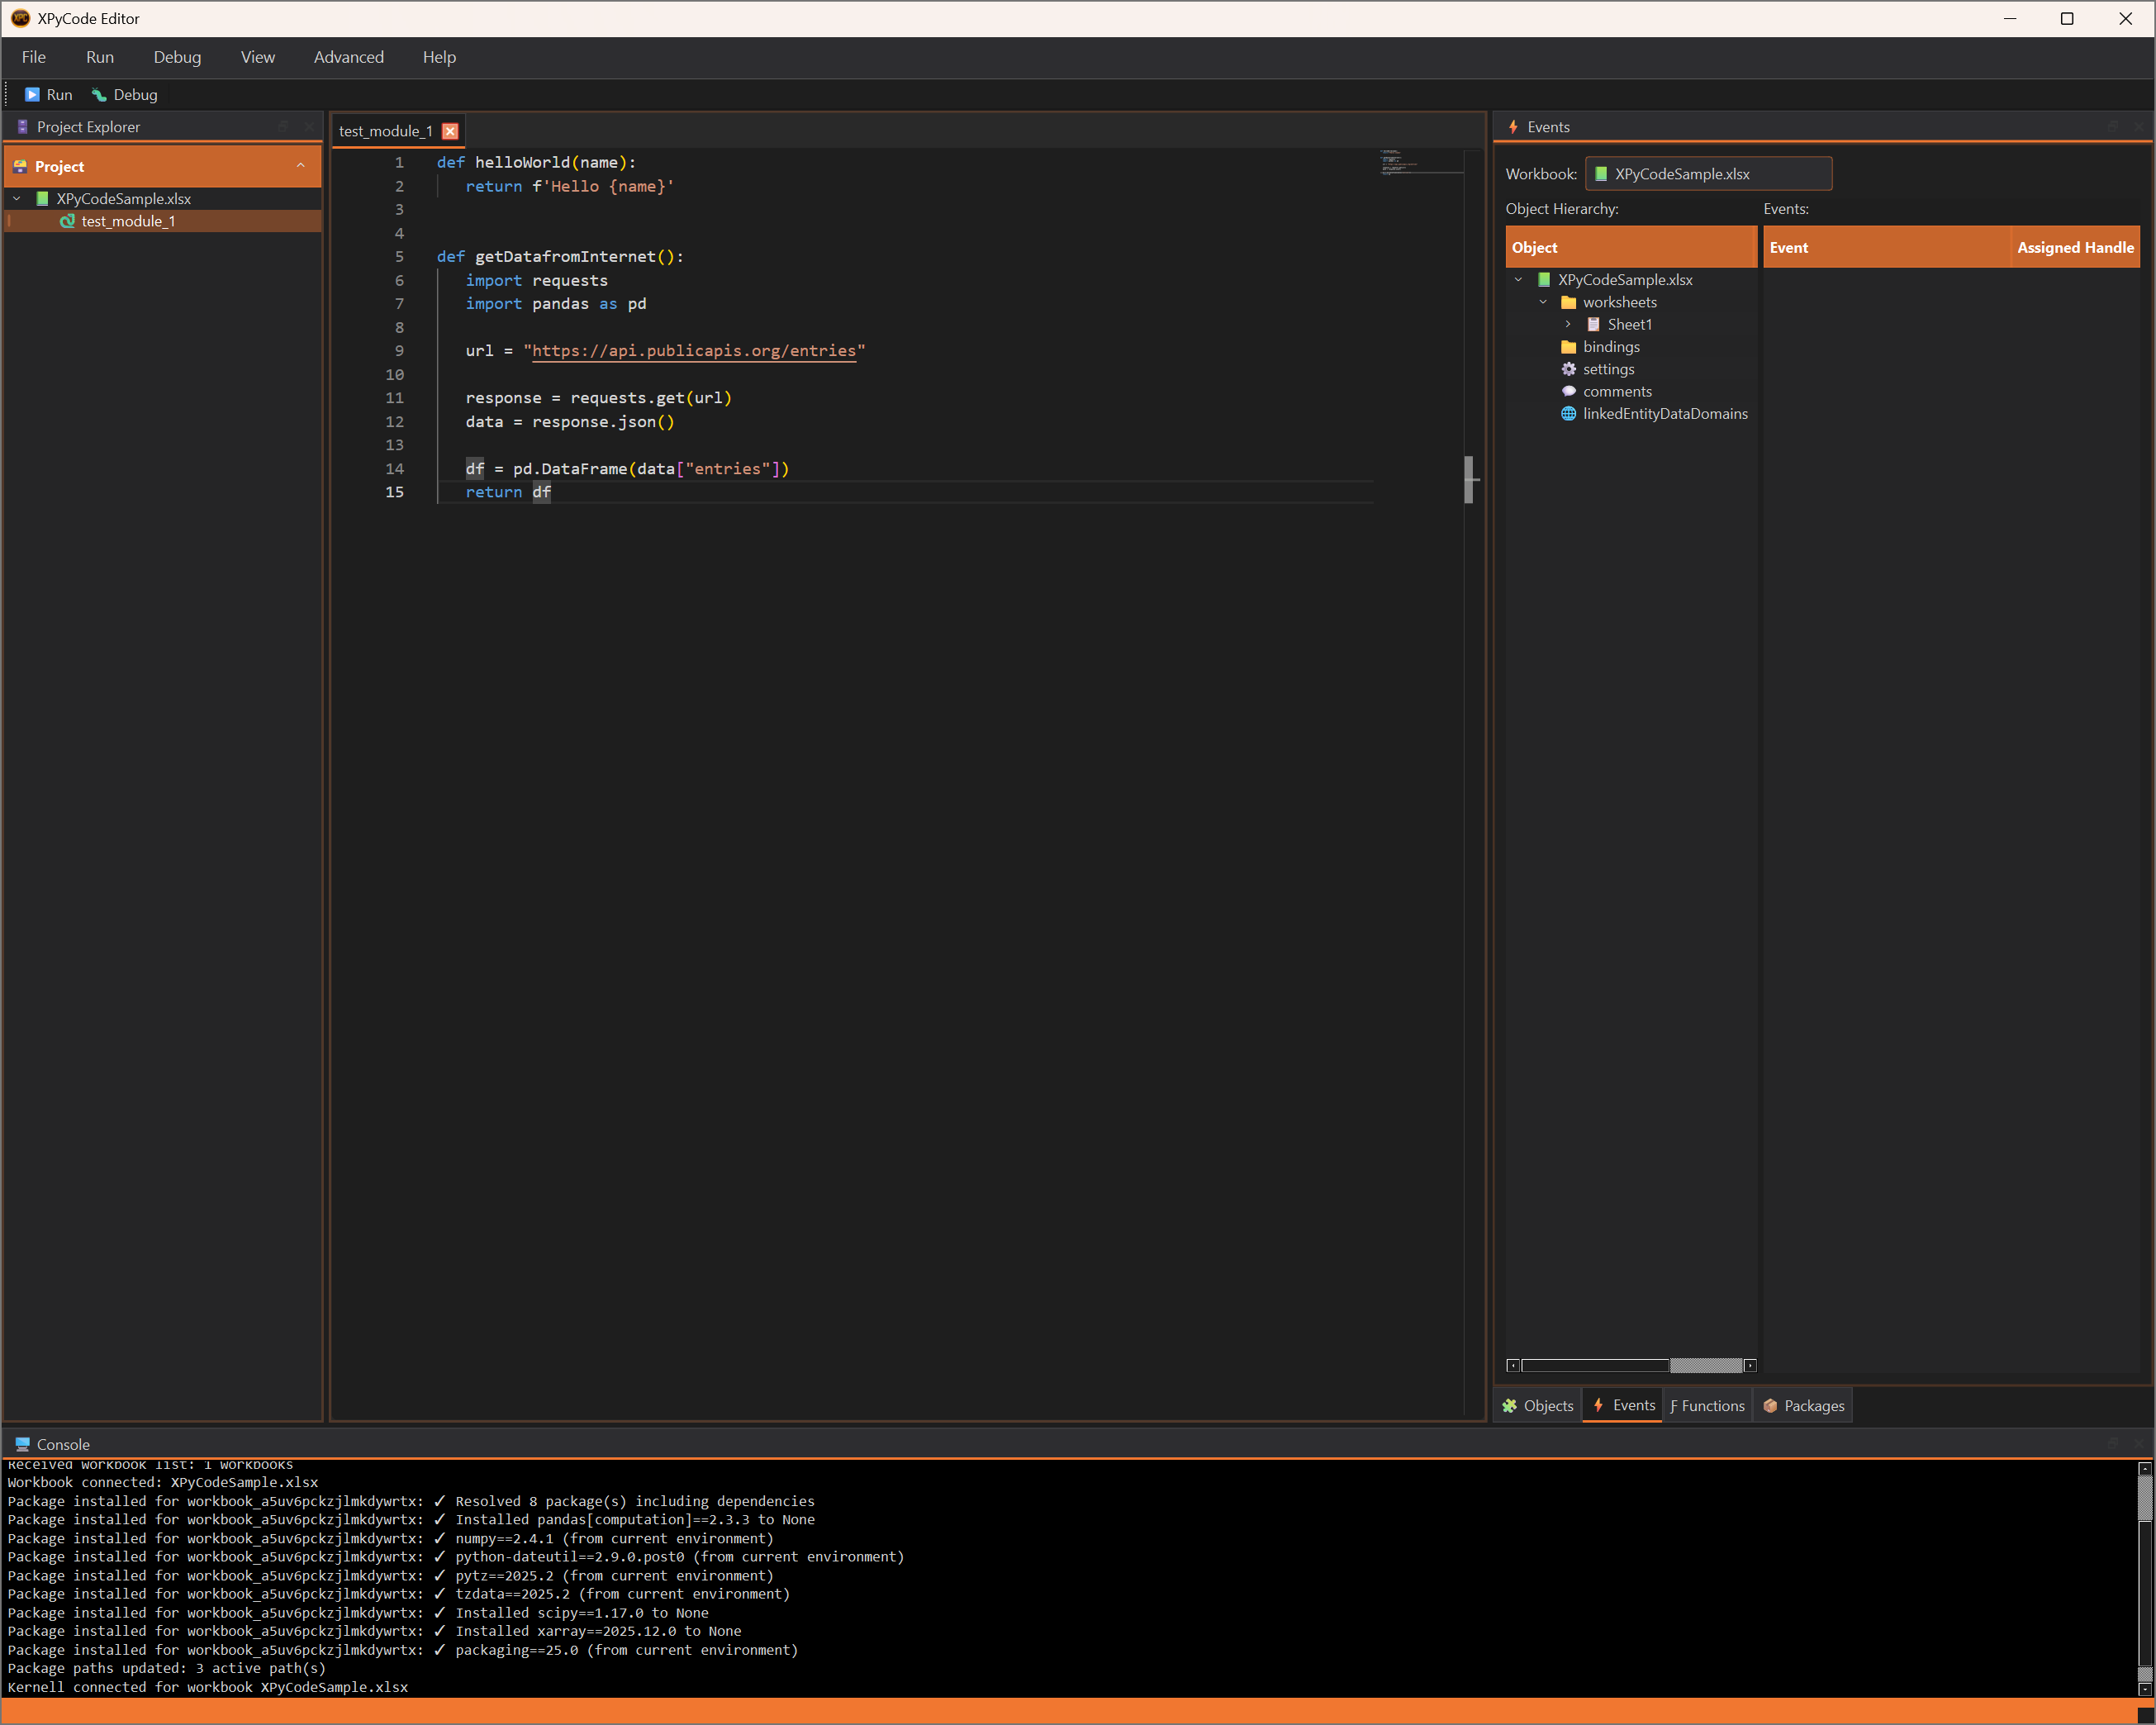
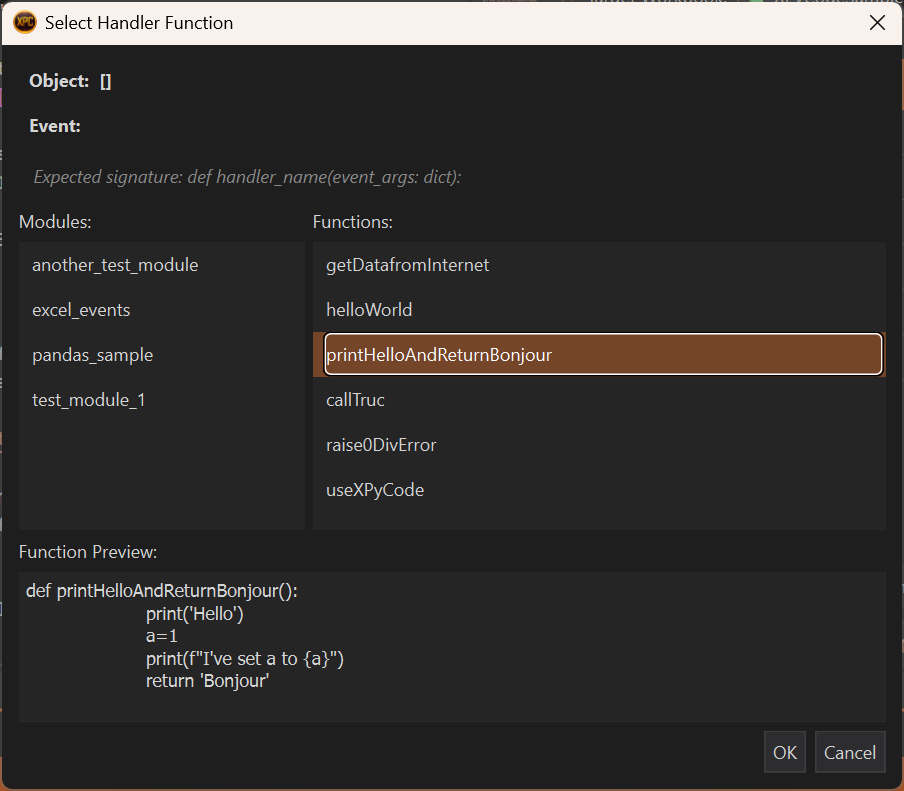
Create a Python Module
In the Project Explorer (left panel):
- Right-click on your workbook name
- Select New Module
- Name it
hello(don't add a .py exetension)
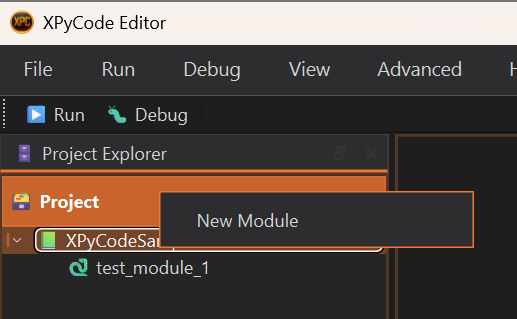
The Monaco editor will open with your new module.
Write Simple Python Code
Type this code in the editor:
def printHelloAndReturnBonjour():
    """Print 'Hello' in console and return 'Bonjour'

    Returns:
        Hard coded 'Bonjour' string (Hello in french)
    """
    print('Hello')
    return 'Bonjour'
IntelliSense Support
As you type, you'll see code completion suggestions. Press Tab or Enter to accept them.
Run Your Code
Execute the code by:
- Pressing F5
- Or clicking the Run button in the toolbar
- Or pressing Ctrl+R
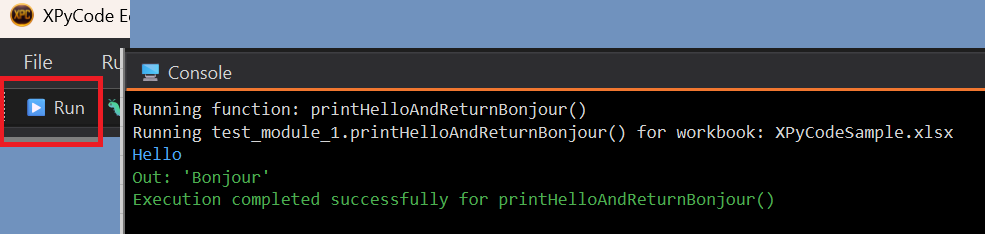
The output appears in the Console panel at the bottom:
Code Executed
Your Python code runs in an isolated kernel attached to your Excel workbook. Each workbook has its own Python environment.
Access Excel Objects
Now let's interact with Excel. Update your code:
import xpycode

def write_hello_to_excel():
    """Write a greeting to the active worksheet."""
    # Get the active worksheet (Office.js method)
    ws = xpycode.workbook.worksheets.getActiveWorksheet()

    # Write to a cell (single cells can use scalar values)
    ws.getRange("A1").values = "Hello from Python!"

    # Read from a cell (returns 2D array)
    cell_values = ws.getRange("A1").values
    print(f"Cell A1 contains: {cell_values[0][0]}")

    # Work with ranges (values is 2D array)
    ws.getRange("B1:B5").values = [[1], [2], [3], [4], [5]]

    # Read and sum the range
    data = ws.getRange("B1:B5").values
    total = sum(row[0] for row in data)
    print(f"Sum of B1:B5: {total}")
Run this code (F5) and watch it interact with your Excel worksheet!
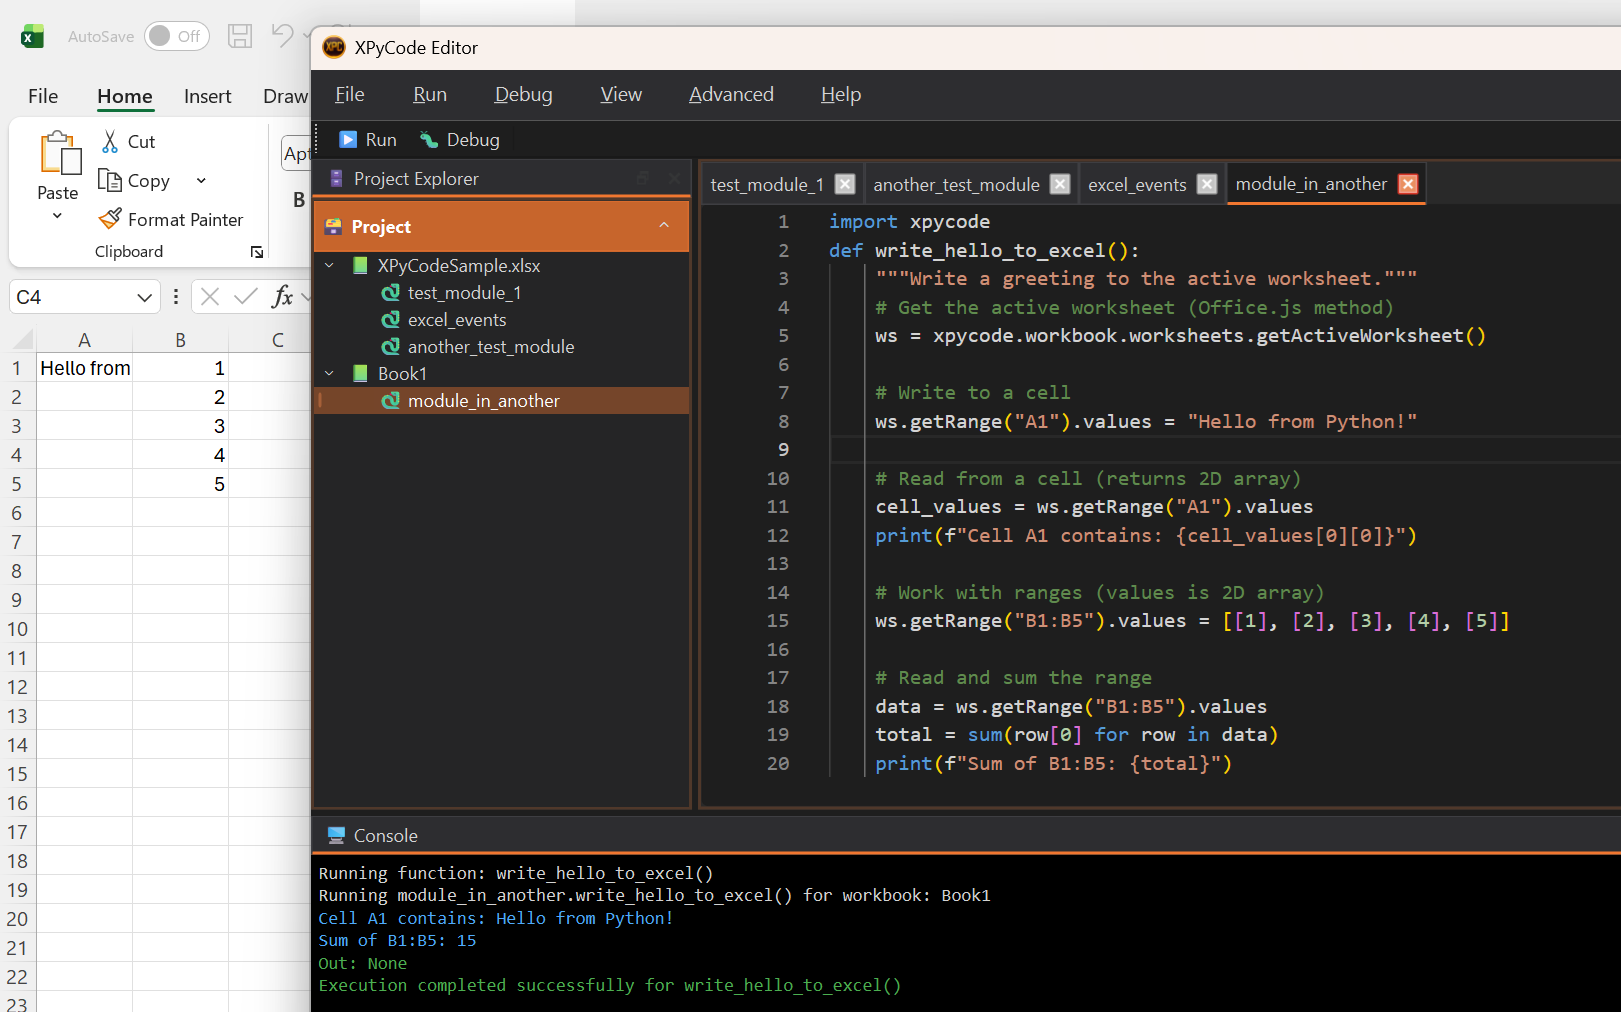
The xpycode Module
The xpycode module is automatically available in your Python environment. It provides access to Excel through an Office.js-compatible API. No context.sync() needed!
Install a Package
Let's install pandas to work with data:
- Click the Packages tab in the left dock
- Type
pandasin the search box in Add Package - Click Search
- Select the latest version
- Click Add to List
- Click Install/Update in Packages
pandas Already Installed
pandas is included in the default requirements, so it's already installed. This example demonstrates the package installation process for other libraries you might need.
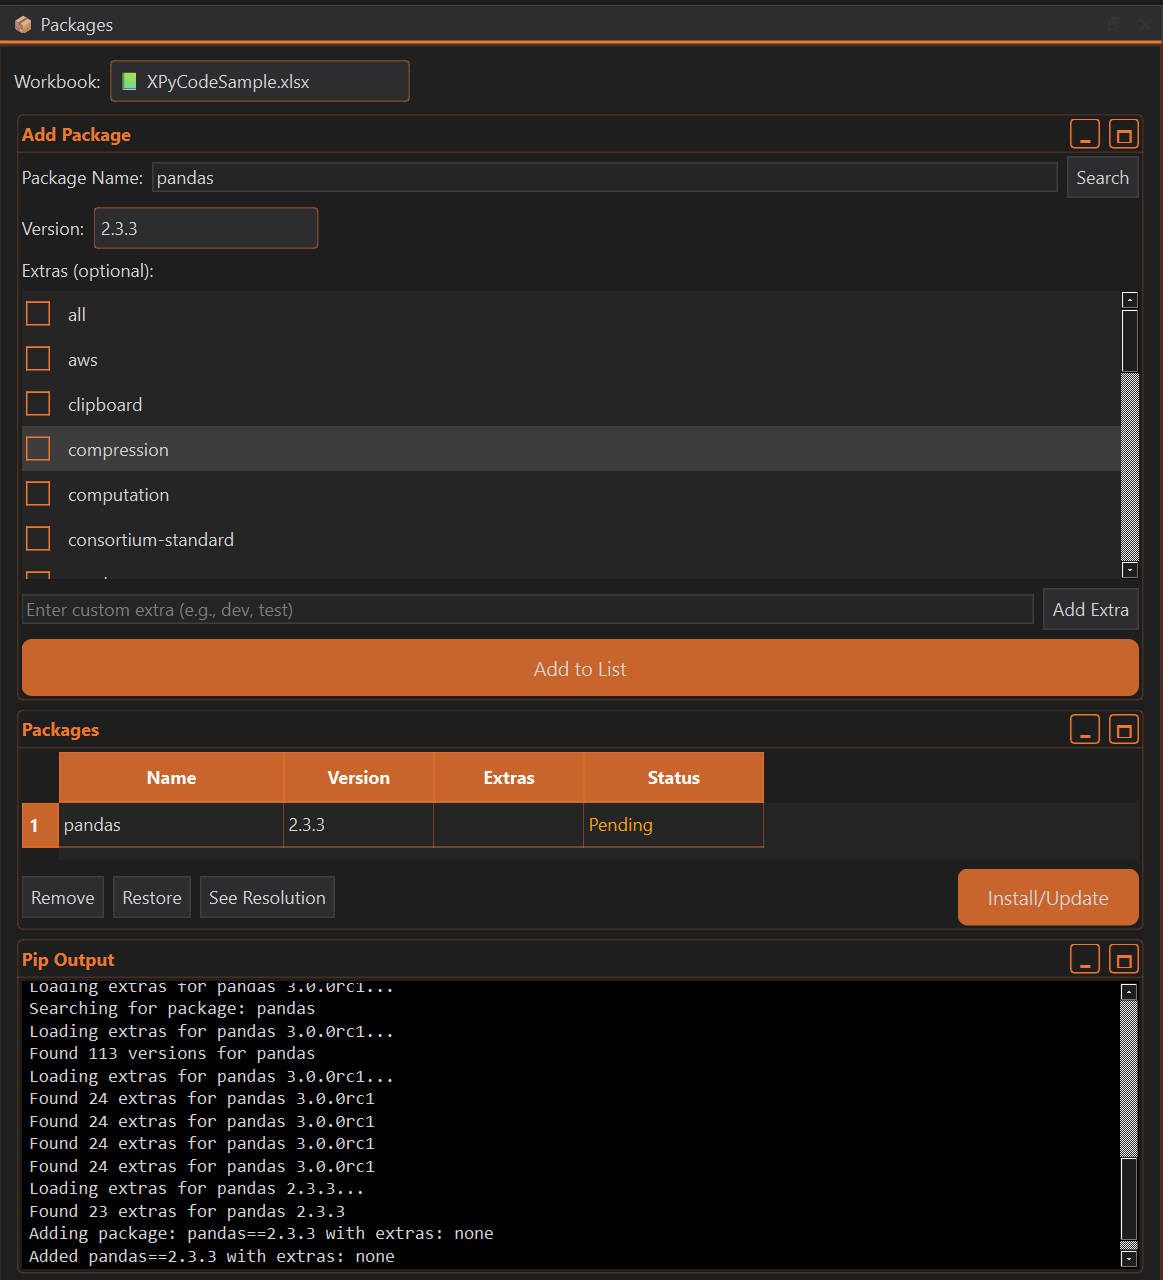
Wait for the installation to complete (you'll see progress in the console).
Per-Workbook Packages
Packages are installed per workbook, not globally. This prevents conflicts between different Excel projects.
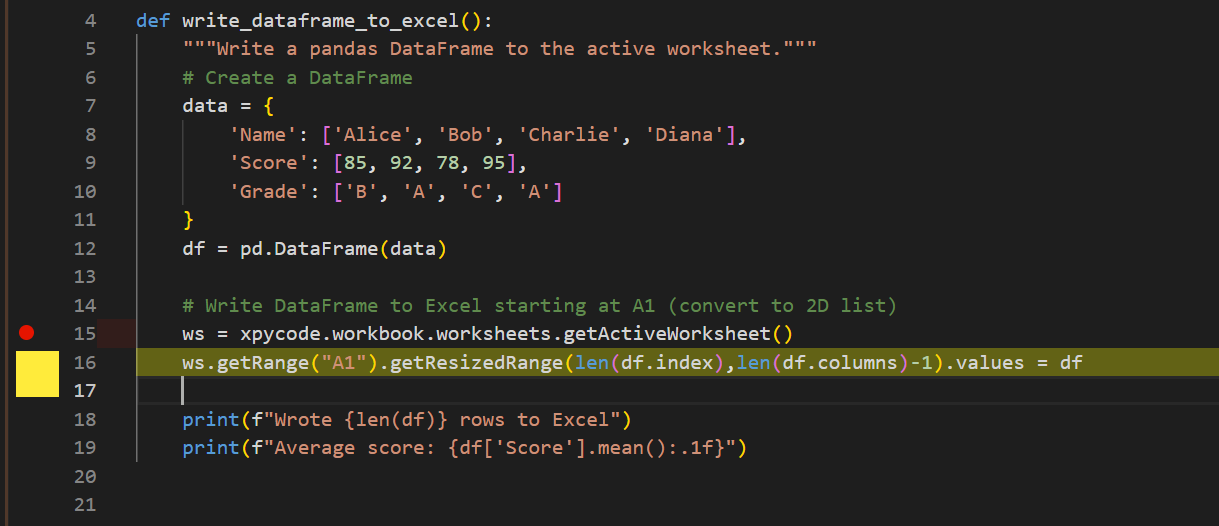
Use Pandas with Excel
Now use pandas in your code:
import pandas as pd
import xpycode

def write_dataframe_to_excel():
    """Write a pandas DataFrame to the active worksheet."""
    # Create a DataFrame
    data = {
        'Name': ['Alice', 'Bob', 'Charlie', 'Diana'],
        'Score': [85, 92, 78, 95],
        'Grade': ['B', 'A', 'C', 'A']
    }
    df = pd.DataFrame(data)

    # Write DataFrame to Excel starting at A1 (df is converted to 2D list by xpycode)
    ws = xpycode.workbook.worksheets.getActiveWorksheet()
    ws.getRange("A1").getResizedRange(len(df.index),len(df.columns)-1).values = df

    print(f"Wrote {len(df)} rows to Excel")
    print(f"Average score: {df['Score'].mean():.1f}")
Run the code (F5) to see your data appear in Excel!
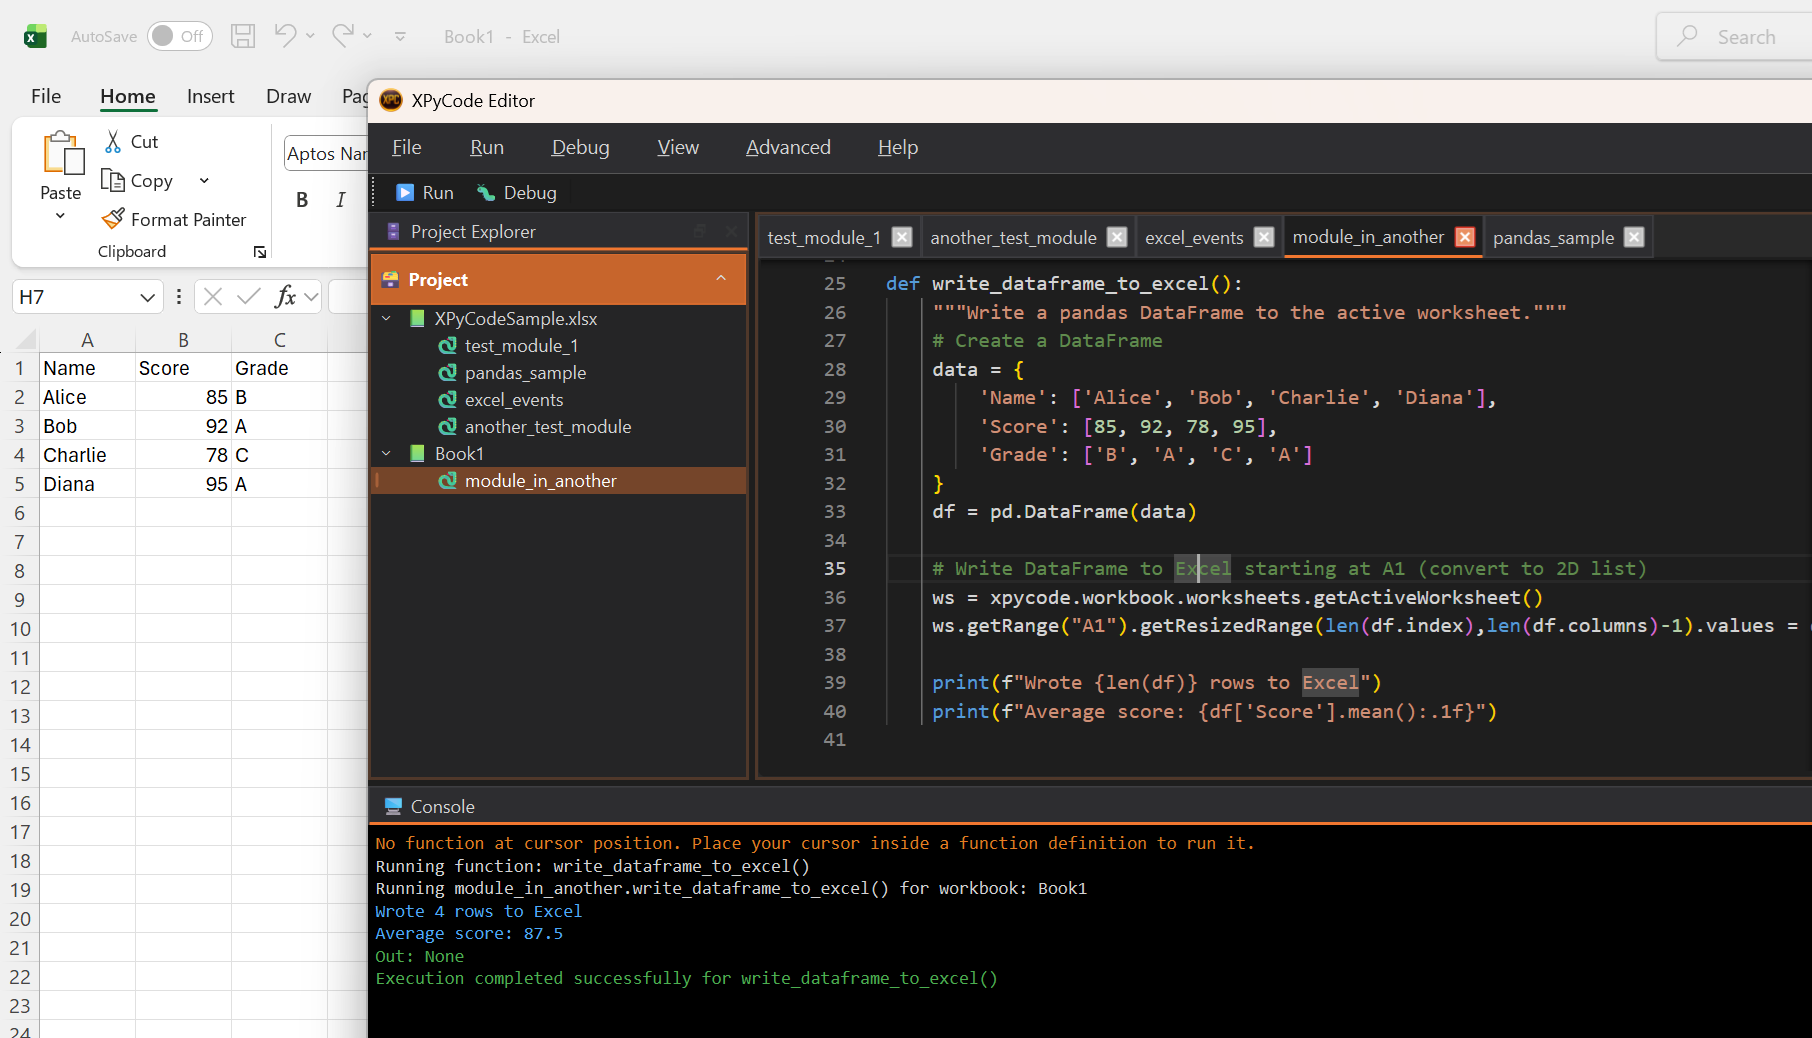
Pandas Conversion
pandas Series and DataFrame objects are automatically converted to 2D arrays (list of lists) when sent to Excel. Column names are included, but index names and values are not.
Debug Your Code
Let's try debugging:
- Click ++f9+ to line 15 of your code (where
df = pd.DataFrame(data)is) - A red dot appears - this is a breakpoint
- Press Shift+F5 to Debug (instead of Run)
The code execution pauses at your breakpoint. The Debug Panel shows:
- Variables: Current values of
data,df, etc. - Call Stack: The execution path
- Watch: Custom expressions to monitor
Use the debug controls:
- F10 Step Over: Execute the current line
- F11 Step Into: Enter function calls
- Shift+F11 Step Out: Exit current function
- Shift+F5 Continue: Resume execution
Debug Like a Pro
Set breakpoints on lines where you want to inspect state. Use the Watch panel to monitor specific variable expressions.
Publish a Function to Excel
Now let's make a function available as an Excel formula:
def calculate_tax(amount: float, rate: float = 0.1) -> float:
    """Calculate tax on an amount.

    Args:
        amount: The base amount
        rate: Tax rate as decimal (default 10%)

    Returns:
        The tax amount
    """
    return amount * rate
- Click the Functions tab
- Click Add Publication
- Select the module and then
calculate_taxfrom the list - Change the name if you which (default is the function name in capital letter
CALCULATE_TAX) - Set dimension to "Scalar" (it is the default dimension)
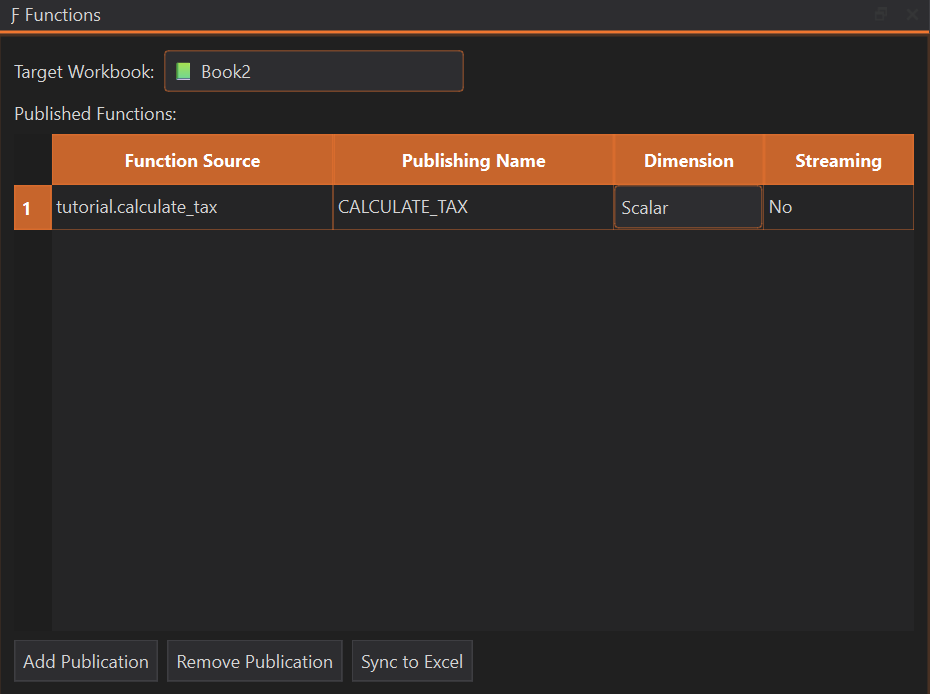
Now you can use it in Excel as a formula:
Custom Functions Created
Your Python functions are now Excel UDFs! They recalculate automatically when inputs change.
Function Publication
Functions are published immediately when added to the list. Code modifications are automatically picked up at the next computation—no need to republish. Use the Sync to Excel button to force resynchronization if you encounter issues or change a function's signature.
Recomputation Impact
Publishing a new function or clicking Sync to Excel forces recomputation of all XPyCode functions in the workbook and reinitializes all streaming functions.
Customize Your Environment
Open settings to personalize XPyCode:
- Go to File → Settings
- Try different themes:
- IDE Theme: XPC Dark / XPC Light / And several other themes to suit your preference
- Editor Theme: VS Dark / VS Light / Plus additional editor themes to match your coding style
- Adjust font sizes
- Configure editor behavior (tabs, word wrap, minimap)
What You've Learned
In just 5 minutes, you've learned to:
- ✅ Create and run Python modules
- ✅ Access Excel objects from Python
- ✅ Install packages (pandas) per workbook
- ✅ Use pandas to work with Excel data
- ✅ Debug code with breakpoints
- ✅ Publish Python functions as Excel UDFs
- ✅ Customize the IDE appearance
Next Steps
Ready to go deeper? Here's what to explore next:
-
Create Your First Function
Learn function publishing in detail with types, dimensions, and streaming.
-
User Guide
Comprehensive guide to all IDE features and capabilities.
-
Tutorials
Hands-on tutorials for real-world scenarios.
-
Keyboard Shortcuts
Master the IDE with keyboard shortcuts reference.
Try This Next
Experiment with Excel events! Use the Event Manager to run Python code when cells change. See the Events Guide.
Create Your First Excel Function
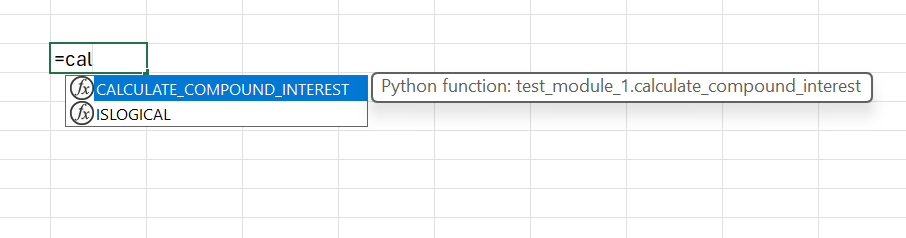
Learn how to create Python functions and publish them as Excel User Defined Functions (UDFs) that work just like native Excel formulas.
What Are Custom Functions?
Custom Functions (also called UDFs - User Defined Functions) let you:
- Write complex calculations in Python instead of Excel formulas
- Use Python libraries (pandas, numpy, scipy, etc.) in formulas
- Share logic across worksheets
- Build reusable function libraries
Once published, your Python functions become Excel formulas that:
- Appear in Excel's function autocomplete
- Recalculate automatically when inputs change
- Support different data types and dimensions
- Can return scalars, arrays, or streaming data
Step-by-Step Guide
Step 1: Write Your Function
Create a new module or use an existing one. Write a well-documented Python function:
def calculate_compound_interest(
    principal: float,
    rate: float,
    years: int,
    frequency: int = 12
) -> float:
    """Calculate compound interest.

    Args:
        principal: Initial investment amount
        rate: Annual interest rate (as decimal, e.g., 0.05 for 5%)
        years: Number of years
        frequency: Compounding frequency per year (default: 12 for monthly)

    Returns:
        Final amount after compound interest
    """
    amount = principal * (1 + rate / frequency) ** (frequency * years)
    return round(amount, 2)
Function Documentation
Always include a docstring with Args and Returns sections. This helps you and others understand the function later.
Step 2: Open Function Publisher
- Click the Functions tab in the right panel
- Ensure your module is selected in the dropdown
- Click Add Publication
The Function Publisher scans your module and lists all eligible functions.
Step 3: Configure Function Settings
Select your function from the list and press OK. Then you can configure the function:
Publishing Name
The name users will type in Excel. Rules:
- UPPERCASE only (Excel convention) - User input is automatically converted to uppercase
- Letters, numbers, and underscores
- Must start with a letter
- Example:
COMPOUND_INTEREST
Naming Convention
Excel function names are case-insensitive but XPyCode enforces UPPERCASE to follow Excel standards.
Dimension
Choose how your function handles data:
- Scalar: Returns a single value (displayed in one cell)
- 1-Row: Returns a 1-D array displayed horizontally across columns
- 1-Column: Returns a 1-D array displayed vertically down rows
- 2-D: Returns a 2-D array displayed across rows and columns
For our compound interest function, choose Scalar since it takes individual values and returns a single result.
Streaming
Enable for generator functions that yield values over time. Leave unchecked for regular functions.
Automatic Streaming Detection
XPyCode automatically detects and sets the streaming flag for generator functions. This is reviewed before each synchronization. You can right-click on the streaming option to manually request a check to verify if the function is a generator.
# Example of a streaming function
def generate_sequence(start: int, count: int):
    """Generate a sequence of numbers."""
    for i in range(count):
        yield start + i
Step 4: Synchronization to Excel (Automated)
Immediate Publication
The function is published as soon as it's added to the publication list. Code modifications are immediately taken into account at the next computation.
The Sync to Excel button is used to:
- Force resynchronization in case of issues
- Update Excel when the function signature changes (e.g., number or type of arguments)
Recomputation Trigger
Publishing a new function or forcing resynchronization will trigger recomputation of all XPyCode functions in the workbook and reinitialize streaming functions.
Step 5: Use in Excel
Open your workbook and type the function name in a cell:
Excel will:
- Show autocomplete as you type
- Display parameter hints
- Calculate the result (16470.09)
- Recalculate if you change any input cell
Function Working
Congratulations! You've created your first Excel function powered by Python.
Understanding Dimensions
The dimension setting controls how your function returns data to Excel and how it will be displayed in the spreadsheet.
Scalar Dimension
Returns a single value
def add_tax(amount: float, rate: float = 0.1) -> float:
    """Add tax to an amount."""
    return amount * (1 + rate)
Usage in Excel:
Best for: Simple calculations, single-cell inputs
1-Row & 1-Column Dimension
Returns a 1-D array
- 1-Row: The output is displayed horizontally in one row across multiple columns
- 1-Column: The output is displayed vertically in one column across multiple rows
def apply_discount(prices: list[float], discount: float) -> list[float]:
    """Apply discount to each price."""
    return [price * (1 - discount) for price in prices]
Usage in Excel (as array formula):
Each element is processed independently.
Best for: Transformations, element-wise operations
2-D Dimension
Returns a 2-D array
The output is displayed across multiple rows and columns.
def create_multiplication_table(size: int) -> list[list[int]]:
    """Create a multiplication table."""
    return [[i * j for j in range(1, size + 1)] for i in range(1, size + 1)]
Usage in Excel:
Best for: Complex outputs, multi-dimensional results
Advanced Features
Type Hints
Use Python type hints for better IntelliSense:
from typing import Optional, Union

def format_currency(
    amount: float,
    currency: str = "USD",
    decimals: Optional[int] = 2
) -> str:
    """Format a number as currency."""
    if decimals is None:
        decimals = 2
    symbol = {"USD": "$", "EUR": "€", "GBP": "£"}.get(currency, currency)
    return f"{symbol}{amount:,.{decimals}f}"
Default Arguments
Provide sensible defaults:
def calculate_payment(
    principal: float,
    rate: float,
    periods: int,
    future_value: float = 0,
    when: int = 0  # 0 = end of period, 1 = beginning
) -> float:
    """Calculate loan payment."""
    # Implementation here
    pass
In Excel, you can omit parameters with defaults:
Error Handling
Handle errors gracefully:
def safe_divide(a: float, b: float) -> Union[float, str]:
    """Divide two numbers safely."""
    if b == 0:
        return "#DIV/0!"  # Excel error code
    return a / b
Using Libraries
Leverage Python libraries:
import numpy as np
from scipy import stats

def calculate_correlation(x: list[float], y: list[float]) -> float:
    """Calculate Pearson correlation coefficient."""
    if len(x) != len(y) or len(x) < 2:
        return float('nan')
    correlation, _ = stats.pearsonr(x, y)
    return correlation
Remember to install required packages through the Package Manager first!
Updating Functions
To modify a published function:
- Edit your Python code in the module
- Changes take effect automatically at the next computation
- If the function signature changes (number or type of arguments): Press Sync to Excel
Formula Refresh
After republishing, you may need to force Excel to recalculate: press Ctrl+Alt+F9, especially with Streaming function Nevertheless, the Sync to Excel usually force recomputation of all xpycode function in Excel
Unpublishing Functions
To remove a function from Excel:
- Open Functions tab
- Select the function
- Click Remove Publication
The function will no longer be available in Excel, and cells using it will show #NAME? error.
Troubleshooting
Function Not Appearing in Excel
- Verify the function was published (check status in Function Publisher)
- Try closing and reopening the workbook
- Check the Console for error messages
#NAME? Error in Excel
- The function name might be misspelled
- The function may have been unpublished
- The Python kernel might have crashed (check Console)
Wrong Results
- Verify the dimension setting matches your function's behavior
- Check for type conversion issues (strings vs numbers)
- Test the function in the IDE with sample inputs
- Add print statements to debug
Performance Issues
- For large arrays, consider optimizing with numpy
- Use caching for expensive calculations
- Check if dimension is set correctly
- Profile your function code
Next Steps
Now that you can create custom functions:
- Excel Integration Guide - Deep dive into function publishing
- Data Analysis Tutorial - Build practical functions with pandas
- API Integration Tutorial - Create functions that fetch live data
User Guide
User Guide
Welcome to the XPyCode User Guide! This comprehensive guide covers everything you need to know to use XPyCode effectively.
Getting Oriented
-
Add-in Overview
Learn about the XPyCode Excel add-in and how to interact with it.
-
IDE Overview
Discover the full-featured integrated development environment.
-
Settings
Customize XPyCode to match your preferences and workflow.
Development Environment
-
Code Editor
Master the Monaco-powered code editor with IntelliSense and syntax highlighting.
-
Project Explorer
Navigate workbooks, sheets, and Python modules efficiently.
-
Console
View output, errors, and logging information from your code.
-
Debugging
Use breakpoints, step controls, and variable inspection to fix issues.
Excel Integration
-
Custom Functions
Publish Python functions as Excel UDFs that work like native formulas.
-
Events
Handle Excel events with Python code for automation and interactivity.
-
On-Time Events
Schedule Python functions to run at specific times, intervals, or dates.
-
Excel Objects
Work with workbooks, worksheets, ranges, and cells from Python.
Package Management
-
Overview
Install and manage Python packages per workbook with automatic dependency resolution.
-
:material-algorithm: Algorithm
Understand how XPyCode resolves and installs package dependencies.
Next Steps
After familiarizing yourself with the user guide:
- Tutorials - Follow hands-on tutorials for real-world scenarios
- Reference - Quick reference for shortcuts and APIs
- Troubleshooting - Solutions to common issues
Quick Navigation
Use the navigation tabs at the top to quickly jump between sections, or use the search feature (Ctrl+K) to find specific topics.
Excel Addin
The XPyCode Taskpane is the main interface for interacting with Python in Excel. It provides quick access to essential features, displays real-time console output, and allows you to manage your XPyCode environment.
Taskpane Overview
The taskpane appears as a sidebar in Excel and consists of several key areas:

- Header - XPyCode branding with Settings and Advanced Actions buttons
- Useful Links - Quick access to documentation and resources
- Status Indicator - Connection status display
- Toolbar - Main action buttons
- Console Area - Real-time Python output and error messages
Toolbar Features
The toolbar provides one-click access to common operations:

Show Editor Button
Opens the XPyCode IDE window where you can write and edit Python code.
- Icon: Code brackets symbol (
</>) - Action: Launches the full IDE interface
- Keyboard Shortcut: None (click to activate)
Quick Access
The Show Editor button is the fastest way to open the IDE from within Excel. You can also use the ribbon button.
Bindings Dropdown
Create and manage Excel bindings to connect Python code with Excel ranges, tables, and text.
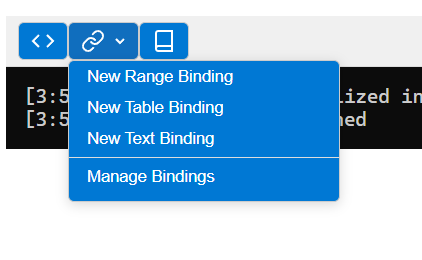
Available options:
- New Range Binding - Bind to a cell range (e.g., A1:C10)
- New Table Binding - Bind to an Excel table
- New Text Binding - Bind to a single cell's text content
- Manage Bindings - View, edit, or delete existing bindings
About Bindings
Bindings allow your Python code to react to changes in specific Excel ranges. When data changes in a bound range, your Python code can automatically respond. See the Events Guide for more details.
Creating a New Binding
- Click the Bindings dropdown button (link icon)
- Select the binding type (Range, Table, or Text)
- Enter a unique binding name
- Select the range/table in Excel
- The binding is created and ready to use in Python
Managing Existing Bindings
The Manage Bindings dialog shows all bindings organized by type:
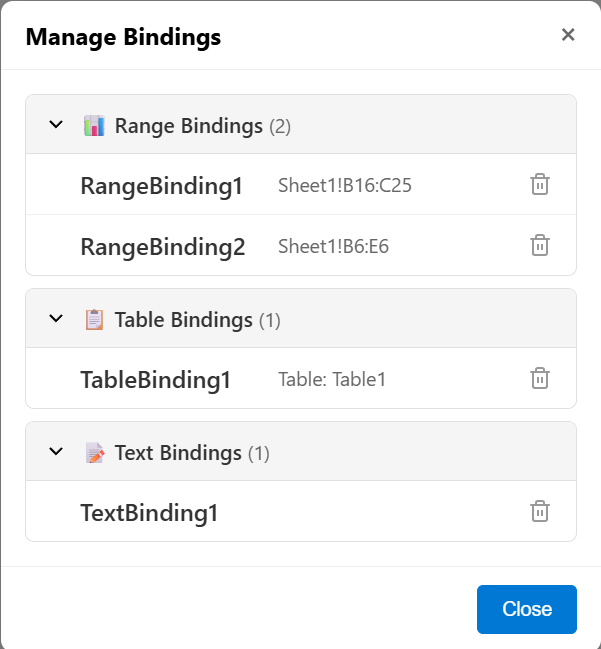
- Range Bindings - Collapsible section showing all range bindings
- Table Bindings - Collapsible section showing all table bindings
- Text Bindings - Collapsible section showing all text bindings
Each binding displays:
- Binding name/ID
- Referenced range or table
- Delete button to remove the binding
Deleting Bindings
Deleting a binding will prevent any event handlers that reference that binding from working. Make sure to update your Python code accordingly.
Documentation Button
Opens the XPyCode documentation website in your default browser.
- Icon: Book symbol
- Action: Opens The documentation web page
- Use Case: Quick access to help and reference materials
Clear Console Button
Clears all output from the console area, providing a fresh start.
- Icon: Circle with diagonal line (clear/cancel symbol)
- Action: Removes all console messages
- Use Case: Clean up console when it gets cluttered
Console Management
The console can be configured to auto-clear on each code execution. See Settings Dialog for details.
Settings Button
Opens the settings dialog to configure taskpane behavior.
- Icon: Gear/cog symbol ⚙️
- Location: Top-right corner of header
- Action: Opens settings dialog (see below)
Advanced Actions Button
Opens the advanced actions dialog for system-level operations.
- Icon: Lightning bolt symbol ⚡
- Location: Top-right corner of header (left of Settings)
- Action: Opens advanced actions dialog (see below)
Advanced Actions
These actions are for advanced users and can stop or restart XPyCode components. Use with caution.
Settings Dialog
Configure taskpane preferences to customize your workflow:
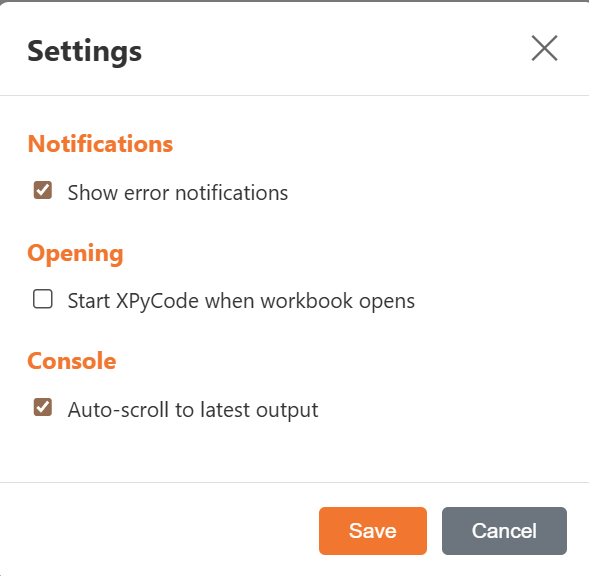
Show error notifications
Controls whether error messages appear as popup notifications.
- Default: Enabled (checked)
- When enabled: Errors trigger notification popups
- When disabled: Errors only appear in console
- Use Case: Disable if you prefer to monitor console only
Start XPyCode when workbook opens
Automatically start XPyCode when opening the workbook.
- Default: Disabled (unchecked)
- When enabled: XPyCode loads automatically on workbook open
- When disabled: Must manually start XPyCode
- Use Case: Enable for workbooks you use frequently
Startup Behavior
This setting uses Office's StartupBehavior API. The add-in will load in the background when you open the workbook.
Auto-scroll to latest output
Automatically scroll the console to show the most recent output.
- Default: Enabled (checked)
- When enabled: Console scrolls to bottom when new output appears
- When disabled: Console stays at current scroll position
- Use Case: Disable if you're reviewing older console messages
Saving Settings
Click Save to apply changes and persist them to the workbook. Settings are stored using Office's document settings API and will be preserved when you save the workbook.
Click Cancel to close the dialog without saving changes.
Advanced Actions Dialog
The Advanced Actions dialog provides system-level operations organized into three tabs:
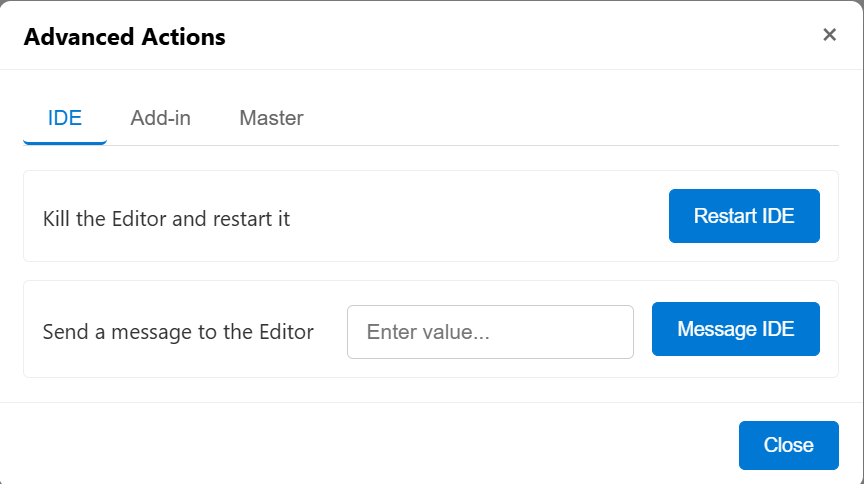
IDE Tab
Operations related to the XPyCode IDE (Editor) window:
Restart IDE
Description: Kill and restart the Editor
- What it does: Closes the IDE window and starts a new instance
- When to use: If the IDE becomes unresponsive or displays incorrectly
- Note: Your code is auto-saved, so you won't lose work
Active Debugging
Restarting the IDE will stop any active debugging session.
Message IDE
Description: Send a message to the Editor
- Requires input: Yes (text message)
- What it does: Sends a custom message to the IDE
- When to use: For debugging or testing IDE communication
- Note: This is an advanced feature primarily for development purposes
Add-in Tab
Operations related to the Excel Add-in (Taskpane):
Flush Messages
Description: Delete all queued messages not yet displayed
- What it does: Clears the message box queue
- When to use: If you have many pending message boxes you want to skip
- Effect: Pending
showMessageBox()calls won't display
Message Queue
When Python code calls showMessageBox(), messages are queued if a dialog is already open. This action clears that queue.
Restart Add-in
Description: Reload the add-in
- What it does: Reloads the taskpane interface
- When to use: If the taskpane becomes unresponsive
- Important: The Python kernel will also restart, losing all variables in memory
Data Loss
Restarting the add-in will clear all Python variables and objects from memory. Save any important data to Excel before restarting.
Master Tab
Operations related to the XPyCode Master (backend service):
Kill Master
Description: Stop XPyCode Master completely (Stops everything)
- What it does: Shuts down the entire XPyCode backend service
- When to use: When you want to completely stop XPyCode
- Effect: IDE, kernels, and all XPyCode processes stop
Complete Shutdown
This stops all XPyCode components. You'll need to restart XPyCode manually after using this action.
Restart Master
Description: Restart XPyCode Master (Stops and Restarts everything)
- What it does: Stops and restarts the entire XPyCode backend
- When to use: After installing system-level Python packages or if experiencing issues
- Effect: All kernels restart, clearing variables in memory
Full Reset
This is equivalent to completely stopping and starting XPyCode. All running code stops and all variables are lost.
Restart Kernel
Description: Stop and restart the Python Kernel for current workbook
- What it does: Restarts only the Python kernel for this workbook
- When to use:
- After installing new packages
- To clear all variables and start fresh
- If the kernel becomes unresponsive
- Effect: All variables and imports are cleared
Quick Reset
This is the recommended way to get a "fresh start" without affecting other workbooks or closing the IDE.
Confirming Actions
Most advanced actions require confirmation before executing:
Review the action description carefully before clicking Yes.
Console Area
The console displays real-time output from your Python code:
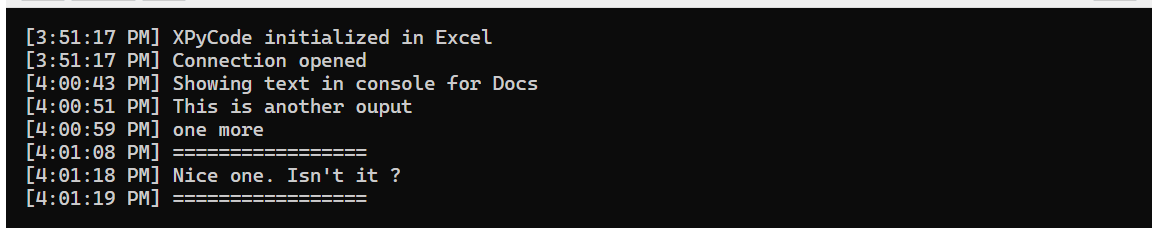
Output Types
The console displays several types of messages:
- Standard output -
print()statements from your code - Error messages - Python exceptions and traceback
- System messages - XPyCode status messages
- Execution results - Return values from functions
Formatting
- Font: Monospace font (Cascadia Mono, Consolas, Courier New)
- Colors: Dark background (#0c0c0c) with light text (#cccccc)
- Timestamps: Some messages include timestamps for tracking execution
- Word wrap: Long lines wrap automatically for readability
Console Features
- Auto-scroll: Automatically scrolls to latest output (configurable in settings)
- Scrollable history: Scroll up to view previous output
- Clear button: Quick clear via toolbar button
- Copy support: Select and copy text from console
Console Tips
- Use
print()statements for debugging - Errors show full Python traceback for troubleshooting
- Clear console periodically to improve performance with large outputs
Useful Links Section
Quick access to important resources:

The links section typically includes:
- Documentation - Full documentation website
- GitHub Issues - Report bugs and request features
- Support - Get help with XPyCode
- Additional resources - Tutorials, examples, etc.
Links appear as clickable chips and open in your default browser.
Status Indicator
The status indicator shows the connection state between the taskpane and XPyCode backend:
Connection States
Disconnected (Red) - XPyCode backend is not running - Cannot execute Python code - Action required: Start XPyCode Master
Connected (Green) - Successfully connected to backend - Ready to execute Python code - Normal operating state
Connection Status
If you remain disconnected, verify that XPyCode Master is running. Check the Troubleshooting Guide for help.
Error Indicator
When errors occur, an error indicator may appear below the status indicator:
- Color: Red background with red border
- Behavior: Click to view error details
- Auto-hide: Can be configured in settings
Error notifications provide quick visibility of problems without cluttering the console.
Common Tasks
Starting the IDE
- Ensure status shows "Connected" (green)
- Click the Show Editor button (<>)
- The IDE window opens in a separate window
Creating a Range Binding
- Click the Bindings dropdown (link icon)
- Select New Range Binding
- Enter a binding name (e.g., "InputData")
- Click Select Range
- Select the range in Excel
- Binding is created and visible in Manage Bindings
Clearing Old Output
Option 1: Click the Clear Console button (circle-slash icon)
Option 2: Enable auto-clear in settings: 1. Click Settings button (gear icon) 2. Check Clear on Run option 3. Click Save
Next Steps
Explore related documentation:
-
IDE Overview
Learn about the full-featured Python IDE for Excel.
-
Settings
Configure IDE and system preferences.
-
Custom Functions
Publish Python functions as Excel formulas.
-
Events
React to Excel events with Python code.
Need Help?
If you encounter issues with the taskpane, check the Troubleshooting Guide or visit our GitHub Issues page.
IDE
IDE
The XPyCode Integrated Development Environment (IDE) provides a full-featured coding experience optimized for Python development with Excel.
: material-file-document-multiple: In This Section
-
: material-view-dashboard: Overview
Learn about the IDE layout, panels, and key features.
-
Code Editor
Master the Monaco-powered code editor with IntelliSense and syntax highlighting.
-
Debugging
Use breakpoints, step through code, and inspect variables.
-
Console
View output, errors, and execution feedback.
-
Project Explorer
Navigate workbooks and modules in your project.
IDE Overview
The XPyCode IDE is a full-featured development environment built specifically for Python-in-Excel workflows. It provides everything you need to write, debug, and manage Python code within your Excel workbooks.
Main Window Layout
The IDE uses a flexible dock-based layout with these main components:
Left Dock: Navigation
The left side houses on panel:
- Project Explorer - Navigate workbooks, sheets, and modules
Right Dock: Utilities
The right side houses multiple tabbed panels:
- Functions - Publish Python functions to Excel
- Packages - Install and manage Python packages
- Events - Configure Excel event handlers
- Objects - View and manage Python objects in memory
Center: Code Editor
The central area displays:
- Welcome Tab - Quick start guide and recent files
- Monaco Editor Tabs - One tab per open Python module
- Powered by Microsoft's Monaco Editor (same as VS Code)
- Full syntax highlighting, IntelliSense, and diagnostics
Bottom Dock: Console and Debug
The bottom section contains:
- Console - Output, errors, and execution logs
- Debug Panel - Variables, call stack, watch expressions, and debug console (visible during debugging)
Top: Menu Bar and Toolbar
- File - Settings, exit
- Run - Run functions
- Debug - Start debugging, step controls, breakpoint management
- View - Views setup
- Advanced - Advanced functions (Restart Kernel, ...)
- Help - About, documentation links
Key Features
1. Workbook-Centric Organization
Each Excel workbook has its own:
- Python kernel (isolated execution environment)
- Set of Python modules
- Package installation
- Published functions and events
- Objects keeper (save and reuse python objects)
This prevents conflicts between different Excel projects and allows each workbook to have different dependencies.
2. Auto-Save
XPyCode automatically saves your code changes with no action required from you, except saving the Excel workbook itself.
Auto-Save Behavior
Changes are saved to the kernel for immediate use and also saved immediately in Excel. Your code will be persisted when you save the workbook.
3. Smart Code Execution
The IDE intelligently determines which function to run based on your cursor position:
- If the cursor is within a function definition, that function is executed
- If not, a warning is displayed in the console
Mandatory Arguments
If the selected function has mandatory arguments, an error will be raised. Ensure all required parameters are provided or use default values.
4. Integrated Debugging
Full debugging support with:
- Breakpoints (F9 to toggle)
- Step over (F10), step into (F11), step out (Shift+F11)
- Variable inspection
- Watch expressions
- Call stack navigation
5. Real-Time Feedback
As you type, you get:
- Syntax errors - Underlined in red
- Warnings - Underlined in yellow
- Code completion - Suggests functions, variables, methods
- Hover information - Shows documentation and type info
- Signature help - Parameter hints for functions
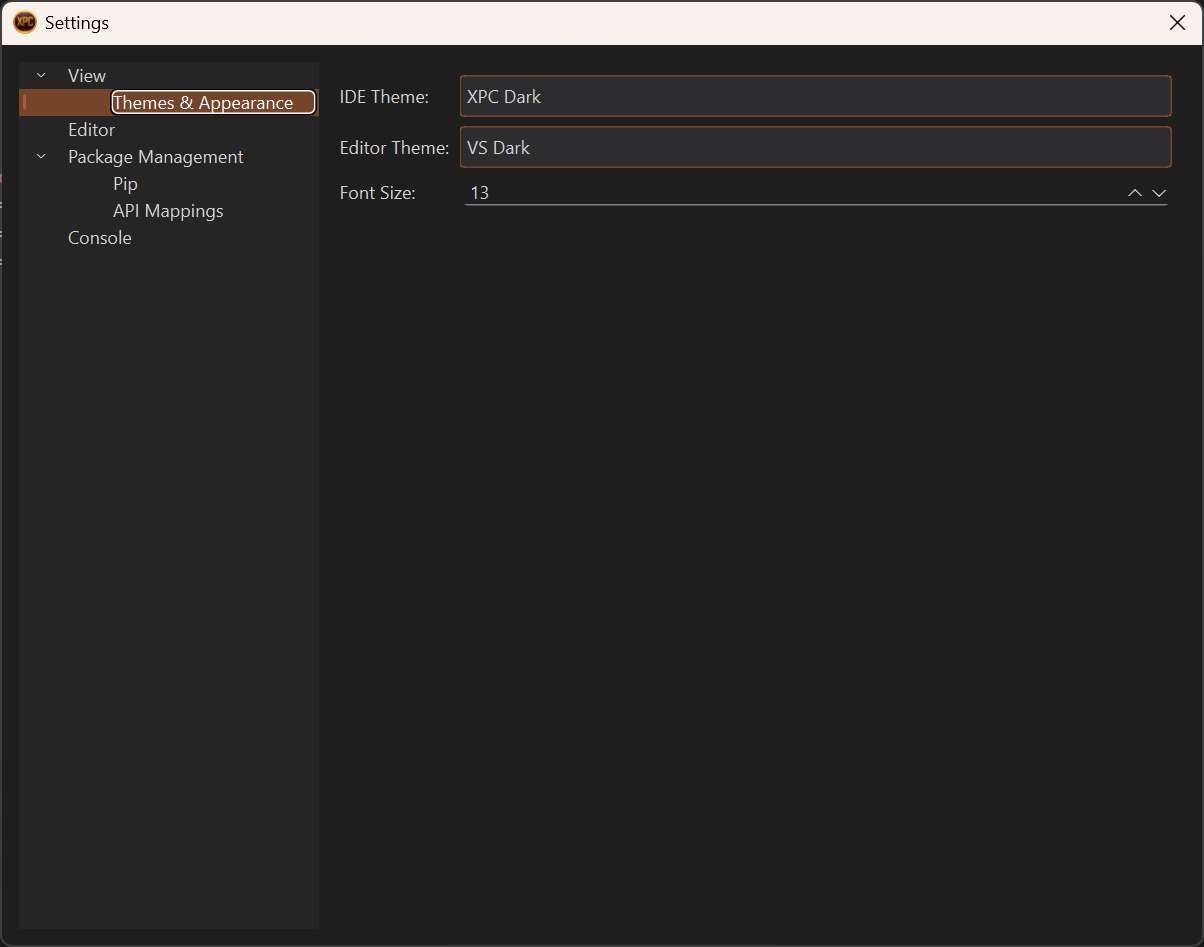
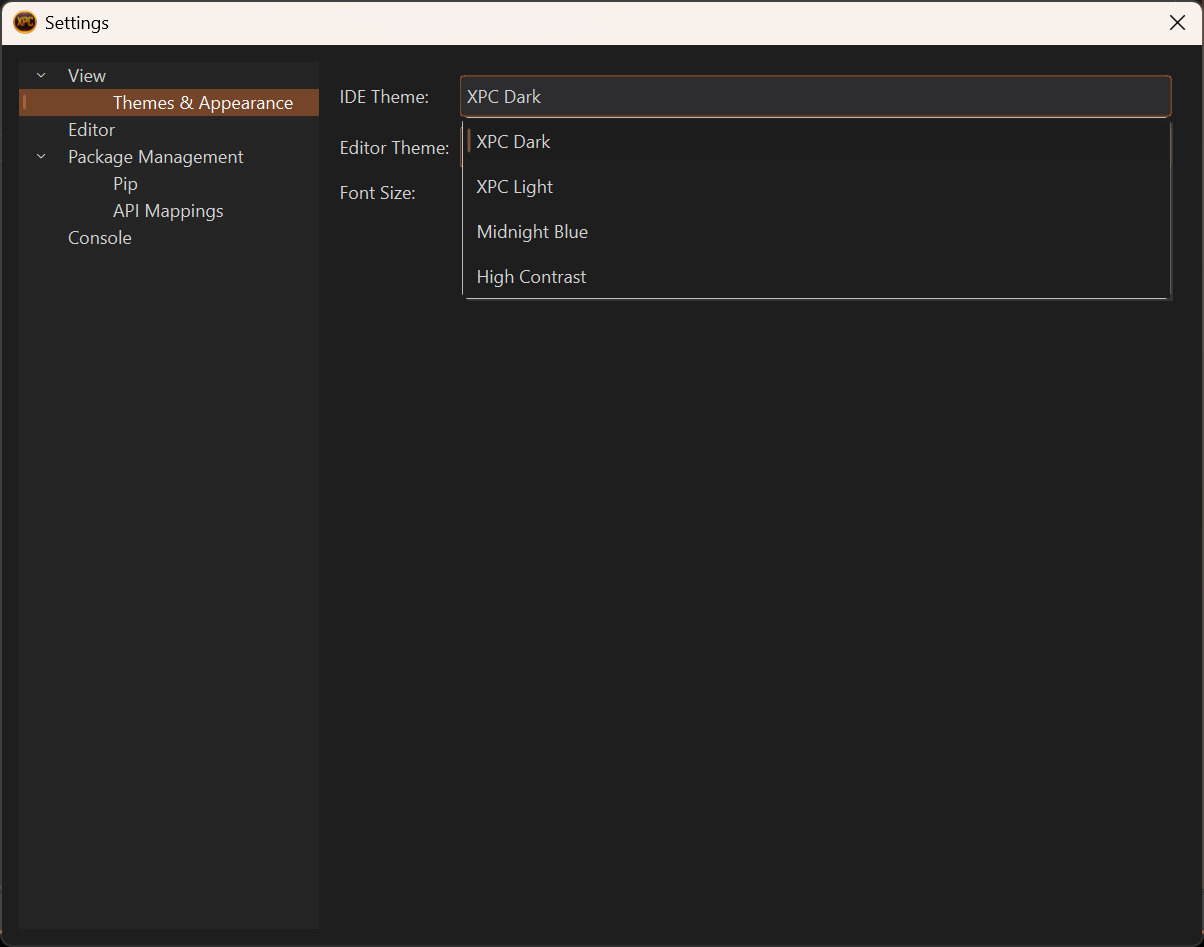
Themes and Appearance
XPyCode supports full theming:
IDE Themes
- XPC Dark (default) - Dark theme optimized for long coding sessions
- XPC Light - Light theme for bright environments
- Midnight blue - Dark theme using dark blue instead of black
- High Contrast - Maximum contrast for accessibility
Editor Themes
- VS Dark - Visual Studio Code dark theme
- VS Light - Visual Studio Code light theme
- High Contrast Black - Maximum contrast for accessibility
- High Contrast Light - Light high contrast theme
- XPC Midnight blue - Dark theme using dark blue instead of black
Change themes in File → Settings → View → Themes & Appearance.
Window Management
Dock Panels
All panels can be:
- Resized - Drag the splitters between panels
- Closed - Click the X button (reopen from View menu)
- Moved - Drag the title bar to dock elsewhere
- Floated - Undock to create floating windows
- Tabbed - Combine multiple panels in one dock area
Tab Management
Editor tabs support:
- Multiple files open - Switch between modules with Ctrl+Tab
Quick Actions
The toolbar provides one-click access to common operations:
| Icon | Action | Shortcut | Description |
|---|---|---|---|
| ▶️ | Run | F5 / Ctrl+R | Execute current code |
| 🐛 | Debug | Shift+F5 | Start debugging |
Project Structure
XPyCode organizes code hierarchically:
- Workbooks - Top-level items (one per open Excel file)
- Modules - Python in-memory modules containing your code
Keyboard Shortcuts
Essential shortcuts for efficient coding:
| Action | Shortcut |
|---|---|
| Run code | F5 or Ctrl+R |
| Debug code | Shift+F5 |
| Toggle breakpoint | F9 |
| Step over | F10 |
| Step into | F11 |
| Step out | Shift+F11 |
| Continue | Shift+F5 |
| Find | Ctrl+F |
| Replace | Ctrl+H |
| Go to line | Ctrl+G |
See the complete Keyboard Shortcuts Reference for all shortcuts.
Extensions and Integrations
Language Server Protocol
XPyCode includes a Python Language Server for:
- Real-time linting with pyflakes
- Advanced code completion with Jedi
- Go to definition
- Find references
- Symbol search
Monaco Editor
The code editor is powered by Monaco Editor (from VS Code):
- Multi-cursor editing
- Column selection
- Rich IntelliSense
- Bracket matching
- Code folding
- Minimap (optional)
Performance Tips
For Large Modules
- Use code folding to collapse functions
- Disable minimap if it slows rendering: Settings → Editor → Minimap
- Split large modules into smaller, focused files
For Many Workbooks
- Close workbooks you're not actively using
- Each workbook has its own kernel, which uses memory
- The IDE shows only open workbooks
Next Steps
Explore each IDE component in detail:
-
Code Editor
Deep dive into Monaco Editor features and capabilities.
-
Project Explorer
Learn to navigate and organize your Python modules.
-
Console
Understanding console output and log filtering.
-
Debugging
Master the debugger with breakpoints and inspection.
Need Help?
If you encounter issues, check the Troubleshooting Guide or consult the specific component guides above.
Code Editor
The XPyCode code editor is powered by Microsoft's Monaco Editor—the same editor that powers Visual Studio Code. It provides a professional coding experience with advanced features for Python development.
Overview
The editor is embedded directly in the IDE using PySide6's WebEngine, providing:
- Full Monaco Editor feature set
- Seamless integration with Python Language Server
- Real-time syntax checking and diagnostics
- Code completion and signature help
- Hover documentation
- Multi-cursor editing
Core Features
Syntax Highlighting
Python syntax is highlighted automatically:
- Keywords -
def,class,if,for, etc. - Strings - Different colors for single/double quoted
- Numbers - Integers and floats
- Comments - Dimmed text for readability
- Functions - Method and function names
- Decorators -
@property,@staticmethod, etc.
The color scheme adapts to your selected editor theme.
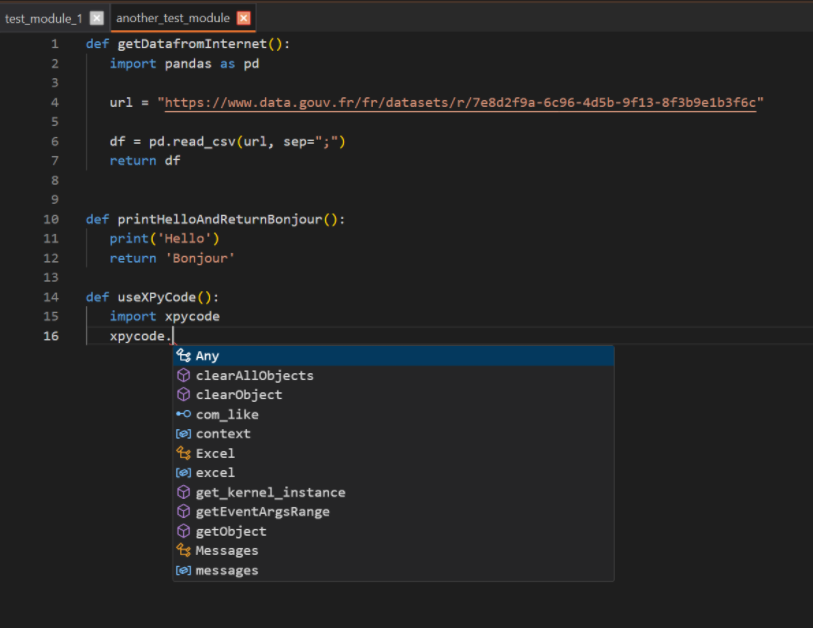
IntelliSense / Code Completion
Press Ctrl+Space or start typing to trigger autocomplete:
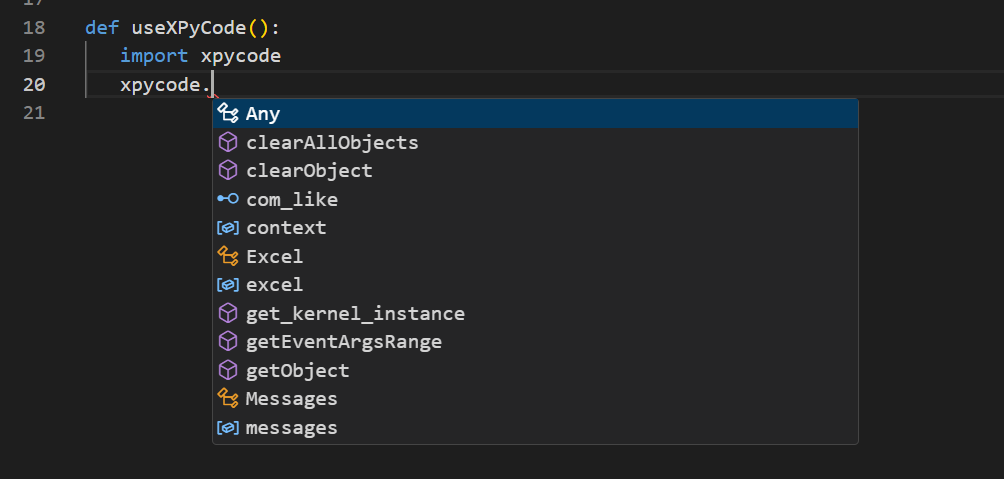
Completion suggestions include:
- Variables - From current scope
- Functions - Defined in your module or imported
- Methods - On objects (e.g.,
list.append()) - Modules - When typing import statements
- Keywords - Python language keywords
- Snippets - Code templates (e.g.,
def,class,if)
Smart Completions
The Language Server analyzes your code context and ranks suggestions by relevance. Press Tab or Enter to accept.
Signature Help
When typing function calls, signature help appears automatically:
Shows: calculate_interest(principal: float, rate: float, years: int) -> float
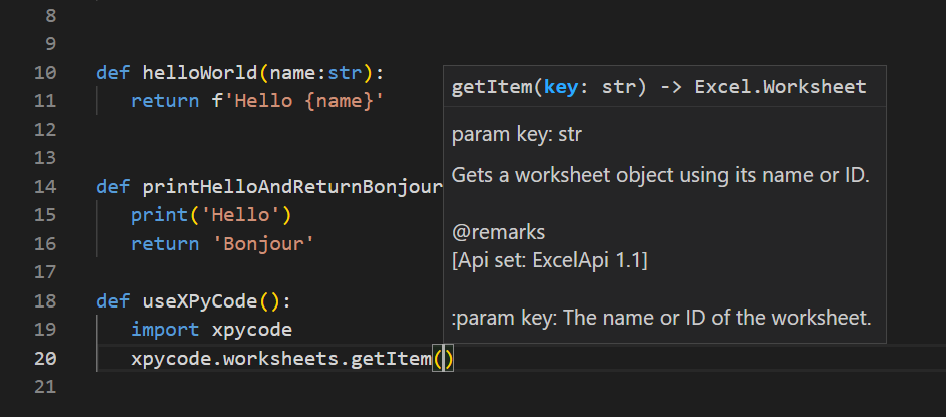
- Displays parameter names and types
- Shows docstring description
- Highlights current parameter as you type
Hover Documentation
Hover over any symbol to see:
- Type information
- Docstrings
- Function signatures
- Module documentation

Two hover modes available in Settings:
- Compact - Brief summary only
- Detailed - Full docstring with examples
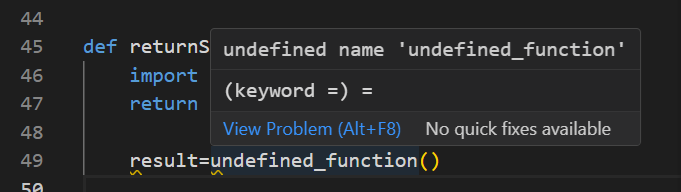
Real-Time Diagnostics
Errors and warnings appear as you type:
- Red underlines - Syntax errors, undefined names
- Yellow underlines - Warnings, unused variables
- Blue underlines - Info-level messages
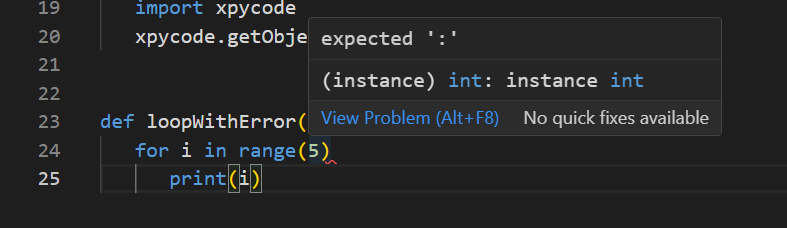
Hover over underlined code to see the error message:
Editing Features
Multi-Cursor Editing
Edit multiple locations simultaneously:
- Hold Alt and click to add cursors
- Or use Ctrl+Alt+Down / Ctrl+Alt+Up to add cursors above/below
- Type to edit all locations at once
- Press Esc to return to single cursor
Perfect for: - Renaming variables in multiple places - Adding similar lines - Bulk editing
Column (Box) Selection
Select a rectangular block of text:
- Hold Shift+Alt and drag with mouse
- Or use ++shift+alt+arrow-keys++
Useful for: - Editing aligned data - Adding prefixes/suffixes to multiple lines - Deleting columns of text
Find and Replace
Find (Ctrl+F):
- Search in current file
- Case-sensitive/insensitive options
- Whole word matching
- Regular expression support
Replace (Ctrl+H):
- Replace single occurrence
- Replace all occurrences
- Preview before replacing
- Regex capture group support
Go to Line
Press Ctrl+G and type a line number to jump directly:
Code Folding
Collapse code blocks to focus on what matters:
- Click the arrow in the gutter next to a function or class
- Or use ++ctrl+shift+bracketleft++ to fold
- ++ctrl+shift+bracketright++ to unfold
Fold these constructs: - Function definitions - Class definitions - Multi-line strings/comments - Import groups
Fold Arrow Visibility
The fold arrow may not always be visible. Click on the space between the line number and the code at function, class, or other foldable definitions to reveal it.
Commenting
Toggle line comments:
- Ctrl+/ - Comment/uncomment current line or selection
- Works with multi-line selections
Indentation
Adjust indentation level:
- Tab - Indent line or selection
- Shift+Tab - Unindent line or selection
Spaces vs Tabs
Configure in Settings → Editor → Insert Spaces. Default is 4 spaces (PEP 8 compliant).
Smart Brackets
Auto-closing brackets, quotes, and parentheses:
- Type
(→ Gets(█)(cursor in middle) - Type
"→ Gets"█" - Type
[→ Gets[█]
Delete both brackets at once with Backspace if nothing is between them.
Auto-Indent
Automatic indentation after:
- Function definitions
- Class definitions
- Control structures (
if,for,while) try/exceptblocks
Formatting
Line Numbers
Always visible in the left gutter. Click a line number to:
- Single click - Place cursor on that line
- F9 on that line - Toggle breakpoint
Minimap
A code overview on the right side shows:
- Entire file structure
- Current viewport position
- Error/warning locations
Enable/disable in Settings → Editor → Show Minimap.
Word Wrap
Wrap long lines to avoid horizontal scrolling:
- Enable in Settings → Editor → Word Wrap
- Or toggle from editor context menu
Useful for: - Docstrings - Long comments - Reading code without scrolling
Font Size
Adjust font size:
- Settings → Editor → Font Size (permanent)
- Ctrl++ / Ctrl+- - Zoom in/out (temporary)
- Ctrl+0 - Reset zoom
Whitespace Visibility
Show spaces and tabs:
- Toggle from editor context menu: View Whitespace
- Useful for debugging indentation issues
Keyboard Shortcuts
Essential editor shortcuts:
| Action | Shortcut | Description |
|---|---|---|
| Find | Ctrl+F | Search in file |
| Replace | Ctrl+H | Find and replace |
| Go to Line | Ctrl+G | Jump to line number |
| Indent | Tab | Indent selection |
| Unindent | Shift+Tab | Unindent selection |
| Duplicate Line | Shift+Alt+Down | Copy line down |
| Move Line | ++alt+up/down++ | Move line up/down |
| Delete Line | Ctrl+Shift+K | Delete entire line |
| Multi-cursor | ++alt+click++ | Add cursor |
| Select All Occurrences | Ctrl+Shift+L | Multi-select word |
| Trigger Suggest | Ctrl+Space | Show completions |
Editor Settings
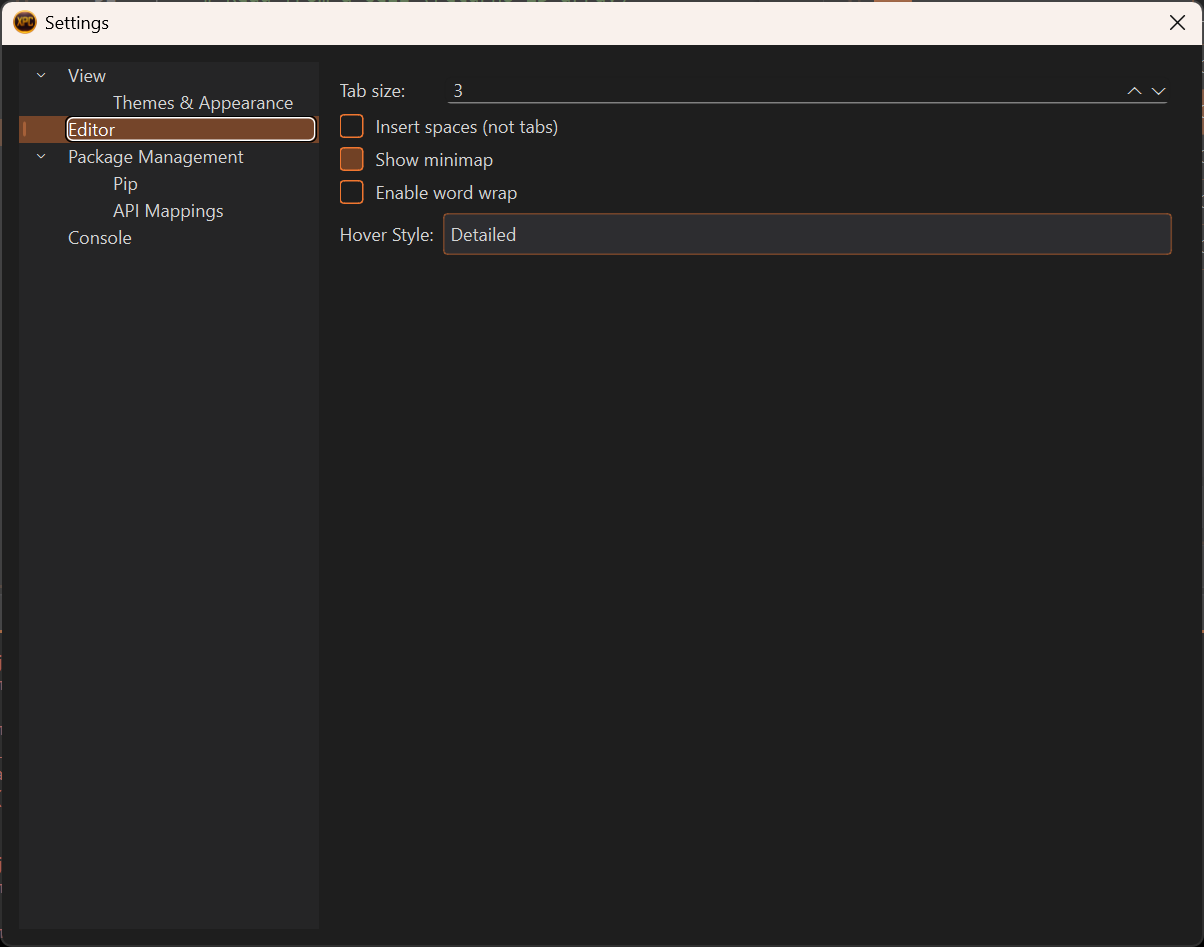
Configure the editor through File → Settings → Editor:
Tab Size
Number of spaces per indentation level:
- Default: 4 (PEP 8 standard)
- Range: 2-8
Insert Spaces
Use spaces instead of tab characters:
- Default: Enabled (recommended for Python)
- When disabled: Uses actual tab characters
Word Wrap
Wrap long lines:
- Default: Disabled
- Enable for better readability without horizontal scrolling
Minimap
Code overview sidebar:
- Default: Enabled
- Disable to maximize editing space
Integration Features
Breakpoint Support
Click in the gutter or press F9 to toggle breakpoints:
- Red dot - Active breakpoint
- Code pauses here during debugging
- Breakpoints are module-specific
Current Execution Line
During debugging, the current line is highlighted:
- Yellow background - Current execution position
- Automatically scrolls into view
- Updates as you step through code
Excel Integration
The editor knows about the xpycode module:
import xpycode

def thisIsATest():
    # IntelliSense works for xpycode.workbook
    wb = xpycode.workbook  # Autocomplete available
    ws = wb.worksheets.getActiveWorksheet()  # Office.js methods
The Language Server includes type stubs for the xpycode module, providing accurate completions and type checking.
Troubleshooting
Completions Not Working or Incorrect Syntax Highlighting
- Ensure code is syntactically valid
- Try restarting the Kernel
- Restart the IDE (use File → Exit and reopen via the Add-In)
Slow Typing Response
- Disable minimap if file is very large
- Close unused tabs
- Reduce font size (renders faster)
- Check if diagnostics are overwhelming the system
Next Steps
-
Project Explorer
Learn to organize and navigate your Python modules.
-
Debugging
Master debugging with breakpoints and variable inspection.
-
Keyboard Shortcuts
Complete reference of all keyboard shortcuts.
Learn by Doing
The best way to master the editor is through practice. Try different features as you write Python code!
Debugging
XPyCode includes a full-featured debugger that lets you pause code execution, inspect variables, step through code line by line, and diagnose issues efficiently.
Overview
The debugger provides:
- Breakpoints - Pause execution at specific lines
- Step Controls - Execute code one line/function at a time
- Variable Inspection - View current variable values
- Call Stack - See the execution path
- Watch Expressions - Monitor custom expressions
- Debug Console - Evaluate expressions during debugging
Breakpoints
Setting Breakpoints
Add a breakpoint to pause execution:
Method 1: Keyboard Shortcut
Place cursor on a line and press F9:
- Toggles breakpoint on/off
Method 2: Debug Menu
Place cursor on a line and menu Debug → Toggle Breakpoint
Breakpoint Lines
Set breakpoints on executable lines (not on comments, blank lines, or decorators). The debugger may adjust the position slightly.
Managing Breakpoints
Remove a Breakpoint
- Menu Debug → Toggle Breakpoint
- Or press F9 on that line
Starting a Debug Session
Start Debugging
Run code in debug mode:
Method 1: Keyboard
Press Shift+F5
Method 2: Toolbar
Click the Debug button (🐛) in the toolbar
Method 3: Menu
Debug → Start Debugging
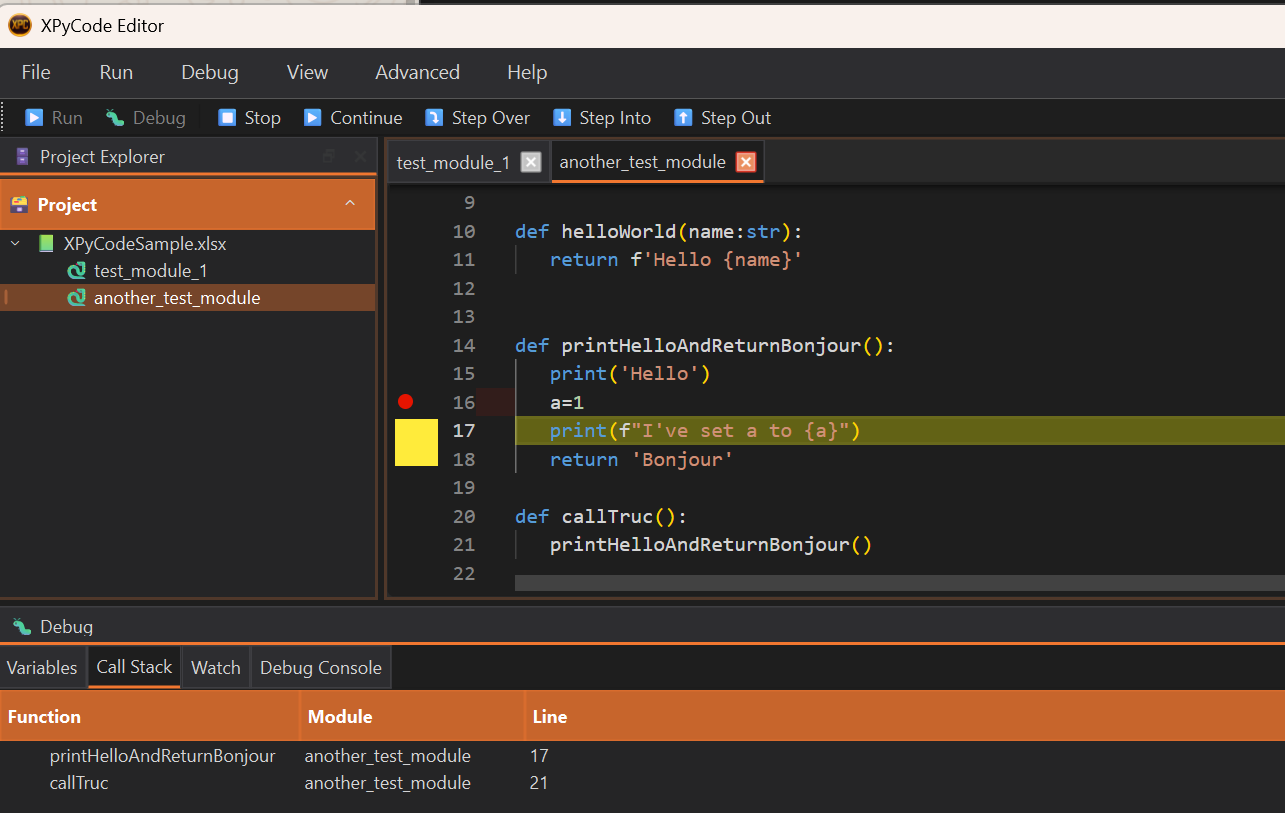
What Happens
When debugging starts:
- Code executes normally until it hits a breakpoint
- Execution pauses at the breakpoint
- The Debug Panel appears at the bottom
- The current line is highlighted in yellow
- Variables panel shows current values
- Debug controls become active
Step Controls
Once paused at a breakpoint, control execution with these commands:
Continue (Shift+F5)
Resume execution until:
- Next breakpoint is hit
- Code completes
- An error occurs
Use when: You want to skip to the next breakpoint.
Step Over (F10)
Execute the current line and move to the next line:
- Functions - Executes the entire function (doesn't step inside)
- Simple statements - Executes and moves to next line
Use when: You want to stay at the current level and don't care about function internals.
Step Into (F11)
Step into function calls:
- Function calls - Enters the function and pauses on first line
- Simple statements - Same as Step Over
Use when: You want to debug inside a function being called.
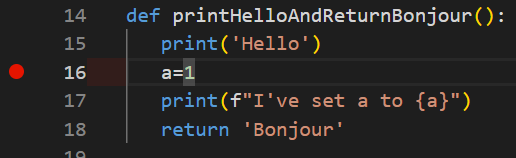
def calculate(x):  # Step Into goes here
    return x * 2

def main():
    result = calculate(5)  # Paused here, press F11
    return f'The result is: {result}'
Stepping Limitations
The debugger only steps into pure XPyCode in-memory modules. Stepping into an external module function will behave like a step over.
Step Out (Shift+F11)
Finish the current function and return to the caller:
- Executes remaining lines in current function
- Pauses at the line after the function call
Use when: You've seen enough of the current function and want to return to the caller.
def helper():
    x = 1  # Currently paused here
    y = 2  # Press Shift+F11
    return x + y  # Executes this

result = helper()  # Pauses here after Step Out
Stop Debugging
End the debug session:
- Debug → Stop Debugging
- Or click the Stop button
Code execution halts immediately.
Variables Panel
The Variables panel shows all variables in the current scope:
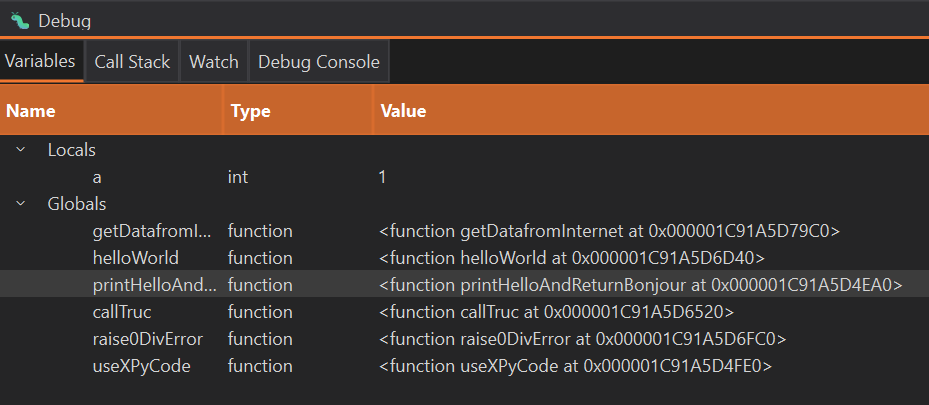
What's Displayed
- Local variables - Variables in the current function
- Global variables - Global variables in the current context
Variable Information
For each variable, you see:
- Name - Variable identifier
- Type - Data type (
int,str,list, etc.) - Value - Current value (truncated if very long)
Watch Expressions
Monitor custom expressions that update during debugging:
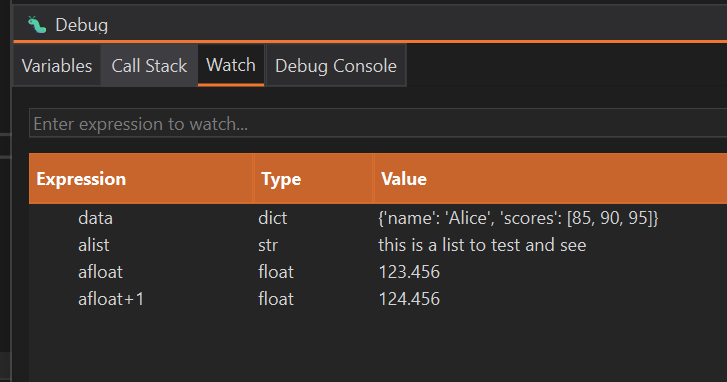
Adding Watch Expressions
- Open the Watch panel (in Debug Panel)
- Click Add or press Enter
- Enter a Python expression
- Press Enter
Examples:
# Watch simple variables
x + y

# Watch computations
len(data) * 2

# Watch attributes
user.name

# Watch function calls
calculate_total(items)

# Watch conditions
balance > 1000
Updating Watch Values
Watch expressions update automatically after each step:
- Step Over - Updates watches
- Step Into - Updates watches
- Step Out - Updates watches
Call Stack
The Call Stack shows the execution path—how you got to the current line:
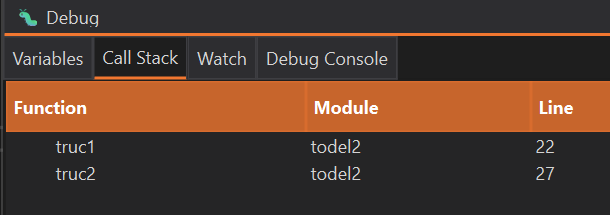
Reading the Call Stack
From top to bottom:
- Top - Current function (where execution is paused)
- Middle - Functions that called the current function
- Bottom - The entry point (usually module level)
Example:
my_function() at line 42    ← Currently here
calculate() at line 30      ← Called my_function
process_data() at line 15   ← Called calculate
<module> at line 5          ← Entry point
Navigating the Stack
Click on a stack frame to:
- View that function's code
- See local variables at that level
- Understand the calling context
Stack Navigation
Clicking a lower stack frame doesn't change execution—it just shows you that frame's state.
Debug Console
Execute Python expressions in the current debug context:
Using Debug Console
- Pause at a breakpoint
- Open the Debug Console tab (in Debug Panel)
- Type Python code
- Press Enter to execute
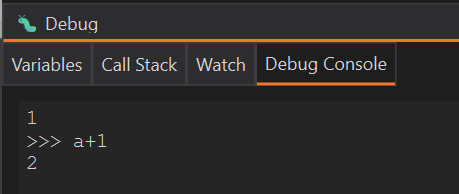
What You Can Do
Inspect Variables
Evaluate Expressions
Call Functions
Debug Console Limitations
The debug console operates in evaluation mode and cannot change variable values. It is a pure eval(), not exec(). Variable modification may be supported in future versions.
Troubleshooting
Breakpoint Not Hitting
Problem: Code doesn't pause at breakpoint
Solutions:
- Verify breakpoint is on an executable line (not comment/blank)
- Ensure code path reaches that line
- Check if using Debug mode (Shift+F5), not Run (F5)
- Remove and re-add the breakpoint
Variables Not Showing
Problem: Variables panel is empty
Solutions:
- Ensure execution is paused (not running)
- Check if variables exist in current scope
- Step Into a function to see its local variables
Step Controls Not Working
Problem: F10/F11 don't step
Solutions:
- Verify you're in an active debug session
- Check if code is paused (not running)
- Look for keyboard shortcut conflicts
Debug Console Not Evaluating
Problem: Expressions don't execute
Solutions:
- Ensure execution is paused at a breakpoint
- Check syntax (must be valid Python)
- Verify variable names are correct
Next Steps
-
Console
Learn to use console output for debugging.
-
Editor
Master editor features to write better code.
-
Troubleshooting
Solutions to common debugging issues.
Master Debugging
The debugger is one of the most powerful tools for understanding and fixing code. Practice using it regularly to become proficient.
Console
The Console panel displays output, errors, and logging information from your Python code execution. It's an essential tool for debugging and monitoring code behavior.
Overview
The Console is located at the bottom of the IDE and shows:
- Standard output (
print()statements) - Standard error (exceptions and errors)
- System messages (IDE notifications)
- Execution status (running, completed, failed)
Output Types
The console uses color-coding for different message types:
Standard Output (White/Default)
Regular print statements and normal output:
Errors (Red)
Python exceptions and error messages:
Warnings (Yellow)
Warning messages from XPyCode core processes.
Print Messages (Blue)
Informational logging:
Success Messages (Green)
Success indicators from the IDE:
Console Settings
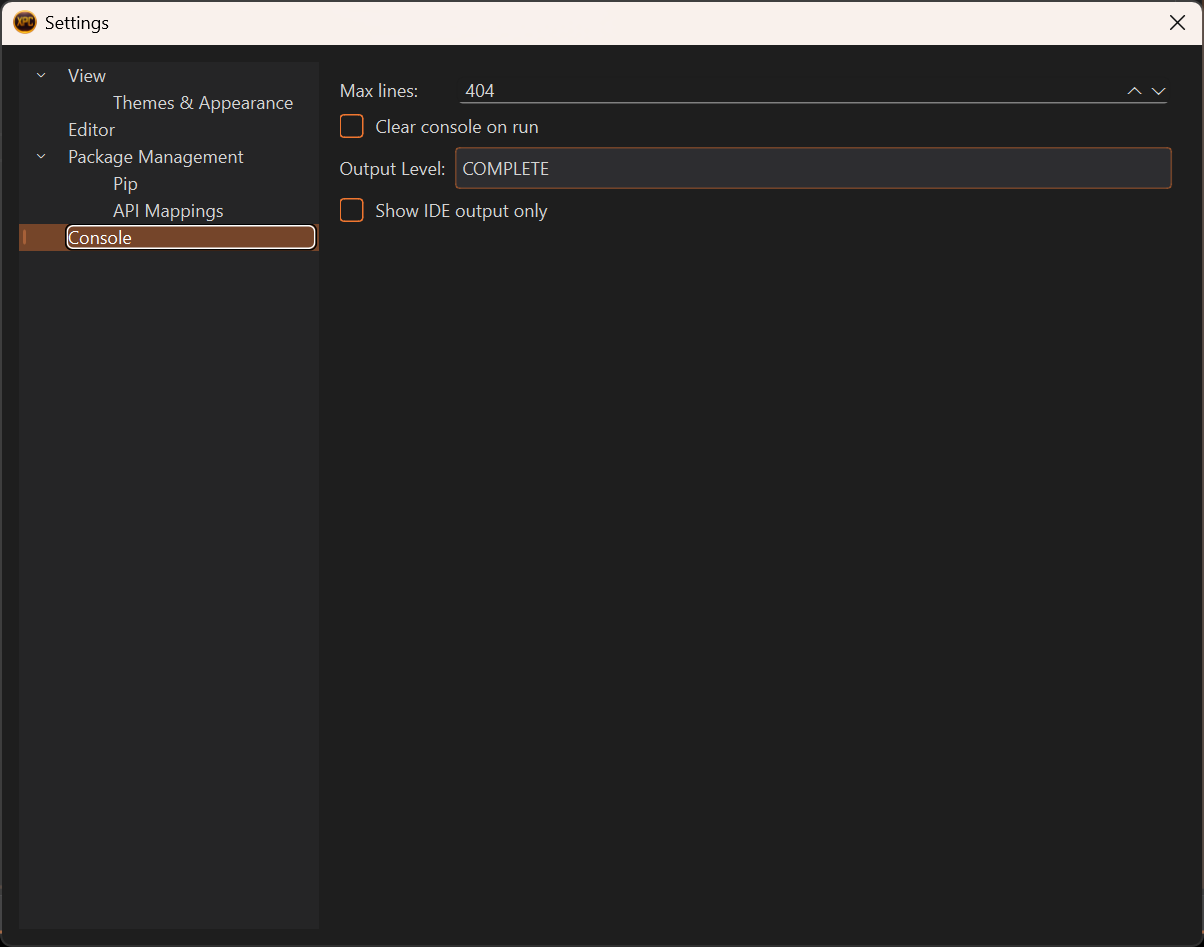
Configure console behavior in File → Settings → Console:
Output Level
Control which messages appear:
- SIMPLE - Messages for usual users
- DETAILED - More messages, including a more verbose communication for advanced users
- COMPLETE - Show everything. Including some logging messages from all XPyCode components
Default: COMPLETE
Max Lines
Maximum number of lines to keep in console:
- Default: 1000
- Range: 100-10000
- Older lines are automatically removed
Prevents memory issues with long-running scripts.
Clear on Run
Automatically clear console when running code:
- Default: Enabled
- When disabled: Output accumulates across runs
Console Only IDE
Show only messages for functions launched via the IDE:
- Default: Disabled
- When enabled: Hides messages (print, error, ....) from functions launched within Excel (functions and events)
- Useful for cleaner output
Console Features
Auto-Scroll
Console automatically scrolls to show new output:
- Scrolls to bottom when new messages arrive
- Stop auto-scroll by manually scrolling up
- Resume auto-scroll by scrolling to bottom
Text Selection
Select and copy console text:
- Click and drag to select
- Ctrl+C to copy
- Ctrl+A to select all
- Right-click → Copy
Context Menu
Right-click in the console for quick actions:
- Copy - Copy selected text
- Select All - Select all text
- Clear - Remove all output
Execution Feedback
The console provides feedback during code execution:
Before Execution
During Execution
Output appears in real-time as code runs.
After Execution
Success:
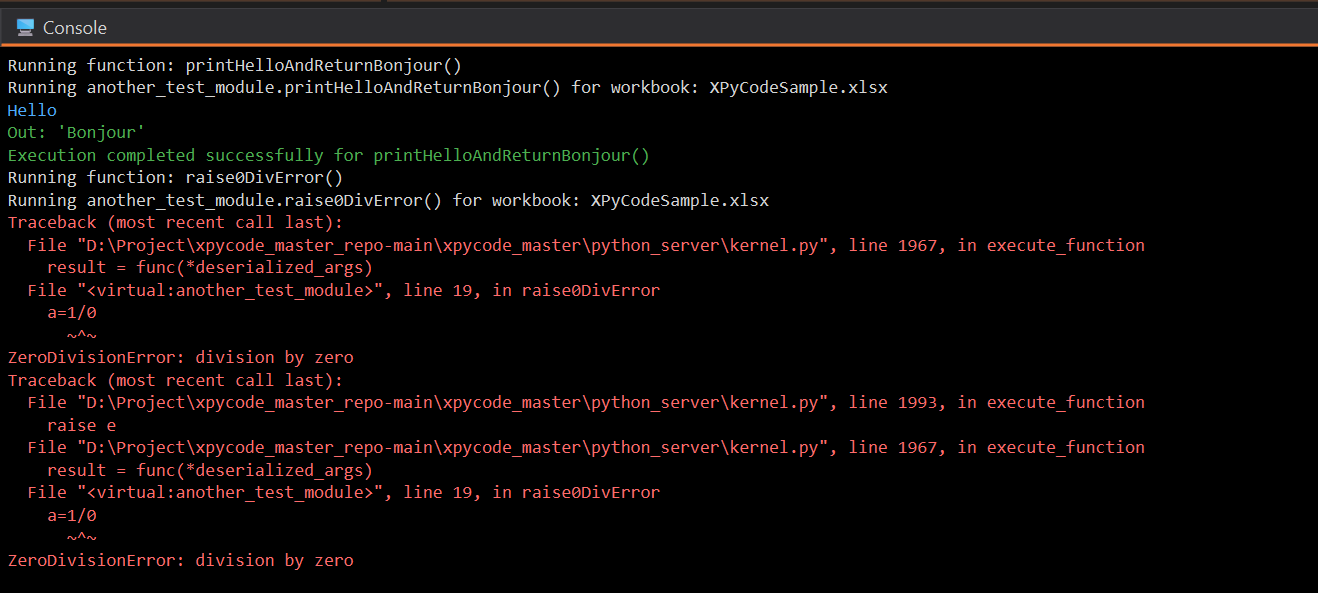
Error:
Traceback (most recent call last):
  File "D:\Project\xpycode_master_repo-main\xpycode_master\python_server\kernel.py", line 1993, in execute_function
    raise e
  File "D:\Project\xpycode_master_repo-main\xpycode_master\python_server\kernel.py", line 1967, in execute_function
    result = func(*deserialized_args)
  File "<virtual:todel2>", line 8, in dividingByZero
    a=1/0
      ~^~
ZeroDivisionError: division by zero
Error Display
Errors appear in red in the actual console for easy identification.
Error Messages
Python error messages are displayed in different locations depending on where the code was executed:
- IDE Console: Shows errors when code is run from the IDE, or when the Console Only IDE setting is disabled
- Add-In Console: Shows errors from UDFs (User Defined Functions) or event handlers triggered from Excel
Using print() Effectively
Basic Output
Formatted Output
Multiple Values
Debug Information
def calculate(x, y):
    print(f"calculate({x}, {y})")  # Debug: function called
    result = x + y
    print(f"  result = {result}")  # Debug: intermediate value
    return result
Troubleshooting
Output Not Appearing
- Check output level setting (should be "COMPLETE" to see everything)
- Verify code is actually running (no syntax errors)
- Ensure output commands are being reached (not inside unexecuted branches)
- Check if "Console Only IDE" filter is hiding messages
Too Much Output
- Reduce output level (SIMPLE or DETAILED only)
- Remove or comment out debug print statements
- Increase "Max Lines" setting
- Enable "Clear on Run" to start fresh each time
Console Freezing
- Very long lines can slow rendering—break them up
- Too many messages too quickly can cause lag
- Clear console if it has reached maximum capacity
- Kill with Exit and restart the IDE (or used the advanced function in the add-in)
Next Steps
-
Debugging
Learn to use the debugger with breakpoints and variable inspection.
-
Settings
Configure console output level, max lines, and filters.
-
Troubleshooting
Solutions to common console and output issues.
Effective Debugging
The console is your window into code execution. Use it actively with print statements and logging to understand what your code is doing.
Project Explorer
The Project Explorer is your primary navigation tool in XPyCode, providing a hierarchical view of open workbooks, their worksheets, and Python modules.
Overview
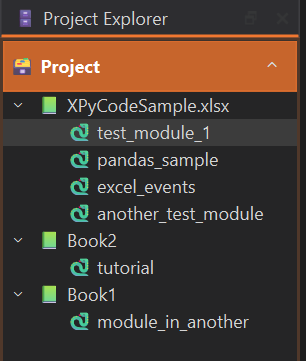
The Project Explorer displays:
- Workbooks - Each open Excel workbook
- Worksheets - Excel sheets within each workbook (for reference)
- Modules - Python .py files attached to the workbook
Tree Structure
📗 Sales_Report.xlsx
├── 🐍 analysis (module)
├── 🐍 report (module)

📗 Budget_2024.xlsx
└── 🐍 budget_calcs (module)
Workbook Node
Top-level items representing open Excel files:
- Icon: 📗 Excel workbook icon
- Name: Filename of the Excel workbook
- Expandable: Click to show modules
Module Nodes
Python files containing your code:
- Icon: 🐍 Python file icon
- Name: In-memory Module (e.g.,
analysis) - Double-click: Opens the module in the editor
Adding Modules
Create new Python modules:
Context Menu
- Right-click on a workbook name
- Select New Module
- Enter module name (without
.pyextension) - Press Enter
Module Naming
Use descriptive names like data_analysis, helpers, calculations. Follow Python naming conventions (lowercase with underscores).
Modules
Double-Click
Double-click a module in the tree to open it in the editor.
Right-Click Menu
Right-click a module:
- Rename - Change module name
- Delete - Remove module (with confirmation)
Keyboard Navigation
- Use arrow keys to navigate the tree
- Press Enter to open selected module
- Press F2 to rename (if supported)
- Press Del to delete (if supported)
Renaming Modules
To rename a module:
- Right-click the module
- Select Rename
- Enter new name
- Press Enter
Rename Effects
Renaming a module doesn't automatically update import statements in other modules—you'll need to update those manually. However, event handlers and UDFs that reference functions from this module are automatically updated.
Deleting Modules
To delete a module:
- Right-click the module
- Select Delete
- Confirm the deletion
Permanent Deletion
Deleted modules cannot be recovered. The code is removed from the business layer permanently. Additionally, event handlers and UDFs that use functions from the deleted module are also removed.
Refreshing the Tree
The tree updates automatically when:
- A new workbook is opened in Excel when the Add-in is opened
- A workbook is closed
Working with Multiple Workbooks
XPyCode supports multiple workbooks simultaneously:
- Each workbook has its own Python kernel
- Isolated environments - No shared state
- Independent packages - Different workbooks can use different package versions
- Separate modules - Module names can duplicate across workbooks
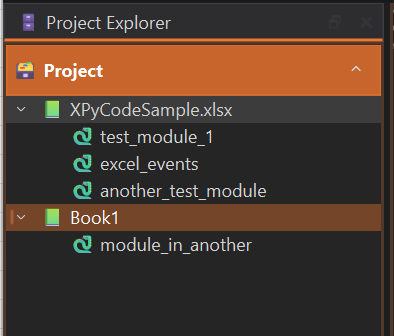
Kernel Isolation
When you run code in Workbook A, it doesn't affect the Python environment in Workbook B. This prevents conflicts and allows independent development.
Troubleshooting
Module Not Appearing
- Check if the module was created successfully (look for confirmation message)
- Verify the workbook is still connected (check add-in in Excel Workbook)
Can't Open Module
- Ensure the workbook is open in Excel (check add-in in Excel Workbook)
- Check if the module exists (it may have been deleted)
- Try closing and reopening the IDE (with Exit)
- Look for error messages in the Console
Tree Not Updating
- Restart the IDE (with Exit)
- Verify the XPyCode server is running
Next Steps
-
Code Editor
Learn about Monaco Editor features and capabilities.
-
Console
View output and errors from your Python code.
-
Function Publisher
Publish your Python functions to Excel.
Efficient Navigation
Master the Project Explorer to navigate large projects efficiently. Use keyboard shortcuts and context menus to speed up your workflow.
Excel Integration
Excel Integration
Connect Python code with Excel workbooks, worksheets, and cells using the xpycode module.
In This Section
-
Excel Objects
Work with workbooks, worksheets, ranges, and cells from Python.
-
Custom Functions
Publish Python functions as Excel formulas (UDFs).
-
Events
Handle Excel events with Python code for interactive spreadsheets.
-
On-Time Events
Schedule Python functions to run at specific times, intervals, or dates.
Excel Objects
Work with Excel workbooks, worksheets, ranges, and cells using the xpycode module in Python.
The xpycode Module
The xpycode module provides embedded objects that mirror Office.js objects, enabling seamless Excel integration from Python.
Users can directly access:
- xpycode.context: A RequestContext object, the foundation for Office.js interaction with Excel. Note that there is no need to use
context.sync()or.load()methods—synchronization is handled automatically. - xpycode.workbook: The workbook object containing the Python module. Unlike COM objects, Office.js only provides access to the current workbook.
- xpycode.worksheets: The worksheet collection of the workbook.
For detailed information on available methods and properties, refer to the Excel JavaScript API documentation.
Win32 COM Access (Windows Only)
For advanced scenarios where Office.js doesn't provide the functionality you need, xpycode provides direct access to the Excel Win32 COM API through xpycode.win32. This allows you to use the full power of Excel's native COM automation interface alongside the standard Office.js-based API.
Windows Only
xpycode.win32 is only available on Windows and requires the pywin32 package to be installed. Accessing this property on other platforms will raise an EnvironmentError.
When to Use Win32 COM
Use xpycode.win32 when you need:
- Application-level access - Control Excel settings, manage multiple workbooks, or access application properties not available in Office.js
- Advanced formatting - Apply complex formatting using VBA-style constants (e.g.,
xlCenter,xlEdgeBottom) - Legacy compatibility - Work with existing VBA/COM code patterns
- Features not in Office.js - Access Excel features that aren't exposed through the Office.js API
For most use cases, prefer the standard xpycode.workbook and Office.js API, as it's cross-platform and simpler to use.
Properties
xpycode.win32 provides three properties:
| Property | Type | Description |
|---|---|---|
application |
xpycode.ExcelComObjects.Application |
The Win32 COM Application object representing the running Excel instance |
workbook |
xpycode.ExcelComObjects.Workbook |
The Win32 COM Workbook object for the current workbook (matched via xpycode_id custom property) |
constants |
xpycode.ExcelComObjects.constants |
Classic Excel VBA constants (e.g., xlCenter, xlEdgeBottom, xlSolid) |
Type Hints
For IDE autocompletion with Win32 COM objects, use xpycode.ExcelComObjects:
import xpycode

def format_with_com():
    # Type hints for IDE support
    app: xpycode.ExcelComObjects.Application = xpycode.win32.application
    wb: xpycode.ExcelComObjects.Workbook = xpycode.win32.workbook

    # Access COM properties and methods
    print(f"Excel version: {app.Version}")
Office.js vs Win32 COM Comparison
| Aspect | Office.js (xpycode.workbook) |
Win32 COM (xpycode.win32.workbook) |
|---|---|---|
| Platform | Cross-platform (Windows, Mac, Web) | Windows only |
| Scope | Current workbook only | All open workbooks + application |
| API Style | Modern async-style (auto-synced) | Traditional COM/VBA style |
| Type Hints | xpycode.Excel.Workbook |
xpycode.ExcelComObjects.Workbook |
| Use Case | Standard Excel operations | Advanced features, app control |
Code Examples
Basic Access Pattern
import xpycode

# Access Win32 COM objects
win32 = xpycode.win32

# Get application-level information
print(f"Excel version: {win32.application.Version}")
print(f"Workbook name: {win32.workbook.Name}")
print(f"Workbook path: {win32.workbook.FullName}")
Using Constants for Formatting
import xpycode

# Access COM objects and constants
win32 = xpycode.win32
xl = win32.constants

# Get the active sheet via COM
ws = win32.workbook.ActiveSheet

# Apply formatting with VBA-style constants
cell_range = ws.Range("A1:C1")

# Set horizontal alignment to center
cell_range.HorizontalAlignment = xl.xlCenter

# Add borders
cell_range.Borders(xl.xlEdgeBottom).LineStyle = xl.xlContinuous
cell_range.Borders(xl.xlEdgeBottom).Weight = xl.xlMedium
Accessing Application-Level Properties
import xpycode

win32 = xpycode.win32

# Control Excel application settings
win32.application.ScreenUpdating = False  # Disable screen updates for performance
win32.application.DisplayAlerts = False   # Suppress alerts

try:
    # Perform operations...
    win32.workbook.ActiveSheet.Range("A1").Value = "Hello from COM!"
finally:
    # Restore settings
    win32.application.ScreenUpdating = True
    win32.application.DisplayAlerts = True
Type Hints Example
import xpycode

def get_workbook_info() -> dict:
    """Get workbook information using Win32 COM with type hints."""
    # Type hints enable IDE autocompletion
    app: xpycode.ExcelComObjects.Application = xpycode.win32.application
    wb: xpycode.ExcelComObjects.Workbook = xpycode.win32.workbook

    return {
        "name": wb.Name,
        "path": wb.FullName,
        "sheets": wb.Worksheets.Count,
        "excel_version": app.Version,
    }
Mixing Office.js and COM
import xpycode

# Use Office.js for standard operations (cross-platform)
ws_officejs = xpycode.workbook.worksheets.getActiveWorksheet()
ws_officejs.getRange("A1").values = "Office.js data"

# Use COM for advanced features (Windows only)
win32 = xpycode.win32
ws_com = win32.workbook.ActiveSheet

# Apply complex formatting via COM
ws_com.Range("A1").Font.Bold = True
ws_com.Range("A1").Interior.Color = 0xFFFF00  # Yellow background
Choosing the Right API
- Start with Office.js (
xpycode.workbook) for standard operations - Switch to Win32 COM (
xpycode.win32) only when you need features not available in Office.js - Remember:
xpycode.workbookis a proxy object, whilexpycode.win32.workbookis a native COM object
Next Steps
- Custom Functions - Publish functions to Excel
- Events - Handle Excel events
- Data Analysis Tutorial - Practical examples
Office.js Reference
For more details on available methods and properties, see the Excel JavaScript API Reference. Remember: xpycode mirrors Office.js, and you don't need to call context.sync()!
Custom Functions
Learn how to publish Python functions as Excel User Defined Functions (UDFs) that work just like native Excel formulas.
Overview
Custom Functions allow you to:
- Use Python logic in Excel formulas
- Leverage Python libraries (pandas, numpy, scipy, etc.)
- Create reusable calculation libraries
- Share complex algorithms with Excel users
- Build domain-specific formula sets
Once published, your Python functions become Excel formulas:
Publishing Functions
Using Function Publisher
- Open the Functions panel (right dock)
- Select your workbook from the dropdown
- Click Add Publication
- Select the module and function
- Review the Publishing Name
- Review the Dimension
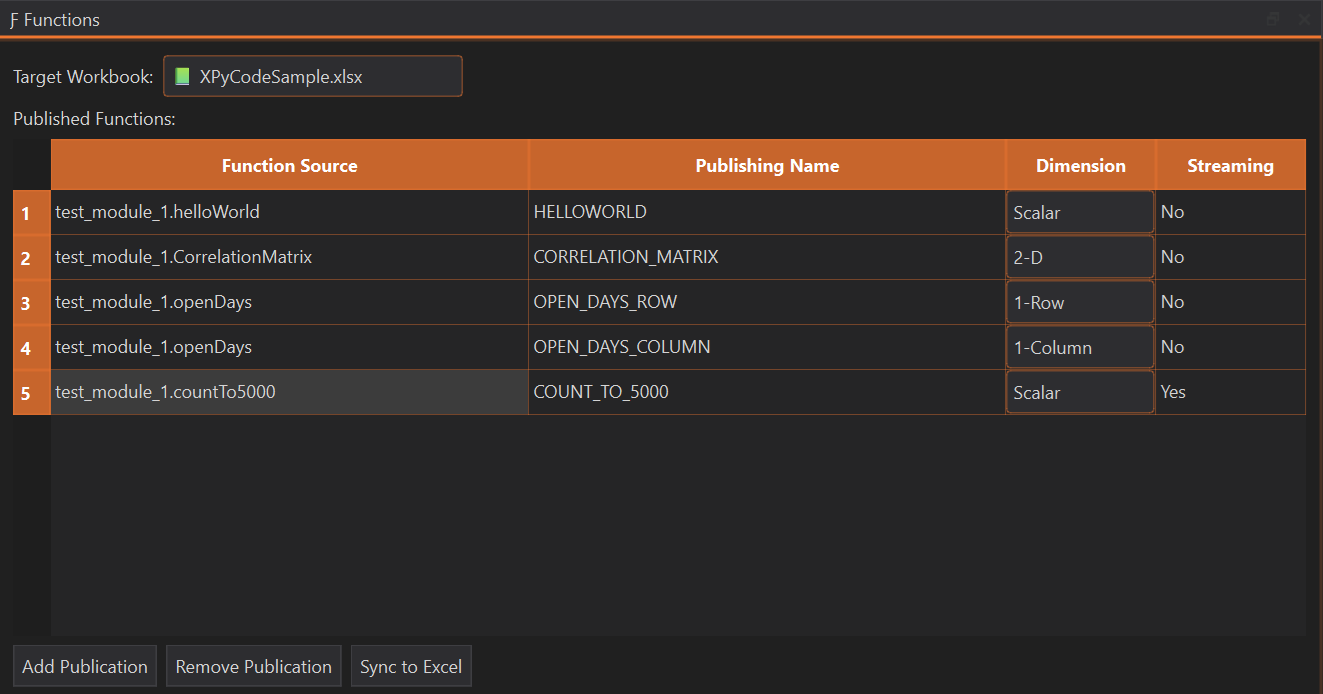
See the First Function guide for a detailed walkthrough.
Function Requirements
Basic Structure
def my_function(param1: type1, param2: type2) -> return_type:
    """Function docstring.

    Args:
        param1: Description
        param2: Description

    Returns:
        Description of return value
    """
    # Function body
    return result
Type Hints (Recommended)
Use type hints for better IntelliSense in Excel:
def calculate_payment(
    principal: float,
    rate: float,
    periods: int
) -> float:
    """Calculate loan payment amount."""
    return principal * (rate * (1 + rate)**periods) / ((1 + rate)**periods - 1)
Default Parameters
Provide default values for optional parameters:
def format_number(
    value: float,
    decimals: int = 2,
    thousands_sep: bool = True
) -> str:
    """Format a number as a string."""
    if thousands_sep:
        return f"{value:,.{decimals}f}"
    return f"{value:.{decimals}f}"
In Excel:
=FORMAT_NUMBER(1234.5)           → "1,234.50"
=FORMAT_NUMBER(1234.5, 0)        → "1,235"
=FORMAT_NUMBER(1234.5, 3, FALSE) → "1234.500"
Dimension Types
The dimension setting controls how your function send data to Excel:
Scalar Dimension
One value out
def add_tax(amount: float, rate: float = 0.1) -> float:
    """Add tax to an amount."""
    return amount * (1 + rate)
Usage in Excel:
Best for: Simple calculations, single-cell inputs
1-Row & 1-Column Dimension
1 dimension array out (element-wise)
1-Row: The output will be displayed in one row and several columns 1-Column: The output will be displayed in several rows and one column
def apply_discount(prices: list[float], discount: float) -> list[float]:
    """Apply discount to each price."""
    return [price * (1 - discount) for price in prices]
Usage in Excel (as array formula):
Each element is processed independently.
Best for: Transformations, element-wise operations
2-D
2 dimensions array out
The output will be displayed in one row and several columns
def create_multiplication_table(size: int) -> list[list[int]]:
    """Create a multiplication table."""
    return [[i * j for j in range(1, size + 1)] for i in range(1, size + 1)]
Usage in Excel:
Best for: Complex outputs, multi-dimensional results
Streaming Functions
Generator functions that yield results over time:
def fibonacci_sequence(count: int):
    """Generate Fibonacci numbers."""
    a, b = 0, 1
    for _ in range(count):
        yield a
        a, b = b, a + b
Configure as streaming in Function Publisher. Excel receives values as they're generated.
Streaming Behavior
Streaming functions are useful for: - Progress updates - Incremental calculations - Large result sets - Real-time data feeds
CPU-Friendly Streaming
The streaming implementation reads from generators with a small asyncio.sleep() interval, preventing 100% CPU usage during continuous updates.
Streaming Function Mutualization
In Excel, streaming functions with the same name and parameters are mutualized—they return the same result across all cells. To get independent streams per cell, add a unique parameter (e.g., a timestamp or cell reference) to differentiate each call. To restart all streaming functions from scratch, trigger a full calculation in Excel.
Publication Impact on Streaming
Any publication changes (even publishing non-streaming functions) or clicking the Sync to Excel button will reset all streaming functions, causing them to restart from the beginning.
Excel Integration
Function Names
Rules for Excel function names:
- UPPERCASE only (enforced by XPyCode to match Excel UDF naming convention)
- Letters, numbers, underscores
- Must start with a letter
- No spaces or special characters
- Maximum 255 characters (practical limit ~30)
Why UPPERCASE?
Excel's native User Defined Functions (UDFs) follow an UPPERCASE naming convention. XPyCode enforces this to ensure consistency with Excel's built-in functions and prevent naming conflicts.
Examples:
- ✅ CALCULATE_ROI, GET_PRICE, NPV_CUSTOM
- ❌ calculateROI, get-price, 123NPV
Return Values
Your function can return:
Scalar Values
Lists (Arrays)
2D Lists (Ranges)
Pandas DataFrames
Pandas Automatic Conversion
pandas Series and DataFrame objects are automatically converted to 2D arrays when sent to Excel, making them directly usable in cells and ranges.
Error Handling
Return Excel error codes:
def safe_divide(a: float, b: float) -> Union[float, str]:
    """Divide safely, returning Excel error on division by zero."""
    if b == 0:
        return "#DIV/0!"  # Excel error code
    return a / b
Excel error codes:
- #DIV/0! - Division by zero
- #N/A - Not available
- #NAME? - Invalid name
- #NULL! - Null value
- #NUM! - Invalid number
- #REF! - Invalid reference
- #VALUE! - Wrong value type
Type Conversions
XPyCode automatically converts between Python and Excel types:
| Python | Excel |
|---|---|
int, float |
Number |
str |
Text |
bool |
TRUE/FALSE |
None |
Empty cell |
list |
Array/Range |
datetime |
Date/Time |
Updating Functions
To modify a published function:
- Edit the Python code
- Save the module (auto-save enabled)
- Re-publish using Function Publisher
- Excel formulas update automatically
Force Recalculation
After republishing, press Ctrl+Alt+F9 in Excel to force recalculation of all formulas.
Unpublishing Functions
To remove a function from Excel:
- Open Function Publisher
- Select the function
- Click Remove Publication
Cells using the function will show #NAME? error.
Example Library
Create a custom function library:
# statistics.py - Custom statistical functions

import numpy as np
from scipy import stats
from typing import List, Union

def percentile_rank(value: float, data: List[float]) -> float:
    """Calculate percentile rank of a value in a dataset."""
    return stats.percentileofscore(data, value)

def z_score(value: float, data: List[float]) -> float:
    """Calculate z-score (standard score) of a value."""
    mean = np.mean(data)
    std = np.std(data, ddof=1)
    if std == 0:
        return float('inf') if value > mean else float('-inf')
    return (value - mean) / std

def moving_average(data: List[float], window: int) -> List[float]:
    """Calculate simple moving average."""
    if window <= 0 or window > len(data):
        return [float('nan')] * len(data)
    result = []
    for i in range(len(data)):
        if i < window - 1:
            result.append(float('nan'))
        else:
            result.append(sum(data[i-window+1:i+1]) / window)
    return result

def correlation_matrix(ranges: List[List[float]]) -> List[List[float]]:
    """Calculate correlation matrix for multiple data series."""
    data = np.array(ranges)
    return np.corrcoef(data).tolist()
Publish as: PERCENTILE_RANK, Z_SCORE, MOVING_AVERAGE, CORRELATION_MATRIX
Next Steps
-
Events
Learn to handle Excel events with Python.
-
Excel Objects
Work with workbooks, sheets, and ranges in Python.
-
Tutorials
Build practical functions with step-by-step tutorials.
Function Libraries
Build a library of reusable functions for your domain. Share the Python module with colleagues so they can use the same functions.
Excel Events
Handle Excel events with Python code to create interactive and responsive spreadsheets.
Overview
Excel events let you run Python code automatically when:
- A cell selection changes
- A worksheet is activated
- Cell values are edited
- A calculation completes
- The workbook is opened or closed
- All events managed by Microsoft Office.js
This enables:
- Validation - Check input data as it's entered
- Automation - Update cells automatically
- Monitoring - Log user actions
- Interactivity - Respond to user selections
Event Manager
Configure event handlers through the Event Manager panel:
- Open the Events tab (right dock)
- Select the workbook from the list
- Select the object for which you want to add an event handler
- Select the event you want to listen to on the right
- Either:
- Double-click to create a new handler (generates a function with the correct signature)
- Right-click and select Create New Handler... to create a new function
- Right-click and select Assign Handler... to select an existing function
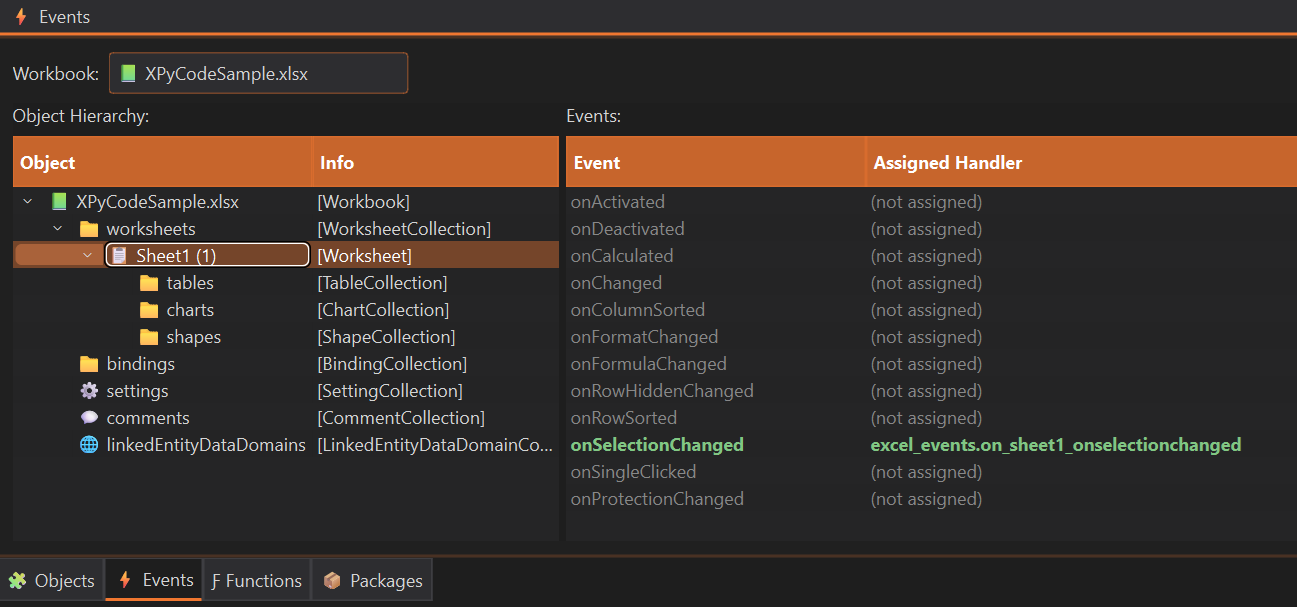
Available Events
Office.js Events
All Office.js events can be managed through XPyCode's Event Manager. For a complete list of available events, see the Excel JavaScript API Events documentation.
Unregister Handler
To stop listening to an event:
- Open the Events tab (right dock)
- Select the workbook from the list
- Select the object with the event handler you want to remove
- Select the event you want to stop listening to on the right
- Right-click and select Clear Handler
The event handler function remains in your code but is no longer triggered by the event.
Next Steps
-
Excel Objects
Learn to work with workbooks, sheets, and ranges.
-
Custom Functions
Publish Python functions as Excel formulas.
-
Automation Tutorial
Build automated workflows with events.
-
On-Time Events
Schedule Python functions with time-based triggers.
Start Simple
Begin with simple event handlers (logging, validation) before building complex automation. Test thoroughly to avoid infinite loops.
On-Time Events
Schedule Python functions to execute automatically based on time, repeating intervals, or specific datetimes — directly from the IDE's ⏱️ Timers panel.
Overview
On-time events let you run Python code on a schedule, independently of any Excel user action. Unlike regular Excel events (which fire when a user interacts with a workbook), on-time events are timer-based and are managed entirely by XPyCode.
Key characteristics:
- Three scheduling types — daily time, repeating interval, or one-shot datetime
- Per-workbook configuration — each workbook stores its own set of on-time events
- Persistent across sessions — the schedule is saved in the workbook and restored automatically on reconnect
- Managed from the IDE — use the ⏱️ Timers panel to add, edit, and delete events without touching code
Comparison with Excel Events
Regular Excel events (see Events Guide) fire in response to user actions such as cell edits or worksheet activation. On-time events fire based on the clock, regardless of what the user is doing.
Scheduling Types
XPyCode supports three scheduling types, each suited to a different use case.
Time — Daily Recurring
type="time" fires every day at a specific HH:MM time. You can optionally restrict it to certain weekdays.
| Field | Example | Description |
|---|---|---|
value |
"14:30" |
Time of day in 24-hour format (HH:MM) |
time_type |
"utc" or "local" |
Whether the time is interpreted as UTC or local clock |
days |
["Monday", "Friday"] |
Optional weekday filter — empty array means every day |
Example: Run at 14:30 every Monday and Friday
{
    "type": "time",
    "value": "14:30",
    "time_type": "local",
    "days": ["Monday", "Friday"],
    "module_name": "reports",
    "function_name": "generate_weekly_summary"
}
Delay — Repeating Interval
type="delay" fires repeatedly every N seconds. The interval restarts each time the handler completes.
| Field | Example | Description |
|---|---|---|
value |
60 |
Interval in seconds between each execution |
time_type |
"utc" or "local" |
Timezone context for the trigger timestamp |
Example: Refresh data every 60 seconds
{
    "type": "delay",
    "value": 60,
    "time_type": "local",
    "days": [],
    "module_name": "data_feed",
    "function_name": "refresh_prices"
}
DateTime — One-Shot
type="datetime" fires once at a specific date and time, then does not repeat.
| Field | Example | Description |
|---|---|---|
value |
"2026-03-15T14:30:00" |
ISO 8601 datetime string |
time_type |
"utc" or "local" |
Whether the datetime is UTC or local |
Example: Send a report on 15 March 2026 at 09:00
{
    "type": "datetime",
    "value": "2026-03-15T09:00:00",
    "time_type": "local",
    "days": [],
    "module_name": "reports",
    "function_name": "send_scheduled_report"
}
DateTime Events
A datetime event whose scheduled time has already passed when the workbook connects will not fire. Ensure the configured datetime is in the future.
Time Type
The time_type field controls how the scheduled value is interpreted:
| Value | Behaviour |
|---|---|
"utc" |
Fires at the same absolute moment worldwide, regardless of the local system clock |
"local" |
Fires when the local system clock shows the specified time |
Use "utc" for server-side or cross-timezone consistency. Use "local" when the schedule should follow the user's local timezone.
Timer Manager Panel
The ⏱️ Timers dock panel in the IDE lets you manage all on-time events for a workbook without editing code or configuration files directly.
Opening the Panel
- In the IDE, locate the right-side dock area
- Click the ⏱️ Timers tab
Panel Layout
- Workbook dropdown — select the workbook whose events you want to manage
-
Events table — lists all configured on-time events with columns:
Column Description Type time,delay, ordatetimeValue The scheduled value (e.g. "14:30",60,"2026-03-15T09:00:00")Time Type utcorlocalDays Weekday filter (for type="time"only)Module Python module containing the handler Function Handler function name -
Add / Edit / Delete buttons — manage events below the table
Adding an Event
- Select the target workbook from the dropdown
- Click Add
- Fill in the dialog form:
- Type — choose
time,delay, ordatetime - Value — enter
HH:MM, an integer (seconds), or an ISO datetime - Time Type — choose
utcorlocal - Days — tick weekdays (only available for
type="time") - Module — the Python module name containing your handler
- Function — the handler function name
- Type — choose
- Click OK to save
Editing an Event
- Select the row in the table and click Edit, or
- Double-click the row directly
The dialog opens pre-filled with the current values. Update fields as needed and click OK.
Deleting an Event
- Select the row in the table
- Click Delete
The event is removed immediately and will no longer fire.
Writing a Handler
On-time event handlers are regular Python functions that accept a single event argument (a dict).
Function Signature
Event Dictionary Keys
| Key | Type | Description |
|---|---|---|
event_id |
str |
UUID of the on-time event that fired |
event_type |
str |
"time", "delay", or "datetime" |
trigger_time |
str |
ISO 8601 timestamp when the event fired |
scheduled_value |
str \| int |
The configured value (e.g. "14:30", 60) |
Example Handler
import xpycode

def on_timer_refresh(event):
    """Handler for periodic data refresh.

    Args:
        event: Dict with keys:
            - event_id: The on-time event UUID
            - event_type: "time", "delay", or "datetime"
            - trigger_time: ISO timestamp when the event fired
            - scheduled_value: The configured value (e.g., "14:30", 60)
    """
    ws = xpycode.workbook.worksheets.getActiveWorksheet()
    # Your logic here...
    print(f"Timer fired at {event['trigger_time']}")
Execution Context
On-time event handlers execute inside the workbook's Python kernel, exactly like regular Excel event handlers. Long-running or blocking code will delay subsequent timer firings. Use asynchronous patterns or offload heavy work to background threads where possible.
Examples
Use Case 1 — Periodic Data Refresh
Refresh a live data feed every 30 seconds:
import xpycode
import requests

def refresh_live_data(event):
    """Fetch latest prices and write to the worksheet."""
    response = requests.get("https://api.example.com/prices")
    data = response.json()

    ws = xpycode.workbook.worksheets.getWorksheet("LiveData")
    ws.getRange("B2").values = [[data["AAPL"]]]
    ws.getRange("B3").values = [[data["MSFT"]]]

    print(f"Data refreshed at {event['trigger_time']}")
Timer Manager configuration:
| Field | Value |
|---|---|
| Type | delay |
| Value | 30 |
| Time Type | local |
| Module | data_feed |
| Function | refresh_live_data |
Use Case 2 — Daily Report Generation
Generate a summary report every weekday morning at 09:00:
import xpycode

def generate_daily_report(event):
    """Compile and format the daily summary report."""
    wb = xpycode.workbook
    ws_data = wb.worksheets.getWorksheet("Data")
    ws_report = wb.worksheets.getWorksheet("Report")

    # Read source data
    data_range = ws_data.getUsedRange()
    values = data_range.values

    # Write summary header
    ws_report.getRange("A1").values = [[f"Report generated: {event['trigger_time']}"]]

    print(f"Daily report complete ({event['trigger_time']})")
Timer Manager configuration:
| Field | Value |
|---|---|
| Type | time |
| Value | 09:00 |
| Time Type | local |
| Days | Monday, Tuesday, Wednesday, Thursday, Friday |
| Module | reports |
| Function | generate_daily_report |
Use Case 3 — One-Shot Scheduled Alert
Send a one-time notification at a specific date and time:
import xpycode

def send_deadline_alert(event):
    """Highlight deadline row and log the alert."""
    ws = xpycode.workbook.worksheets.getWorksheet("Projects")
    # Highlight the deadline row
    ws.getRange("A5:F5").format.fill.color = "#FF0000"
    print(f"Deadline alert fired at {event['trigger_time']}")
Timer Manager configuration:
| Field | Value |
|---|---|
| Type | datetime |
| Value | 2026-03-15T09:00:00 |
| Time Type | local |
| Module | alerts |
| Function | send_deadline_alert |
Delay Intervals
Avoid very short delay intervals (less than 5 seconds). Rapid repeated executions can impact Excel performance and may cause handlers to queue up if they take longer than the interval to complete.
Next Steps
-
Events Guide
Handle Excel events triggered by user actions.
-
Custom Functions
Publish Python functions as Excel formulas.
-
Automation Tutorial
Build automated workflows combining events and timers.
Package Management
Package Management
Install and manage Python packages for each workbook with automatic dependency resolution.
In This Section
-
Overview
Learn about the package manager features and how to install packages.
-
Algorithm
Understand how XPyCode's real-virtual environment works.
Package Management Overview
XPyCode includes a built-in package manager that lets you install and manage Python packages per workbook with automatic dependency resolution.
Key Features
- Per-Workbook Isolation - Each workbook has its own packages
- Out of Python Environment - Your python environment is not impacted by packages features
- PyPI Integration - Search and install from PyPI or another repository
- Dependency Resolution - Automatic dependency handling
- Version Control - Choose specific package versions
- Extras Support - Install with optional dependencies
- Python Paths - Manual addition of modules locations
- Cache - Local cache for all packages and versions
Package Manager Panel
Access the Package Manager from the left dock:
- Click the Packages tab
- Search for packages
- Select version and extras
- Click Install/Update
Searching Packages
- Type package name in search box
- Click Search
- Browse results
- Select a package version and potential extras
- Click Add to List to update the Packages list
Installing Packages
- Click Install/Update in Packages sub-widget
- Wait for installation to complete
Batch Package Resolution
The entire packages list is resolved and updated at once. Nothing is installed or changed until the Install/Update button is clicked. This allows you to queue multiple package changes before applying them.
Installation progress appears in the Console.
Updating Packages
- Find the installed package or double click on the package in the list
- Select a newer version
- Click Add to List
- Click Install/Update
Uninstalling Packages
- Find the installed package in the list
- Click Remove
- Click Install/Update
Configuring Package URLs
To configure custom package repositories:
- Navigate to File → Settings
- Select Package Management section
- Configure the following options:
- Pip Settings: Set custom repository URLs and proxy configuration
- API Mappings: Configure API URLs for package repositories (optional). PyPI provides an API that facilitates metadata retrieval. You can add additional API URLs if they comply with the PyPI format.
Next Steps
- Packages Algorithm - Detailed package installation logic
Package Management Algorithm
Detailed explanation of how XPyCode manages Python packages.
: material-cog-sync: Installation Logic
XPyCode builds a real-virtual environment.
This means it doesn't create a separate Python environment with its own binaries, core modules, and packages. Instead, on top of the current environment that launched it, XPyCode adds references to additional package locations.
This logic includes packages directly requested by the user (the Packages List) and their dependencies. For optimization and to avoid inconsistency, packages already installed in the Python environment are not re-downloaded—XPyCode uses them directly.
Impacts
Downloaded packages are cached in:
Disk Space
Duplicating multiple versions of heavy packages can lead to significant disk space usage.
! !! note "Package Compatibility" This methodology allows installation of packages without wheels that may need local setup at installation. Nevertheless, there may be edge cases not well managed. We are at the early stages of this project—please report any issues you encounter.
Next Steps
- Data Analysis Tutorial - Use pandas with Excel
- Package Management Overview - Return to the overview
Service Management
Run XPyCode as a system service for automatic startup and background operation.
Overview
The service management feature enables XPyCode to run as a system service, providing:
- Automatic Startup - Start with your system without manual intervention
- Background Operation - Run continuously in the background
- System Integration - Leverage native service managers on each platform
Supported Platforms
- Windows - Uses
pywin32for Windows Service integration - Linux - Uses
systemdfor service management - macOS - Uses
launchdfor daemon management
Installation as a Service
Windows
Windows service installation uses pywin32 and integrates with Windows Services Manager.
# Install service (auto-start by default)
python -m xpycode_master service install

# Install without auto-start
python -m xpycode_master service install --no-auto-start

# Install with custom arguments
python -m xpycode_master service install --args "--log-level DEBUG"
Administrator Privileges
Windows service operations require Administrator privileges. Run your terminal as Administrator.
Linux
Linux service installation uses systemd for service management.
Sudo Required
On Linux, systemd operations require root privileges. Always use sudo for service management commands.
macOS
macOS service installation uses launchd for daemon management.
User vs System Launch Agents
macOS installs as a user launch agent by default, which starts when you log in. System-wide daemons are not supported in this version.
Service Management Commands
Start Service
Start the XPyCode service:
Service Started
The service will start in the background. You can verify status with the status command.
Stop Service
Stop a running service:
Restart Service
Restart the service (stop then start):
When to Restart
Restart after updating XPyCode or changing service configuration.
Check Status
Get the current service status:
Output shows: - Service state (running, stopped, not installed) - Process ID (if running) - Auto-start configuration - Service arguments
Set Automatic Startup
Configure the service to start automatically on system boot:
Set Manual Startup
Configure the service for manual start only:
Update Service Arguments
Change the arguments passed to the XPyCode service:
Restart Required
After updating arguments, restart the service for changes to take effect.
Uninstall Service
Remove the service from your system:
Permanent Removal
This removes the service configuration. You'll need to run install again to re-enable service mode.
Configuration
Service configuration is stored in a JSON file.
Configuration Location
On Windows: %USERPROFILE%\.xpycode\service_config.json
Configuration Options
- args - Command-line arguments passed to XPyCode on startup
- auto_start - Whether to start automatically on system boot
Manual Configuration
You can edit this file directly, but using set-args and set-auto/set-manual commands is recommended.
Viewing Logs
Windows
View service logs in Windows Event Viewer:
- Open Event Viewer (eventvwr.msc)
- Navigate to Windows Logs → Application
- Filter by source:
xpycode_master
PowerShell Command:
Event Viewer Access
Event Viewer logs are available to all users, but some events may require Administrator privileges to view.
Linux
View service logs using journalctl:
# Follow logs in real-time
journalctl -u xpycode.service -f

# View last 100 lines
journalctl -u xpycode.service -n 100

# View logs since boot
journalctl -u xpycode.service -b
Journal Permissions
You may need to use sudo to view system journal entries depending on your configuration.
macOS
View service logs using log show:
# View logs from the last hour
log show --predicate 'subsystem == "com.xpycode.master"' --last 1h

# Follow logs in real-time
log stream --predicate 'subsystem == "com.xpycode.master"'

# View today's logs
log show --predicate 'subsystem == "com.xpycode.master"' --info --debug --last 1d
Unified Logging
macOS uses the Unified Logging system. Logs are stored in binary format and accessed via the log command.
Troubleshooting
Service Won't Start
Check Permissions:
- Windows: Ensure running as Administrator
- Linux: Use
sudofor service commands - macOS: Check launch agent permissions with
launchctl list
Verify Installation:
If "not installed", run the install command again.
Service Crashes on Startup
Check Logs:
Review platform-specific logs (see Viewing Logs) for error messages.
Common Issues:
- Port conflicts - Another service using the same port
- Missing dependencies - Run
pip install --upgrade xpycode_master - Invalid arguments - Check
service_config.jsonfor malformed args
Test Manually:
Run XPyCode manually to see errors directly:
Service Status Shows "Unknown"
This can happen when:
- Service manager hasn't updated state yet (wait a few seconds)
- Service was modified outside XPyCode commands
- Platform-specific service manager has issues
Fix:
# Uninstall and reinstall
python -m xpycode_master service uninstall
python -m xpycode_master service install
Windows Service Control Manager Errors
If you see "Access Denied" or similar errors:
- Open Command Prompt or PowerShell as Administrator
- Verify Windows Service Manager has permission to start services
- Check Windows Event Viewer for detailed error messages
Linux systemd Unit Not Found
If systemctl reports unit not found:
# Check if unit file exists
ls -la /etc/systemd/system/xpycode.service

# Reload systemd
sudo systemctl daemon-reload

# Reinstall service
sudo python -m xpycode_master service install
macOS Launch Agent Not Loading
If launchd won't load the agent:
# Check for errors
launchctl list | grep xpycode

# View detailed status
launchctl print gui/$(id -u)/com.xpycode.master

# Unload and reload
launchctl unload ~/Library/LaunchAgents/com.xpycode.master.plist
launchctl load ~/Library/LaunchAgents/com.xpycode.master.plist
Permission Denied Errors
Windows: - Run terminal as Administrator - Check user account has service installation rights
Linux:
- Use sudo for all service commands
- Verify user is in appropriate groups (systemd-journal for log viewing)
macOS:
- User launch agents don't require sudo
- Check file permissions in ~/Library/LaunchAgents/
Tips
- Start Simple: Install with defaults first, customize later
- Check Logs: Always review logs when troubleshooting
- Test Manually: Run XPyCode manually before installing as service
- Auto-start: Enable auto-start only after verifying service works correctly
Next Steps
- Settings - Configure XPyCode preferences
- IDE Overview - Learn about IDE features
- Troubleshooting - General troubleshooting guide
Settings
Configure XPyCode to match your preferences and workflow.
Accessing Settings
Open settings dialog:
- File → Settings
View Settings
IDE Theme
Choose interface theme:
- XPC Dark (default) - Dark theme optimized for coding
- XPC Light - Light theme for bright environments
- And several other themes to suit your preference
Editor Theme
Choose code editor colors:
- VS Dark (default) - Visual Studio Code dark
- VS Light - Visual Studio Code light
- Plus additional editor themes to match your coding style
Font Size
Adjust text size:
- Default: 14
- Range: 8-24
Editor Settings
Tab Size
Spaces per indentation level:
- Default: 4 (PEP 8 standard)
- Range: 2-8
Insert Spaces
Use spaces instead of tabs:
- Default: Enabled
- Recommended for Python (PEP 8)
Word Wrap
Wrap long lines:
- Default: Disabled
- Enable for better readability
Minimap
Show code overview:
- Default: Enabled
- Disable to maximize editing space
Hover Style
Control the detail level of hover tooltips when you hover over code elements:
- Compact (default) - Brief information
- Detailed - Comprehensive information with extended documentation
Console Settings
Output Level
Control which messages appear:
- SIMPLE - Messages for usual users
- DETAILED - More messages, including a more verbose communication for advanced users
- COMPLETE - Show everything. Including some logging messages from all XPyCode components
Default: COMPLETE
Max Lines
Maximum console history:
- Default: 1000
- Range: 100-10000
Clear on Run
Auto-clear console:
- Default: Enabled
- Starts fresh for each execution
Console Only IDE
Filter IDE messages:
- Default: Disabled
- Shows only your code output when enabled
Tips
- Experiment with themes to find what works best
- Adjust font size for your display resolution
- Enable word wrap for long comments/docstrings
- Use "Clear on Run" to keep console clean
Next Steps
- IDE Overview - Learn about IDE features
- Editor Guide - Master the code editor
Tutorials
Data Analysis with Pandas
Learn to use pandas for data analysis in Excel with this hands-on tutorial.
Tutorial Goals
By the end of this tutorial, you'll be able to:
- Load data from Excel into pandas DataFrames
- Clean and transform data
- Perform statistical analysis
- Write results back to Excel
Setup
Install Pandas
- Open Package Manager
- Search for "pandas"
- Install latest version
Pre-installed Package
This tutorial uses pandas for demonstration purposes. Since pandas is a core XPyCode package, it's already installed by default—no installation needed!
Create a New Module
- Right-click your workbook in Project Explorer
- Select New Module
- Name it
data_analysis
Load Data from Excel
import pandas as pd
import xpycode

def load_data_from_excel() -> pd.DataFrame:
    """Load data from active worksheet into a DataFrame.

    Returns:
        DataFrame with the loaded data
    """
    # Get active worksheet (Office.js method)
    ws = xpycode.workbook.worksheets.getActiveWorksheet()

    # Read data range (assuming headers in row 1)
    # values returns 2D array
    data = ws.getRange("A1:D100").values

    # Convert to DataFrame (first row is headers)
    df = pd.DataFrame(data[1:], columns=data[0])

    print(f"Loaded {len(df)} rows")
    print(df.head())
    return df
Clean Data
def clean_data(df: pd.DataFrame) -> pd.DataFrame:
    """Clean the data by removing missing values and duplicates.

    Args:
        df: Input DataFrame

    Returns:
        Cleaned DataFrame
    """
    # Remove missing values
    df = df.dropna()

    # Convert data types
    df['Age'] = df['Age'].astype(int)
    df['Score'] = df['Score'].astype(float)

    # Remove duplicates
    df = df.drop_duplicates()

    print(f"After cleaning: {len(df)} rows")
    return df
Analyze Data
def analyze_data(df: pd.DataFrame) -> dict:
    """Analyze data with descriptive statistics.

    Args:
        df: DataFrame to analyze

    Returns:
        Dictionary with analysis results
    """
    # Descriptive statistics
    stats = df.describe()
    print(stats)

    # Group by and aggregate
    summary = df.groupby('Category').agg({
        'Score': ['mean', 'min', 'max', 'std'],
        'Age': 'mean'
    })
    print(summary)

    # Calculate correlations
    corr = df[['Age', 'Score']].corr()
    print(corr)

    return {'stats': stats, 'summary': summary, 'corr': corr}
Write Results to Excel
def write_results_to_excel(summary: pd.DataFrame):
    """Write analysis results to Excel.

    Args:
        summary: Summary DataFrame to write
    """
    # Get worksheet by name (Office.js method)
    ws_summary = xpycode.workbook.worksheets.getItem("Summary")

    # Convert summary to 2D array for writing
    summary_data = summary.reset_index()

    # Write to Excel (2D array for ranges)
    ws_summary.getRange("A1").getResizedRange(len(summary_data.index),len(summary_data.columns)-1).values = summary_data

    print("Results written to Summary sheet")
Tips
Office.js Range.values Requirements
- The Office.js
Rangeobject'svaluesattribute requires 2-D arrays with the exact size (or accepts a scalar if it represents only one cell) - The
getResizedRange()method takes "The number of rows and columns by which to expand..." — don't confuse it with COM Range object'sResizemethod that takes the size of the future range
Next Steps
- API Integration Tutorial - Fetch external data
- Automation Tutorial - Automate Excel tasks
- Custom Functions - Create pandas-powered functions
API Integration
Learn to fetch data from REST APIs and display it in Excel.
Tutorial Goals
- Make HTTP requests from Python
- Parse JSON responses
- Write API data to Excel
- Create custom functions that fetch live data
Setup
Install Requests
Create Module
Create api_functions.py module.
Basic API Request
import requests
import xpycode

def fetch_exchange_rate(from_currency: str, to_currency: str) -> float:
    """Fetch currency exchange rate from API."""
    url = f"https://api.exchangerate-api.com/v4/latest/{from_currency}"

    response = requests.get(url)
    data = response.json()

    rate = data['rates'][to_currency]
    return rate
Write to Excel
import requests
import xpycode

def update_exchange_rates():
    """Fetch and update exchange rates in Excel."""
    currencies = ["EUR", "GBP", "JPY", "CAD"]
    ws = xpycode.workbook.worksheets.getActiveWorksheet()

    # Write headers (scalars work for single cells)
    ws.getRange("A1").values = "Currency"
    ws.getRange("B1").values = "Rate"

    # Fetch and write rates
    for i, currency in enumerate(currencies, start=2):
        rate = fetch_exchange_rate("USD", currency)
        ws.getRange(f"A{i}").values = currency
        ws.getRange(f"B{i}").values = rate

    print("Exchange rates updated!")
Publish as Function
Create a custom function:
def GET_EXCHANGE_RATE(from_curr: str, to_curr: str) -> float:
    """Get current exchange rate.

    Args:
        from_curr: Source currency code (e.g., "USD")
        to_curr: Target currency code (e.g., "EUR")

    Returns:
        Exchange rate
    """
    try:
        url = f"https://api.exchangerate-api.com/v4/latest/{from_curr}"
        response = requests.get(url, timeout=5)
        data = response.json()
        return data['rates'][to_curr]
    except Exception as e:
        return f"#N/A: {str(e)}"
Publish using Function Publisher as GET_EXCHANGE_RATE.
Use in Excel:
Publish as Streaming Function
Create a custom function:
import requests
import datetime
import time

def GET_ISS_POSITION_UNTIL(until):
    """Get the current ISS position repeatedly.

    Args:
        until: A datetime, something convertible to datetime, or None.
               If conversion fails, runs forever.

    Yields:
        dict with latitude, longitude, and timestamp
    """

    # Try to normalize `until` to a datetime
    infinite = False
    if until is None:
        infinite = True
    else:
        try:
            if not isinstance(until, datetime.datetime):
                until = datetime.datetime.fromisoformat(str(until))
        except Exception:
            infinite = True

    while infinite or datetime.datetime.utcnow() < until:
        try:
            url = "http://api.open-notify.org/iss-now.json"
            response = requests.get(url, timeout=5)
            data = response.json()

            position = {
                "latitude": float(data["iss_position"]["latitude"]),
                "longitude": float(data["iss_position"]["longitude"]),
                "timestamp": datetime.datetime.utcfromtimestamp(
                    int(data["timestamp"])
                )
            }

            yield f"{position['latitude']} x {position['longitude']}"

        except Exception as e:
            yield str({"error": str(e)})

        time.sleep(5)
Publish using Function Publisher as GET_ISS_POSITION_UNTIL.
Use in Excel:
Passing None Values
To pass None to a Python function from Excel, include the argument position but leave it empty. For example, =MY_FUNCTION(A1, , B1) passes None as the second argument.
Next Steps
- Data Analysis Tutorial - Process API data with pandas
- Automation Tutorial - Schedule automatic updates
Excel Automation
Automate Excel tasks using Python events and scheduled operations.
Tutorial Goals
- Respond to Excel events automatically
- Validate and transform data on entry
- Create automated reporting workflows
- Build interactive dashboards
Auto-Calculate Totals
Create an event handler that calculates totals automatically:
import xpycode

def auto_calculate_totals(event):
    """Auto-calculate row totals when data changes."""
    # Get worksheet (Office.js method)
    ws = xpycode.worksheets.getItem(event_args.worksheetId)

    # Only handle Data sheet, columns B and C
    if ws.name != "Data":
        return

    if not (event.address.startswith("B") or event.address.startswith("C")):
        return

    # Extract row number
    row = int(''.join(filter(str.isdigit, event.address)))

    # Get values (returns 2D array when reading)
    qty = ws.getRange(f"B{row}").values[0][0] or 0
    price = ws.getRange(f"C{row}").values[0][0] or 0

    # Calculate and write total (can use scalar for single cell)
    total = qty * price
    ws.getRange(f"D{row}").values = total

    print(f"Updated total for row {row}: {total}")
Register this function for onChanged of Data worksheet event in Event Manager.
Using Bindings for Targeted Events
You can also create a binding on specific cells using the add-in and add an event handler on this binding to trigger the event only when those cells change, providing more targeted event handling.
Data Validation
Validate input automatically:
import xpycode

def validate_email(event):
    """Validate email addresses as they're entered."""
    # Only validate column D (Email)
    if not event.address.startswith("D"):
        return

    # Get worksheet and range
    ws = xpycode.worksheets.getItem(event_args.worksheetId)
    email_cell = ws.getRange(event.address)
    email = email_cell.values[0][0]

    if email is None or email == "":
        return

    # Simple email validation
    if "@" not in email or "." not in email.split("@")[1]:
        # Invalid email - clear cell and show message
        email_cell.values = [[None]]
        print(f"Invalid email format: {email}")

        # Optionally write error to adjacent cell
        row = int(''.join(filter(str.isdigit, event.address)))
        ws.getRange(f"E{row}").values = [["Invalid email"]]
    else:
        # Valid email - clear any previous error
        row = int(''.join(filter(str.isdigit, event.address)))
        ws.getRange(f"E{row}").values = [[""]]
        print(f"Valid email: {email}")
Register for onChanged of the requested worksheet event in Event Manager.
Using Bindings for Targeted Events
You can also create a binding on specific cells using the add-in and add an event handler on this binding to trigger the event only when those cells change, providing more targeted event handling.
Dynamic Reports
Generate reports automatically:
import xpycode
import pandas as pd
from datetime import datetime

def generate_daily_report(event):
    """Generate report when Summary sheet is activated."""
    # Get worksheet (Office.js method)
    ws = xpycode.worksheets.getItem(event_args.worksheetId)

    if ws.name != "Summary":
        return

    # Get worksheets (Office.js method)
    wb = xpycode.workbook
    ws_data = wb.worksheets.getItem("Data")
    ws_summary = wb.worksheets.getItem("Summary")

    # Load data (values is 2D array)
    data = ws_data.getRange("A1:D100").values
    df = pd.DataFrame(data[1:], columns=data[0])

    # Generate summary
    summary = df.groupby('Category').agg({
        'Amount': ['sum', 'mean', 'count']
    }).reset_index()

    # Write to summary sheet (2D array for ranges, or scalar for single cells)
    ws_summary.getRange("A1").values = f"Report Generated: {datetime.now()}"
    output_data = [summary.columns.tolist()] + summary.values.tolist()
    ws_summary.getRange("A3").values = output_data

    print("Report generated successfully!")
Register for onActivated event.
Interactive Dashboard
Create an interactive dashboard:
import xpycode

def update_dashboard(event):
    """Update dashboard charts when selection changes."""
    # Get worksheet (Office.js method)
    ws = xpycode.worksheets.getItem(event_args.worksheetId)

    if ws.name != "Dashboard":
        return

    # Get selected category from dropdown cell (values is 2D array)
    selected_category = ws.getRange("B1").values[0][0]

    if selected_category is None:
        return

    # Load and filter data
    ws_data = xpycode.workbook.worksheets.getItem("Data")
    data = ws_data.getRange("A1:D100").values

    # Filter for selected category (data[0] is headers)
    filtered = [row for row in data[1:] if row[0] == selected_category]

    # Write filtered data for chart (include headers)
    output_data = [data[0]] + filtered
    ws.getRange("A5").values = output_data

    print(f"Dashboard updated for: {selected_category}")
Register for onSelectionChanged event.
Complete Workflow
Combine multiple automation techniques:
import xpycode
import pandas as pd
from datetime import datetime

# 1. Validate inputs
def validate_input(event):
    """Validate data as it's entered."""
    # Validation logic here
    pass

# 2. Auto-calculate
def auto_calculate(event):
    """Calculate dependent values."""
    # Calculation logic here
    pass

# 3. Update summary
def update_summary(event):
    """Update summary when data changes."""
    ws = xpycode.workbook.worksheets.getItem(event.worksheet)

    # Recalculate totals (values returns 2D array when reading)
    data = ws.getRange("A2:D100").values
    total = sum(row[3] for row in data if row[3] is not None)

    # Write totals (can use scalar for single cells)
    ws.getRange("F2").values = total
    ws.getRange("F1").values = f"Last Updated: {datetime.now()}"

# Register all handlers in Event Manager
Next Steps
- Events Guide - Learn about all event types
- Excel Objects - Master Excel object manipulation
- Custom Functions - Create automated functions
Cross-Module Code Sample
Learn how to call functions from one in-memory module within another module in the same workbook.
Codes
from_module
to_module_good
to_module_bad
Import Best Practice
Always import in-memory modules within functions, not at the module level. This ensures you always get the latest version of the module. You'll understand why this matters in the example below.
Publish the functions using_another_module_good and using_another_module_bad.
In Excel:
=USING_ANOTHER_MODULE_GOOD()  → returns "A First Value"
=USING_ANOTHER_MODULE_BAD()   → returns "A First Value"
Development Action
Now the XPyCode user changes from_module:
from_module
Force function recomputation (Ctrl+Alt+F9).
In Excel:
=USING_ANOTHER_MODULE_GOOD()  → returns "A Second Value"
=USING_ANOTHER_MODULE_BAD()   → returns "A First Value"
Why Does This Happen?
XPyCode automatically updates from_module when the code changes.
However, in to_module_bad, the module itself was not changed, so it wasn't reloaded. The from_module variable at the module level still references the old compiled version of the module.
In to_module_good, the from_module variable inside the function is retrieved from sys.modules at each function call, ensuring you always get the latest version.
Frequently Asked Questions
Find answers to common questions about XPyCode.
Events
Why don't I see all the events I was used to having in VBA?
XPyCode uses events provided by Microsoft's Office.js JavaScript API, which is a newer technology than VBA. The available events are determined by Microsoft, not XPyCode. As Microsoft adds more events to Office.js, they will become available in XPyCode.
All my events are deactivated, why?
You have probably set the EnableEvents setting to False. You can turn it back to True via the Add-in Settings (⚙️ icon in the taskpane header).
Where are double-click events?
Double-click events are not available in Office.js. Consider adapting your workflow to be more "web-oriented" by using single clicks instead of double clicks.
When an error occurs on a binding onDataChanged event, all the binding events stop working
This is a known issue currently under investigation. As a workaround, close and reopen the workbook to restore event functionality.
Why does the sample use worksheet events instead of bindings?
Binding events (especially onDataChanged) have some behaviors that are not yet fully managed by XPyCode. While bindings provide more targeted event handling, they can raise unexpected issues. Using worksheet events with range intersection checks is currently more reliable, though slightly slower.
Connection & Startup
My connection is closed and the add-in reconnects when I don't use Excel for a while
This occurs because Excel puts the add-in in pause mode when not actively used. This is a Microsoft behavior that XPyCode cannot bypass at this time.
At opening, I have a streaming function raising an error like "AttributeError: Attribute worksheets not found on OfficeJs object"
This happens because the streaming function runs while Excel is still initializing. To fix this, enable the "Start XPyCode when workbook opens" setting in the taskpane Settings (⚙️). This ensures the add-in is ready before functions execute.
When opening an Excel file, I see the workbook appearing and disappearing repeatedly in the Editor
This occurs when a function or streaming function tries to run while the add-in is not yet open. Enable the "Start XPyCode when workbook opens" setting to resolve this issue.
All the events and functions I created are not working when I open the workbook
This happens because the add-in has not been launched. Click the Open Console button in the Excel Ribbon to start XPyCode, or enable "Start XPyCode when workbook opens" in the Settings so the add-in starts automatically with the workbook.
Errors & Troubleshooting
My registered custom functions are not recognized when I open a saved workbook
This can occurs if it is the first workbook using XPyCode Add-in and it has "Start XPyCode when workbook opens" enabled. It is a known issue under resolution.
In this case close and reopen the workbook or open an empty workbook and activate the Add-in with Show Console before opening your saved workbook.
I have this error: "Cannot use the object across different request contexts." What does it mean?
This error typically occurs when you try to set an attribute (like Range values) using an Excel object (like a Range) instead of a standard Python type (string, float, list, etc.).
Example of what causes the error:
# Wrong - passing a Range object
source_range = ws.getRange("A1:B10")
target_range.values = source_range  # Error!
Correct approach:
# Right - passing the values (a Python list)
source_range = ws.getRange("A1:B10")
target_range.values = source_range.values  # Works!
I have too many dialog boxes queued up. How can I dismiss them all at once?
Go to Add-in Advanced Actions (⚡ icon), select the Add-in tab, and click "Flush Messages" to clear all pending dialogs.
My streaming function is blocked
Check if Excel is in manual calculation mode. When you set calculation to manual while updating cells, don't forget to set it back to automatic. It's best practice to use a try/finally block to ensure calculation mode is restored even if an error occurs:
import xpycode

def my_streaming_function():
    # Save current calculation mode
    calc_mode = xpycode.workbook.application.calculationMode
    try:
        # Set to manual for bulk updates
        xpycode.workbook.application.calculationMode = "Manual"
        # ... your updates here ...
    finally:
        # Always restore calculation mode
        xpycode.workbook.application.calculationMode = calc_mode
How do I reset the Python kernel if it's stuck?
You can restart the kernel in two ways:
- From the Add-in: Go to Advanced Actions (⚡ icon) and click Restart Kernel
- From the IDE: Go to Advanced menu → Restart Kernel
Note that restarting the kernel will clear all Python objects in memory, including those saved in the Objects Keeper.
API & Code
Why does the xpycode module have both "excel" and "Excel" attributes?
Excel(uppercase) is the class used for type hints and IntelliSense/autocompletion in your IDEexcel(lowercase) is used to access static methods and enums of the class (think of it as the singleton instance, even though it's not technically one on the Office.js side)
Why are Union and Intersect in xpycode.Tools when they exist in workbook.application?
The Office.js Union and Intersect methods have reliability issues in the context of XPyCode, so we've implemented more robust versions in xpycode.Tools. Use these instead for consistent behavior.
How can I make my code run faster?
Here are some performance tips:
- Batch read operations: Getting data has a fixed time cost regardless of size. Prefer reading a range of data at once and parsing it in Python rather than reading cell by cell.
# Slow - cell by cell
for i in range(100):
    value = ws.getRange(f"A{i+1}").values[0][0]

# Fast - batch read
all_values = ws.getRange("A1:A100").values
for row in all_values:
    value = row[0]
- Batch write operations: Set values for entire ranges instead of cell by cell.
# Slow - cell by cell
for i, value in enumerate(data):
    ws.getRange(f"A{i+1}").values = [[value]]

# Fast - batch write
ws.getRange(f"A1:A{len(data)}").values = [[v] for v in data]
-
Batch formatting: Use
xpycode.Tools.Unionto format multiple ranges at once instead of formatting cell by cell. -
Use transactions for bulk operations: Wrap multiple write operations in a transaction to avoid syncing after each operation.
# Without transaction - syncs after each write
for i, value in enumerate(data):
    ws.getRange(f"A{i+1}").values = [[value]]

# With transaction - single sync at end
with xpycode.transaction():
    for i, value in enumerate(data):
        ws.getRange(f"A{i+1}").values = [[value]]
How can I batch multiple Excel operations for better performance?
Use xpycode.transaction() to batch multiple operations:
import xpycode

with xpycode.transaction():
    ws = xpycode.workbook.worksheets.getActiveWorksheet()
    # All these operations are batched
    ws.getRange("A1").values = "Header 1"
    ws.getRange("B1").values = "Header 2"
    ws.getRange("A2:B100").values = [[i, i*2] for i in range(99)]
    # Single sync happens at the end
For write-only operations, use xpycode.blockingTransaction() which will raise an error if you accidentally try to read values, ensuring no intermediate syncs occur.
Can I use multiple workbooks with XPyCode at the same time?
Yes! Each workbook has its own isolated Python kernel, set of modules, installed packages, and published functions. This prevents conflicts between different Excel projects and allows each workbook to have different dependencies.
Addin Modes
What's the difference between local and external addin modes?
- External mode (default): The add-in UI is served from
https://addin.xpycode.com. No certificate setup required but needs internet. - Local mode (
--use-local-addin): The add-in UI is served from a local HTTPS server on your machine. Requires self-signed certificates (created and registerd automatically on windows if user rights permit it).
In both modes, the Python kernel runs locally on your machine.
I switched between local and external mode and now the add-in doesn't work
The Excel add-ins cache clearing is automatic. If it doesn't work, you need to:
- Close all Excel workbooks before starting xpycode_master with the new mode
- Clear the Office add-in cache folder:
- Windows:
%LOCALAPPDATA%\Microsoft\Office\16.0\Wef\ - macOS:
~/Library/Containers/com.microsoft.Excel/Data/Documents/wef/ - Restart Excel and re-add XPyCode from Shared Folder
Which mode should I use?
- Use external mode (default) for simpler setup and easier troubleshooting
- Use local mode (
--use-local-addin) if you want full control and avoid external calls to xpycode website
Getting Help
If your question isn't answered here:
- Check the Troubleshooting Guide for common issues
- Review the User Guide for detailed feature documentation
- Report issues on our GitHub Issues page
Reference
Keyboard Shortcuts
Complete reference of all keyboard shortcuts in XPyCode IDE.
Execution
| Action | Shortcut | Description |
|---|---|---|
| Run Code | F5 or Ctrl+R | Execute current module |
| Debug Code | Shift+F5 | Start debugging |
Debugging
| Action | Shortcut | Description |
|---|---|---|
| Toggle Breakpoint | F9 | Add/remove breakpoint on current line |
| Continue | Shift+F5 | Resume execution until next breakpoint |
| Step Over | F10 | Execute current line, skip function calls |
| Step Into | F11 | Step into function calls |
| Step Out | Shift+F11 | Finish current function and return to caller |
File Operations
| Action | Shortcut | Description |
|---|---|---|
| New Module | Ctrl+N | Create new module |
Editing
| Action | Shortcut | Description |
|---|---|---|
| Undo | Ctrl+Z | Undo last change |
| Redo | Ctrl+Y or Ctrl+Shift+Z | Redo undone change |
| Cut | Ctrl+X | Cut selected text |
| Copy | Ctrl+C | Copy selected text |
| Paste | Ctrl+V | Paste from clipboard |
| Select All | Ctrl+A | Select all text in editor |
| Delete Line | Ctrl+Shift+K | Delete entire current line |
| Duplicate Line | Shift+Alt+Down | Copy line down |
| Move Line Up | Alt+Up | Move current line up |
| Move Line Down | Alt+Down | Move current line down |
| Comment Line | Ctrl+/ | Toggle line comment |
| Indent | Tab | Indent line or selection |
| Unindent | Shift+Tab | Unindent line or selection |
Search and Navigation
| Action | Shortcut | Description |
|---|---|---|
| Find | Ctrl+F | Search in current file |
| Replace | Ctrl+H | Find and replace |
| Find Next | F3 or Enter | Find next occurrence |
| Find Previous | Shift+F3 | Find previous occurrence |
| Go to Line | Ctrl+G | Jump to specific line number |
Multi-Cursor
| Action | Shortcut | Description |
|---|---|---|
| Add Cursor | ++alt+click++ | Add cursor at click position |
| Add Cursor Above | Ctrl+Alt+Up | Add cursor on line above |
| Add Cursor Below | Ctrl+Alt+Down | Add cursor on line below |
| Select All Occurrences | Ctrl+Shift+L | Add cursor at all occurrences of selected word |
| Cancel Multi-Cursor | Esc | Return to single cursor |
Code Assistance
| Action | Shortcut | Description |
|---|---|---|
| Trigger Suggest | Ctrl+Space | Show code completion suggestions |
| Trigger Parameter Hints | Ctrl+Shift+Space | Show function parameter information |
Code Folding
| Action | Shortcut | Description |
|---|---|---|
| Fold | ++ctrl+shift+bracketleft++ | Collapse code block |
Tab Management
| Action | Shortcut | Description |
|---|---|---|
| Next Tab | Ctrl+Tab | Switch to next editor tab |
| Previous Tab | Ctrl+Shift+Tab | Switch to previous editor tab |
Application
| Action | Shortcut | Description |
|---|---|---|
| Settings | Ctrl+, | Open settings dialog (if supported) |
| Command Palette | Ctrl+Shift+P | Show command palette (if supported) |
| Close | Alt+F4 | Close application (no exit) |
Tips
- Many shortcuts work like VS Code since Monaco Editor is used
- Some shortcuts may vary by operating system
- Hold Ctrl for Windows/Linux, Cmd for macOS equivalent
Related
- Editor Guide - Learn editor features
- Debugging Guide - Master debugging
- IDE Overview - Explore IDE capabilities
xpycode API Reference
Overview
The xpycode module provides Python access to Excel through an API that mirrors Microsoft's Office.js Excel API. If you're familiar with Office.js, you'll feel right at home.
Key difference from Office.js JavaScript: You don't need to call context.sync() - xpycode handles synchronization automatically.
Module Entry Points
import xpycode

xpycode.workbook      # Excel.Workbook - the active workbook
xpycode.worksheets    # Excel.WorksheetCollection - shortcut to workbook.worksheets
xpycode.context       # Excel.RequestContext (rarely needed)
xpycode.win32         # Win32 COM access (Windows only)
Working with Workbooks
# Get workbook properties
name = xpycode.workbook.name

# Access worksheets collection
worksheets = xpycode.workbook.worksheets
Working with Worksheets
# Get active worksheet
ws = xpycode.workbook.worksheets.getActiveWorksheet()

# Get worksheet by name
ws = xpycode.workbook.worksheets.getItem("Sheet1")

# Get worksheet by index (0-based)
ws = xpycode.workbook.worksheets.getItemAt(0)

# Get worksheet name
print(ws.name)

# Add a new worksheet
new_ws = xpycode.workbook.worksheets.add("NewSheet")
Working with Ranges
# Get a range from worksheet
ws = xpycode.workbook.worksheets.getActiveWorksheet()

# Single cell
cell = ws.getRange("A1")

# Range of cells
range_obj = ws.getRange("A1:C10")

# Get range address
print(range_obj.address)

# Read values (returns 2D array)
values = range_obj.values
# Example: [["Header1", "Header2"], [1, 2], [3, 4]]

# Write values (2D array for ranges)
range_obj.values = [["Hello", "World"]]

# Single cell write (can use scalar or 2D array)
cell.values = 42  # Scalar works for single cells
# or: cell.values = [[42]]  # 2D array also works

# Get range dimensions
row_count = range_obj.rowCount
col_count = range_obj.columnCount
Working with Tables
# Get tables collection
tables = ws.tables

# Get table by name
table = ws.tables.getItem("MyTable")

# Get table range
table_range = table.getRange()
data = table_range.values
Event Arguments Helper
For event handlers, use getEventArgsRange() to get the Range object:
import xpycode

def on_selection_changed(event_args):
    # Get the Range object from event arguments
    selected_range = xpycode.EventManager.getEventArgsRange(event_args)

    # Now use Office.js Range methods
    values = selected_range.values
    address = selected_range.address
    print(f"Selected {address}: {values}")
Utility Functions
Object Storage
# Save objects between executions
xpycode.Objects.saveObject("my_data", [1, 2, 3])
data = xpycode.Objects.getObject("my_data")
xpycode.Objects.clearObject("my_data")
xpycode.Objects.clearAllObjects()
Message Boxes
xpycode.Messages.showMessageBox("Hello!", "Title")
xpycode.Messages.showMessageBoxInfo("Information message")
xpycode.Messages.showMessageBoxWarning("Warning message")
xpycode.Messages.showMessageBoxError("Error message")
Transactions
Transactions allow you to batch multiple Excel write operations together for better performance. Instead of syncing with Excel after each operation, all operations within a transaction are deferred until the transaction ends.
transaction()
Context manager for batching Excel operations. Use this to improve performance when making multiple writes to Excel.
import xpycode

with xpycode.transaction() as t:
    ws = xpycode.workbook.worksheets.getActiveWorksheet()
    ws.getRange("A1").values = "Hello"
    ws.getRange("B1").values = "World"
    ws.getRange("C1:C100").values = [[i] for i in range(100)]
    # All operations are committed at the end of the block
Parameters:
raise_error(bool, default=True): If True, exceptions are re-raised after the transaction ends. If False, exceptions are suppressed.error_callback(callable, optional): Function called with exception info if an error occurs.
Important Notes:
No True Rollback
Transactions don't provide rollback functionality. If an error occurs, pending operations are still executed.
Reading Forces Commit
Accessing values (e.g., range.values, worksheet.name) within a transaction forces an immediate sync. This is because xpycode needs to fetch data from Excel.
No Nested Transactions
Only one transaction can be active at a time. Nested transactions will raise an error.
You can manually commit a transaction before the end of the block using t.commit(), but this will immediately open a new transaction, so use with caution.
blockingTransaction()
Similar to transaction(), but attempting to read values (e.g., range.values, range.address) will raise an error instead of forcing a commit. Use this when you're certain you only need to write data.
import xpycode

with xpycode.blockingTransaction() as t:
    ws = xpycode.workbook.worksheets.getActiveWorksheet()
    ws.getRange("A1").values = "Hello"
    ws.getRange("B1").values = "World"
    # This would raise an error:
    # value = ws.getRange("C1").values  # Error!
Parameters:
raise_error(bool, default=True): If True, exceptions are re-raised after the transaction ends. If False, exceptions are suppressed.error_callback(callable, optional): Function called with exception info if an error occurs.
Use blockingTransaction() when:
- You're only performing write operations
- You want to catch accidental reads during bulk writes
- You want maximum performance without any intermediate syncs
Type Hints
xpycode includes type stubs for IDE autocompletion. You can use type hints:
from xpycode import Excel

def process_range(ws: Excel.Worksheet) -> None:
    range_obj: Excel.Range = ws.getRange("A1:B10")
    values = range_obj.values
    # ...
Win32 COM Access
For advanced scenarios requiring features not available in Office.js, xpycode provides direct access to Excel's Win32 COM API on Windows.
Entry Point
Platform and Dependencies
- Windows only - Raises
EnvironmentErroron other platforms - Requires pywin32 - Raises
ImportErrorifpywin32package is not installed - Instance matching - Discovers the correct Excel instance by scanning the Running Object Table (ROT) for a workbook with the
xpycode_idcustom property
Properties
| Property | Type | Description |
|---|---|---|
application |
xpycode.ExcelComObjects.Application |
The Win32 COM Application object representing the running Excel instance |
workbook |
xpycode.ExcelComObjects.Workbook |
The Win32 COM Workbook object for the current workbook |
constants |
xpycode.ExcelComObjects.constants |
Classic Excel VBA constants (e.g., xlCenter, xlEdgeBottom, xlSolid) |
Type Hints
For IDE autocompletion, use the xpycode.ExcelComObjects namespace:
import xpycode

# Type hints for Win32 COM objects
app: xpycode.ExcelComObjects.Application = xpycode.win32.application
wb: xpycode.ExcelComObjects.Workbook = xpycode.win32.workbook
Example: Using All Three Properties
import xpycode

# Access Win32 COM interface
win32 = xpycode.win32
xl = win32.constants  # VBA constants

# Application-level operations
app = win32.application
app.ScreenUpdating = False  # Improve performance
print(f"Excel version: {app.Version}")

# Workbook-level operations
wb = win32.workbook
print(f"Workbook: {wb.FullName}")
print(f"Sheets: {wb.Worksheets.Count}")

# Use constants for formatting
ws = wb.ActiveSheet
cell = ws.Range("A1")
cell.Value = "Formatted Cell"
cell.HorizontalAlignment = xl.xlCenter
cell.Borders(xl.xlEdgeBottom).Weight = xl.xlMedium

app.ScreenUpdating = True
Office.js vs Win32 COM
Key difference: xpycode.workbook is an Office.js proxy object (cross-platform, auto-synced), while xpycode.win32.workbook is a native COM object (Windows only, direct access).
import xpycode

# Office.js approach (preferred for standard operations)
ws = xpycode.workbook.worksheets.getActiveWorksheet()
ws.getRange("A1").values = "Office.js"

# Win32 COM approach (for advanced features)
ws_com = xpycode.win32.workbook.ActiveSheet
ws_com.Range("A1").Value = "Win32 COM"
ws_com.Range("A1").Font.Bold = True
For more details and examples, see the Excel Objects Guide.
Code Examples
Read and Write
import xpycode

def read_and_write():
    # Get active sheet
    ws = xpycode.workbook.worksheets.getActiveWorksheet()

    # Read single cell (returns 2D array)
    value = ws.getRange("A1").values[0][0]

    # Write single cell (can use scalar or 2D array)
    ws.getRange("B1").values = "Hello, Excel!"  # Scalar for single cell
    # or: ws.getRange("B1").values = [["Hello, Excel!"]]  # 2D array also works

    # Read range (returns 2D array)
    data = ws.getRange("A1:C10").values

    # Write range (must be 2D array)
    ws.getRange("E1").values = [[1, 2], [3, 4], [5, 6]]
Work with DataFrames
import pandas as pd
import xpycode

def work_with_dataframe():
    # Read from Excel
    ws = xpycode.workbook.worksheets.getActiveWorksheet()
    data = ws.getRange("A1:D100").values

    # Create DataFrame (first row is headers)
    df = pd.DataFrame(data[1:], columns=data[0])

    # Process data
    df_filtered = df[df['Score'] > 80]

    # Write back to Excel
    ws.getRange(f"F1:I{len(output_data)}").getResizedRange(len(df_filtered.index),len(df_filtered.columns)-1).values = df_filtered
Event Handlers
import xpycode

def auto_update(event):
    """Update summary when data changes."""
    # Get the Range object from event arguments
    selected_range = xpycode.EventManager.getEventArgsRange(event)

    # Get worksheet
    ws = xpycode.workbook.worksheets.getItem(event.worksheet)

    # Get changed cell values
    cell_values = selected_range.values

    # Update summary
    ws.getRange("Z1").values = [[f"Last changed: {event.address} = {cell_values}"]]
Common Patterns
Iterate Over Range
# Read range (returns 2D array)
ws = xpycode.workbook.worksheets.getActiveWorksheet()
data = ws.getRange("A1:A10").values

# Iterate
for row in data:
    cell_value = row[0]
    print(cell_value)
Find Last Row
ws = xpycode.workbook.worksheets.getActiveWorksheet()

# Simple approach: check until empty
row = 1
while ws.getRange(f"A{row}").values[0][0] is not None:
    row += 1
last_row = row - 1

print(f"Last row with data: {last_row}")
Bulk Update
ws = xpycode.workbook.worksheets.getActiveWorksheet()

# Prepare data (2D array)
data = [[i, i*2, i*3] for i in range(1, 101)]

# Write in one operation (faster than cell-by-cell)
ws.getRange("A1").getResizedRange(len(data)-1,len(data[0])-1).values = data
Office.js Reference
For complete API documentation, refer to: - Excel JavaScript API Reference - Office.js Overview
The xpycode API mirrors the Office.js Excel API, so methods and properties documented there apply to xpycode.
Remember: Unlike Office.js JavaScript, you don't need to call context.sync() - xpycode handles synchronization automatically!
Related
- Excel Objects Guide - Detailed object usage
- Custom Functions - Using xpycode in UDFs
- Events - Event handling patterns
Troubleshooting
Solutions to common issues and problems in XPyCode.
Connection Issues
Server Won't Start
Problem: python -m xpycode_master fails or exits immediately
Solutions:
- Check Python version:
python --version(must be 3.9+) - Verify installation:
pip show xpycode_master - Check for port conflicts: Try different port with
--port 8001 - Look for error messages in terminal
- Reinstall:
pip install --upgrade --force-reinstall xpycode_master
IDE Won't Connect
Problem: IDE not opening
Solutions:
- Verify server is running
- Check firewall isn't blocking Python
- kill and Restart the IDE via the Add-In
- Check WebSocket connection in console logs
Add-in Not Loading in Excel
Problem: XPyCode add-in doesn't appear in Excel
Solutions:
- Ensure the XPyCode server is running before opening Excel
- Check Home → Add-ins → More Add-ins → Shared Folder
- Click Refresh to reload the add-in list
- Verify manifest file location (check server logs):
- Windows:
%USERPROFILE%\.xpycode\manifest - macOS/Linux:
~/.xpycode/manifest - On non-Windows platforms, manually install the certificate from
~/.xpycode/certs - Add manifest path to Trust Center → Trusted Add-in Catalogs or use platform-specific sideloading methods recommended by Microsoft
- Restart Excel completely (close all workbooks)
- Re-register the add-in by restarting the XPyCode server
Code Execution Issues
Code Won't Run
Problem: Pressing F5 does nothing or shows errors
Solutions:
- Check for syntax errors (red underlines in editor)
- Kill and restart the Kernel (via IDE or Add-In)
- Check console for error messages
- Save the module first (Ctrl+S)
- Try closing and reopening the module tab
Import Errors
Problem: ModuleNotFoundError: No module named 'xxx'
Solutions:
- Install package via Package Manager
- Verify installation completed successfully
- Check package name spelling
- Restart kernel if needed
Code Runs But No Output
Problem: Code executes but console shows nothing
Solutions:
- Add
print()statements to verify execution - Check Console output level (should be "All")
- Verify code path is being reached
- Check if "Console Only IDE" filter is hiding output
Debugging Issues
Breakpoints Not Hitting
Problem: Debugger doesn't stop at breakpoints
Solutions:
- Verify using Debug (Shift+F5), not Run (F5)
- Ensure breakpoint is on executable line (not comments/blanks)
- Check if code path reaches the breakpoint
- Remove and re-add the breakpoint
- Restart debugging session
Variables Not Showing
Problem: Variables panel is empty during debugging
Solutions:
- Ensure execution is paused at a breakpoint
- Check if variables exist in current scope
- Step Into a function to see its local variables
Step Commands Not Working
Problem: F10/F11 don't advance execution
Solutions:
- Verify in active debug session
- Check if execution is paused (not running)
- Look for keyboard shortcut conflicts with other software
Function Publishing Issues
Function Not Appearing in Excel
Problem: Published function shows #NAME? error
Solutions:
- Verify function was published (check Function Publisher status)
- Click on "Sync to Excel"
- Close and reopen workbook
- Force Excel recalculation: Ctrl+Alt+F9
- Check console for publishing errors
Function Returns Wrong Results
Problem: Excel formula returns incorrect values
Solutions:
- Test function directly in IDE first
- Check dimension setting (Scalar/Array/Broadcast/Full)
- Verify type conversions (Python ↔ Excel)
- Add debug print statements
- Check for None/null values
Function is Slow
Problem: Excel formulas take long to calculate
Solutions:
- Optimize Python code (use numpy for arrays)
- Check if dimension is correct for use case
- Avoid expensive operations in scalar functions
- Cache results if appropriate
- Profile code to find bottlenecks
- Kill and Restart the Kernel
Package Management Issues
Package Installation Fails
Problem: Package Manager shows installation errors
Solutions:
- Check internet connection
- Try different PyPI mirror (see settings)
- Check package name and version exist
- Look for compilation errors (C extensions)
- Install dependencies manually if needed
Dependency Conflicts
Problem: Installing package breaks others
Solutions:
- Check version compatibility
- Use Package Manager to install compatible versions
- Consider using different workbooks for conflicting dependencies
Console Issues
Console Not Showing Output
Problem: print() statements don't appear
Solutions:
- Check output level setting (should be "COMPLETE" for nothing filtered)
- Verify code is executing (no errors)
- Disable "Console Only IDE" filter
- Check if console is cleared automatically
Console Text Corrupted
Problem: Garbled or missing characters
Solutions:
- Clear console and run again
- Check encoding settings
- Restart IDE if persistent (via the Add-In or use File → Exit)
Settings Issues
Settings Not Saving
Problem: Changes revert after closing
Solutions:
- Ensure clicking OK/Apply in settings dialog
- Check file permissions for config directory
- Verify settings file isn't read-only
Theme Not Applying
Problem: Theme change doesn't take effect
Solutions:
- Restart IDE after theme change
- Check theme files exist in resources
- Try default theme first
Performance Issues
IDE Slow or Laggy
Problem: UI is unresponsive
Solutions:
- Close unused workbooks
- Disable minimap in editor
- Reduce max console lines
- Close unused IDE panels
- Kill and Restart the IDE (via Add-IN or File → Exit)
- Check system resources (CPU, memory)
Large File Editing Slow
Problem: Editor lags with big files
Solutions:
- Split into smaller modules
- Disable unnecessary editor features
- Use code folding to collapse sections
Excel Integration Issues
Excel Formulas Not Recalculating
Problem: Function results don't update
Solutions:
- Force recalc: Ctrl+Alt+F9
- Check if calculation mode is Manual
- Re-publish function (Sync to Excel)
- Verify function code was saved
Excel Events Not Firing
Problem: Event handlers don't execute
Solutions:
- Verify handler is registered in Event Manager
- Check event name and target worksheet
- Look for errors in event handler code
- Add error handling to event function
- Check console for event-related errors
Clearing the Office Add-in Cache
If the add-in behaves unexpectedly after updates or mode switches, clearing the cache often helps:
Windows
- Close all Excel workbooks
- Navigate to:
%LOCALAPPDATA%\Microsoft\Office\16.0\Wef\ - Delete all contents of this folder
- Restart Excel
macOS
- Close all Excel workbooks
- Navigate to:
~/Library/Containers/com.microsoft.Excel/Data/Documents/wef/ - Delete all contents of this folder
- Restart Excel
After Clearing Cache
After clearing the cache:
- Start xpycode_master:
python -m xpycode_master - Open Excel
- Go to Add-ins → More Add-ins → Shared Folder
- Click Refresh if XPyCode doesn't appear
- Add XPyCode to your workbook
Network Issues
Behind Corporate Proxy
Problem: Can't access PyPI or external services
Solutions:
- Configure proxy in Settings Package Management
- Use internal PyPI mirror if available via Settings
- Download packages manually and use Python Paths
- Contact IT for proxy whitelist
SSL/Certificate Errors
Problem: SSL verification failures with messages like:
- SSL: CERTIFICATE_VERIFY_FAILED
- SSLError: [SSL] certificate verify failed
- unable to get local issuer certificate
Solutions:
- Manually install the self-signed certificate:
- Windows: Run the XPyCode server which automatically registers the certificate
- macOS/Linux: Import the certificate from
~/.xpycode/certsinto your system's certificate store - Verify the certificate is trusted by your system
- Restart Excel after installing the certificate
- If issues persist, check that the certificate hasn't expired
Getting More Help
Reporting Bugs
- Check if issue is already reported on GitHub Issues
- Include:
- XPyCode version
- Python version
- Excel version
- Operating system
- Steps to reproduce
- Error messages/logs
- Create minimal reproducible example
Community Support
- GitHub Issues
- Check documentation thoroughly first
- Search existing issues before creating new ones
Related
- Installation Guide - Setup help
- IDE Overview - Learn IDE features
- API Reference - Complete API documentation
Slack Community
Join the XPyCode community on Slack to connect with other users, ask questions, share tips, and get help.
Join Our Workspace
-
Slack Workspace
Already a member? Access the XPyCode Slack workspace directly.
-
Join the Community
New to XPyCode Slack? Get an invitation to join our community.
What to Expect
Our Slack community is a great place to:
- Ask questions - Get help from the community and the XPyCode team
- Share your projects - Show off what you've built with XPyCode
- Report issues - Discuss bugs and feature requests
- Stay updated - Learn about new releases and features
- Connect - Meet other Excel + Python enthusiasts
Quick Links
| Resource | Link |
|---|---|
| Slack Workspace | https://xpycode.com/slack |
| Invitation Link | https://xpycode.com/slack_invite |
We look forward to seeing you in the community! 
About
License
XPyCode is licensed under the MIT License with Commons Clause.
MIT License
Copyright © 2024 BGE Advisory
Permission is hereby granted, free of charge, to any person obtaining a copy of this software and associated documentation files (the "Software"), to deal in the Software without restriction, including without limitation the rights to use, copy, modify, merge, publish, distribute, sublicense, and/or sell copies of the Software, and to permit persons to whom the Software is furnished to do so, subject to the following conditions:
The above copyright notice and this permission notice shall be included in all copies or substantial portions of the Software.
THE SOFTWARE IS PROVIDED "AS IS", WITHOUT WARRANTY OF ANY KIND, EXPRESS OR IMPLIED, INCLUDING BUT NOT LIMITED TO THE WARRANTIES OF MERCHANTABILITY, FITNESS FOR A PARTICULAR PURPOSE AND NONINFRINGEMENT. IN NO EVENT SHALL THE AUTHORS OR COPYRIGHT HOLDERS BE LIABLE FOR ANY CLAIM, DAMAGES OR OTHER LIABILITY, WHETHER IN AN ACTION OF CONTRACT, TORT OR OTHERWISE, ARISING FROM, OUT OF OR IN CONNECTION WITH THE SOFTWARE OR THE USE OR OTHER DEALINGS IN THE SOFTWARE.
Commons Clause
"Commons Clause" License Condition v1.0
The Software is provided to you by the Licensor under the License, as defined below, subject to the following condition.
Without limiting other conditions in the License, the grant of rights under the License will not include, and the License does not grant to you, the right to Sell the Software.
For purposes of the foregoing, "Sell" means practicing any or all of the rights granted to you under the License to provide to third parties, for a fee or other consideration (including without limitation fees for hosting or consulting/ support services related to the Software), a product or service whose value derives, entirely or substantially, from the functionality of the Software. Any license notice or attribution required by the License must also include this Commons Clause License Condition notice.
What This Means
You CAN:
✅ Use XPyCode for personal projects ✅ Use XPyCode in your organization ✅ Modify the source code ✅ Distribute the software ✅ Use it commercially within your organization ✅ Create derivative works
You CANNOT:
❌ Sell XPyCode as a product ❌ Offer XPyCode as a paid hosted service ❌ Bundle XPyCode into a commercial product where it's a substantial component ❌ Charge for consulting/support services that primarily derive value from XPyCode
Full License Text
The complete license text is available in the LICENSE file in the repository.
Supporting XPyCode
Help us continue the XPyCode development → Donate
Why make a donation?
The funding will be used to continue the development of XPyCode and bring it to a stable, secure, and production-ready release.
During the alpha and beta phases, the tool will remain freely available and license-free, which requires dedicated resources without immediate revenue.
Contributions will support:
- Core development and stabilization
- Security reviews and hardening
- Bug fixing, testing, and performance improvements
- Documentation and user support
- Promotion and community outreach to help establish XPyCode as a trusted standard for Python–Excel integration
This funding phase is essential to ensure long-term quality, reliability, and adoption before introducing any paid licensing model.
How to Make a Donation
Visit our donation page: 💵 Clik Here to donate
Support the Project
If you find value in XPyCode today, one simple way to support the project is to contribute as if the license already existed — for example, by donating around €3 per month.